About 15 years ago, when I lost a beloved 12-string guitar because its bridge was lifting and I knew of no one who could repair it, and also didn’t know that it COULD be repaired, I took it upon my self to learn how to repair acoustic guitars. The ‘workshop’ that you see today, as well as this blog, is a natural consequence of that incident.
My effort is always to help out in whatever way I can. Strangers have reached out to me from Assam, Karnataka and from foreign shores as well. I know that I will never work on their guitars for I am too inaccessible to them. Yet, the effort is always to guide them through whatever it is they are troubled by.
When a guitar does come to me for repair, believe me, it is not just the instrument that I try and lend healing to. Some part of the distressed owner too is healed in the process. And so, as I look over the instrument on the counter, I make small talk with the owner. For him/her it would seem like small talk, but in fact, I am gauging him/her: attachment levels, socio-economic standing, thought process – is he/she only trying to squeeze out the cost of the instrument, or, does he/she actually want the instrument repaired, etc.
I am particularly partial towards those instruments that hold a sentimental value for their owners. While rectifying faults in those instruments, my heart and mind goes back to the 12-string that I had to literally throw in a dumpster in Doha, Qatar. When I am able to satisfy such customers, the personal satisfaction that it brings, no amount of monetary gain can equal. When I fail, it is that much more depressing.
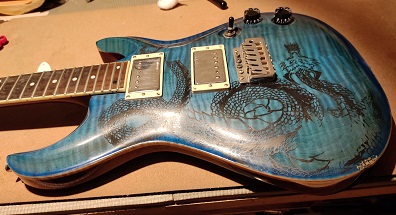
Take for example this guitar,

which came to me. As I looked at it and ‘chatted’ with the owner, I learned he was an out-of-job engineer (I think that is what he said he was). Because of health issues, he had to give up his job and was under treatment (for what, he never said, and I never asked).
This was his first guitar and it was evident that he was attached to it. The problem as I saw it, was this

Can you see the saddle leaning forward? I remember asking him if he faced intonation issues, and his reply that the intonation was spot on, posed a bigger problem. It only meant that the bridge itself was glued in the wrong place. If the saddle is leaning and does not affect intonation, that is the only inference that could have been drawn.
However, that was not what the guitar was in for. The owner had experienced string buzz 4 or 5 years ago and had taken the guitar to a shop in Aminabad. Over there, this is how he got back his guitar

The fretwires were flatter than a ruler’s edge! The owner told me that he had been so disheartened by the episode that he had just kept away his favourite guitar. Now, after all these years, he decided to try and get it repaired and that is when he brought it to me.
He was interested in getting all the fretwires replaced. I told him that it would be costly affair and asked him to have patience and let me work on the fretwires. I told him that I can always make the instrument playable for now, and he can get them replaced at a later date. In hindsight, I feel that if I had acceded to his request, I would have been a happier person: less work, less hassle, more money!!!!!!!
Anyway, he agreed to my proposition.
I also told the owner that considering the age of the strings, they would need to be replaced, and that he should get me a set. I also pointed out the saddle situation and suggested that he should get that – at least – changed. Of course, the best would be to get both the nut and saddle changed and get bone elements put in.
However, he politely declined to all proposals saying that the cost was too much for him, and I understood his position. For those of you who have worked with old strings, winding and unwinding them, you know how easy it is for them to break.
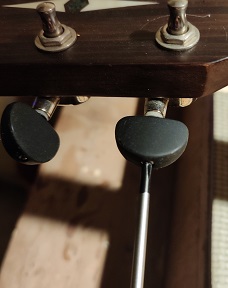
With as much care as I could possibly take, I unwound the strings and pulled them away so that I could access the fretwires, though I didn’t dare slipping them either out of their holes or out of the peghead.

The fretwires needed a proper crowning and polishing. Now, I have more than a few crowning files with which I work on instruments.

However, there is one by reputed US luthier supplies’ firm, StewMac, which I own (frighteningly expensive) which I reserve for very, very special jobs. It is double sided with different coarseness on each side.


I pulled out this file and went to work on the instrument. Slowly, a crown began to take shape and I was very happy thinking about the owner.


After the crowning, the frets had to be polished so that the marks that any file invariably leaves, can be removed. And so: ‘mummyfication’!

Of course, the fretboard and bridge was oiled too, for it was very dry. Looking at the finished job, even I was satisfied.


Certainly not what healthy, new fretwires would be like, but these would do and the owner would be able to play the guitar quite easily.
When I handed over the instrument to the owner, he was thrilled with the results. He told me what a wonderful job I had done on something that he had thought could never be mended.
I just told him that I was happy that he was happy!
However, a couple of days later he called me up to say that it wasn’t very easy moving up and down the neck and if I could do something about it. I said, sure, and asked him to bring over the instrument.
When the owner came, he showed me what was happening. He held the ‘usual D’ chord and tried moving that shape up the neck. According to him, this was where his fingers were getting caught at the fretwires.
Again, my problem was the owner not wishing to change strings and me having to loosen them and tighten them all over again. What I decided to do was to work on fretwires in the areas where the treble strings would strike. This would mean loosening just the ‘G’, ‘B’ and ‘e’ strings.
I did that, worked on the frets, but did not polish them. When the owner came, I told him that it was possible that he might feel that a certain ‘grittyness’ while playing but assured him that when he was ready to change strings, he should bring them to me. I would take off the old strings, polish the frets all over and put on the new strings.
However, the owner was not at all pleased with the work done on his instrument and left saying that I had spoiled his instrument!
I was shocked and for long after he had left, I did not know how to react. When I called him and tried to explain to him again saying that I could not complete the work on the instrument because he wanted the old strings retained, and that I would finish the polishing before new strings were put on it, he was not willing to understand. There was a lot that he had to say, much of what I would rather not repeat here.
In hindsight, maybe, if I had taken photographs of the effort the second time and shared them with the owner, things would have been different.
I have since moved on from the incident, blaming it on the Law of Averages. After so many satisfied customers, there have to be a few dissatisfied ones too – for whatever reason!