
I had never been a great fan of Cort guitars, but unfortunately for me, I had never had the opportunity to study a high-end model. I got that opportunity recently when I worked on a natural finish MR710F, and I was actually impressed. Solid spruce top, solid African mahogany (Okoume) back and sides, solid bone saddle and nut, and a Fishman Presys Preamp – all-in-all a great sounding guitar.


It was in for a general tune-up and set-up but unbeknown to the owner, there was a crack developing in the bridge

because there was this!

The owner, a singer, song-writer and a performing artist, was understandably visibly shocked at the discovery, but here’s the reason for it – at least a major reason for it.
Do you see that black strip stuffed in the saddle slot to keep the saddle from tilting? Well, the owner told me that this was exactly how he had bought his guitar and he had no part in introducing this alien piece.
When I took the strings off and pulled out the saddle and the shim, the shim seemed to be a thick piece of Rexine or something like it.

which had left an unseemly mark on the saddle.

Also, the owner was a little concerned about what was happening to his fretboard.

I too had noticed the marks and they were a bit disconcerting. Disconcerting because it meant that the fretboard had been dyed, and the natural colour of the wood used for the fretboard was showing through where the fingernails of the player had dug into it. Why would anybody use a cheap piece of wood for a fretboard when solid spruce and solid okoume had been used for the top and the back and sides, respectively?
I told the owner what was happening and assured him that I would try and do whatever I could, but after he was gone, I did check up on Cort guitars the specifications of this particular model. Here is what I read:
https://www.cortguitars.com/product/item.php?ca_id=102030&it_id=152&lanOk=eng#tab_Specifications
The specifications for this model on the site of the manufacturer stated that the wood used for the fretboard and the bridge was Ovangkol.
Now, I do not claim to be a wood expert but what little I know about tonewoods, Ovangkol, it is much like rosewood in looks and properties. I scratched the surface a little more, and


this is what I got to see. This did not appear to be Ovangkol (right pix, courtesy wood-database.com) Does it to you? And when you are using beautiful, figured wood like Ovangkol, rosewood, flamed maple, bear-claw spruce, or cocobolo, why would you wish to hide it under some cheap dye? I would only try to hide it under a dye, if I knew I was using wood I should not be using.
But like I said, I am no expert on wood, but then again, this is certainly not what you would expect to see in a guitar retailing for around Rs 28K!
As I was pouring over the guitar, there seemed to be something inside it. I took a look inside and saw these. Shook them out and out fell at least six or seven such sachets!


Shocked, I asked the owner about them and he innocently replied that he had been given to understand that these were good for the guitar. Speechless for some time, when I regained my voice, I explained to him that Silica gel is a desiccant; its job is to absorb any moisture in its surrounding. YOU DON’T LET THIS COME ANYWHERE NEAR YOUR GUITAR!!!!!!
Remember, earlier I said the shim in the saddle slot was a major contributing factor for the bridge splitting? These sachets were surely the other contributors. Dry, open-pore wood on acoustic guitars will always crack more easily.
With those out of the way, I turned my attention to the saddle. It would have to be replaced for it to sit upright in its slot. I measured the radius on the fretboard and the bridge, and for the second time in as many weeks, discovered that I did not have saddles of that radius!


After the labour last week, I was not quite ready to put in the same effort and time into the job. Besides, what saddle the guitar already had was bone . So, I decided to use the original saddle but only after shimming it up with real bone.
I found these pieces of bone in my bone box.


I used super-thin CA glue and glued these pieces behind the saddle. And then began a tedious process of little sanding, measuring and trial-fitting the saddle where it would sit snugly in its slot. I hope you realise that if I overshot that precise thickness where the saddle would seat snugly in its slot, I would actually have to re-make a new saddle. Slowly, ever so slowly, I crept up to the exact size.
Once I got there, I kept the saddle aside and turned my attention to the bridge. With my concoction of dyed saw dust and wood glue, I filled up the slot and sanded it flush to the level of the bridge.
Even the bridge, as I was sanding the filled up crack level, began to lose its dark colour. And here, I must apologise, for I forgot to click a photograph of it.
With sanding marks and a discoloured bridge staring me in the face, I sanded smooth the area where I had worked on, with seven grits of sandpaper: #600, #800, #1000, #1200, #1500, #1800 and #2000.

Then, with vegetable dyes, I began dyeing the bridge area that I had worked on. Here’s the area of the crack: joined, sanded, dyed and oiled.


You will notice that I took precautions by taping off the top that neither the dye nor the conditioning oil touched any part of the top.
Next was the fretboard. A little crowning to remove the divots where the ‘B’ string hit the frets, also brought out a new shine in them.

Taping off the celluloid binding on the fretboard, I went about dyeing it. But it was not easy, demanding a lot of attention and repeated layers to hide areas where the colour had disappeared. But once I was through, I was happy how everything turned out.


Also, I talked to the owner and asked if he would like to have bone bridgepins to replace the stock, plastic ones. The advantage of having bone bridgepins would be a marked difference in sound transfer.
He gave the go-ahead and I set about making space for them. The bridgepin holes were reamed to a proper circumference so that the pins sat in snugly without having to be forced in. We don’t want another split in the bridge, now do we? And don’t you think the little abalone on top with a gold ring looks real pretty set off against the dark bridge?


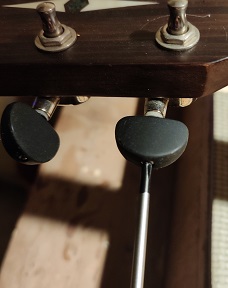
But before I strung it up, I snugged up the hardware on the headstock, gave it some love potion, burnished it proper, and things could not have turned out better.


The owner was used to playing .011″ strings but I suggested that going by the construction of the guitar, and even though he was more a finger-style artist, that he should give .012″ strings a try. He agreed and chose to have these strings put on his guitar.

I leave you with a final look at this guitar. It was indeed very satisfying working on this one.


I have question about the silica gel used in this particular instrument. I believe it was used to lower the moisture level in the solid wood guitar. But in general isn’t it needed to regulate the moisture level in solid wood guitar in Lucknow where the humidity is generally above 50. I have heard that solid wood guiatrs need humidity between 40-50. What’s the best way to regulate humidity all year round?
Yes!
All that you say is correct. Solid wood instruments need a lot of attention and care, but then not everyone can afford them.
But unless you are in Kerala, Tamil Nadu, or North-East India Silica gel is poison (even) for your guitar.
About Lucknow humidity, wait a couple of weeks more and you will see the humidity drop below 35%.
Hi, Aditya!
Did you check the humidity today – March 22?
It’s 26%!!!!!!!!!!
Time to give a drink of water to your guitar…too!!!
Hi Amit,
I am Aditya, a resident of lucknow but have been outside lucknow for about 10 years due to work. I have started reading your blogs recently and really like them. Like your passion for guitars. I am a lefty and tried learning right handed for a while but it did not work. Recently I started left handed and it feels better. Have you ever worked on left handed guitars? Would love to read about your work on left handed guitar as well. Keep up the great work mate. Cheers!!
Hey, Aditya!
Never go against the grain – whether in wood or your personal make-up. Good to know that you have returned to playing left-handed.
And no, I’ve never worked on a leftie guitar. Frankly speaking, there’s nothing different between a leftie and a rightie guitar IF you take the nut and saddle out of the equation.
Do swing by when you’re visiting Lucknow!
Fascinating Work Sir, Immensely impressed!