Regular readers of this blog are familiar with how peeved I get with cheap (Rs 3K – 3.5K) toys that masquerade as guitars.
New readers may understand it this way: granted that you wish to learn how to play the guitar and you aren’t sure whether you will be able to sustain the drive to learn it, is it alright to buy a toy to experiment, or does it make sense to buy something in the Rs 10 – 12K range? PARENTS, PAY ATTENTION!!!!
Not all cheap instruments are bad, but generally speaking, a cheap guitar is always going to give problems because it’s constructed by cutting corners (literally) to cut down production costs. A (relatively) expensive guitar (pricey ones start above 25 -28K and there is no upper limit!) will cause fewer problems and serve you a lifetime and then some. What was that Hindi saying about a cheap buy making you cry every step of the way, and an expensive buy making you cry just once??!!
So, if you buy a (relatively) expensive guitar but are unable to sustain interest in it, has the investment gone down the drain? Not so. You can always pass it on to a younger sibling/nephew/ niece, or sell it online on exchange, buy/sell websites, or sell it to a music school. You should be able to recover most of your investment, if not all of it.


In contrast to all that I have said above (and now that my rant is over and I am breathing much easier), let me introduce you to Jolly JIMM, an exception to the cheap=bad rule. It was bought for Rs 3.5 K some half-a-decade ago and came in for action correction and attention to a crack along the bass-side seam of the lower bout, caused by the guitar being accidentally dropped.

As I inspected it, I noticed that while it was a long crack, only at some places did it move under pressure. I wicked in some thin CA glue to stabilise it, and then put on some spool clamps that I had made many years ago.

I also noticed that the instrument wasn’t the usual ply-board that it was constructed out of but what looked like basswood to me. Nice! Usually guitars in this range are built out of ply-board.
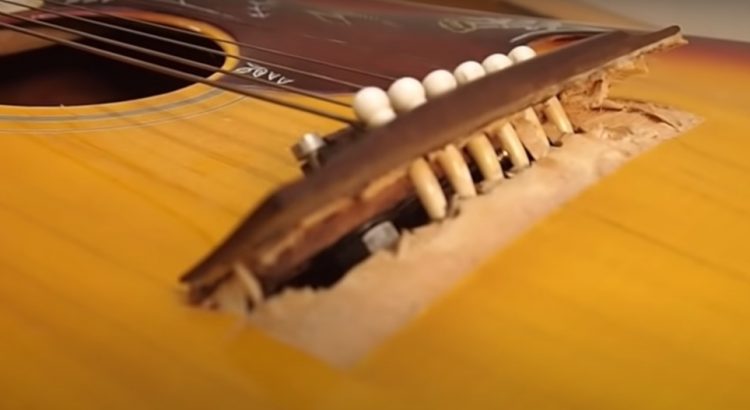
Also, the bridge was lifting. The front line on the chit of paper shows how much it went under on the treble side of the guitar, while the bottom line shows how much that end went under the bass side of the guitar. But since I felt it would be some time before the lifting bridge would cause any problems, I decided to leave it be.

Of course, it had the ‘mandatory’ plastic nut and saddle. Those would go and be replaced by bone elements. The guitar seemed built well enough to be able to sport them.

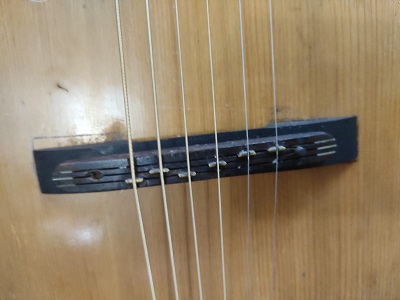
Also, the bridgeplate inspection revealed that it was woefully inadequate in its dimensions. Consequently, while some bridgepin holes were half on it and half on the top, others were completely on the top. But all through, the ball ends had eaten into wherever they came in contact with. These indentations were deep enough for the ball ends to get stuck in, and while one was trying to take off the strings, they refused to budge!


Can you make out? Anyway, that needed to be attended to.
But what caught my attention immediately was the strap tied to the neck of the guitar.

And here I will go off on another bender. The tying of the strap to the neck like this, IS NEVER TO BE DONE!
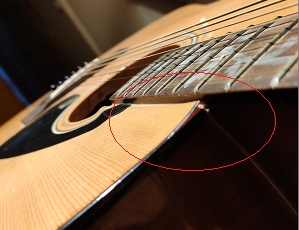
Why? Understand this! Often, guitar necks are made of three pieces of wood glued together, rather than from a single piece of wood. The idea is that the joints make the neck stronger than a single-piece neck.


Try and see if you can catch the joint line in between the two red lines. So, there is a joint right where the headstock meets the neck, and a second joint where the neck meets the heel. By tying the strap along the headstock, you will be forcing the entire weight of the guitar on that joint, and it is not uncommon in such instruments for the neck to break just at this joint.
So, included in the work on the instrument, was the addition of a strap button too. The plastic one went and a steel one replaced it at the base of the guitar, while a strap button was screwed on the side of the heel of the guitar.


Now for the serious bit: attending to the bridgeplate. Initially, I had thought of adding a thin, long piece of wood and stick it against the bridgeplate along the side, and to the top along the width of the piece.
But I had to drop the idea because I would never be able to make a piece of exact thickness and would have to plane it down to the thickness of the bridgeplate once the piece was stuck inside. The problem: I didn’t have a plane that small which would be able to go inside through the soundhole (my hand and arm included).
So, I thought up this: saw dust and wood glue mixed together and applied to the deep indentations.

And what would I apply it with? Ice-cream sticks! But I failed with various lengths of sticks because I could not straighten my arm enough inside the guitar.

And so, the trusty fingers it was with which I applied the mixture.

Once I was satisfied that I had applied enough, I let the instrument sit easy and breathe for a good five or six hours before even looking in its direction.
Then, the rest of the work was relatively simple. Clean the fretboard and bridge and oil it, and polish the frets. Amazing what a little bit of attention and love does.


A new bone nut and saddle were installed and the nut was lubricated with graphite to facilitate easy string movement.

And when you have invested so much time and effort into it, a little more wouldn’t harm. So, the front of the headstock was cleaned very properly.


Meanwhile, the open tuning machines were oiled and the oil was worked into them properly

and a brand new set of strings was put on.

That is how Jolly JIMM looks now and it “sure sounds good”. And that is not me saying it, but the owner!