An experienced guitar tech with over 16 years of experience working on acoustic Gibsons and Martins in the Gulf region.
There is nothing that cannot be repaired; the only consideration is the price at which it comes. And yet, if there is sentiment attached, no price is too high!
WhatsApp/Call me: 7080475556
email me: guitarguyhelp@gmail.com
This lovely cutaway came in the other day for action correction and overall service. A good guitar for the price and considering that it was from Japanese giant Ibanez, the workmanship was not to be doubted.
Once I was through with working on it and sat down to write this post, I learned that Ibanez made the MD39C especially for the Indian market. At 39 inches long, it fell in the comfortable range between a full-size guitar (41”) and a three-fourth (kids’) guitar (38”).
At its price, it boasted of a solid spruce top though the quality of the spruce wasn’t very good. The back and sides were Nato – [a collective name for wood from Mora trees (the best-known species are Mora excelsa (Mora) and Mora gonggrijpii (Morabukea)], and the instrument sported smart, semi-closed, chrome tuning machines.
The 20-fret guitar also had a rosewood fretboard and bridge. Naturally, it had a plastic saddle and nut, which, on this guitar, had already begun to get cut under string tension.
All that remained to be done was loosen the strings, pull out the saddle and shave it down to the right height. A few hits and misses and finally it was done.
I cleaned and polished the body, including the neck, the headstock and the tuning machines, lightly sanded and oiled the fretboard, and restrung the instrument.
The owner was pleased with the final result (Sorry! photographs to show)!
Those of you who have been following my ramblings with dedication, know about my pet peeve: plastic parts masquerading as nuts and saddles.
To give the devil his due, it’s not that plastic nuts and saddles don’t do the job, but then there is a huge difference between doing the job and doing it well – wouldn’t you say?
Plastic is cheap, easily available and so, nuts and saddles can be manufactured a dime a dozen, and in a jiffy. Why shouldn’t the guitar manufacturer – Gibson, Givson or Gibtone – use it and increase his profit margin? Bone, on the other hand, is certainly more expensive.
With plastic, the drawback is just one: the sound – the most important function of your instrument – gets hit. How do you know that? All you need to do is play some random stuff on your guitar and record it. Now swap your plastic nut and saddle for bone elements (yes, you’ll have to take the strings off for the switch), play the guitar while recording it.
When you play back the two recordings, I am sure your ears (trained or untrained), will be able to pick up the big difference in the sound of your guitar. The bone nut and saddle will make each note ring out clear as a bell, while the sustain of the note will also be appreciably longer.
Why? How? Bone is a natural, denser material (in comparison to plastic) and thus, the transfer of sound, first from the strings to the nut/saddle, and then from the nut/saddle to the wood, is maximised (again, in comparison to plastic).
So, even if you were to buy a low-priced guitar – say, Rs4,000 – Rs 5,000 – and put in bone elements into it, you should be able to see a marked change in the sound of the instrument.
When people ask me how they can upgrade their already existing guitar, the first thing I tell them is to swap the plastic elements in it for bone nuts and saddles.
(Buffalo) horn is a variation of bone and is also used to make nuts and saddles. Certainly rarer than bone, users of horn swear by the material, though, personally speaking, I am not qualified to speak on the issue, for I have never used it.
How to differentiate between plastic and bone?
Simple examination of plastic nuts and saddles should reveal a lot, for eg, if you look at the underside of the elements you will see holes on the surface like these.
Bone elements will never have these holes.
A second, surer test is what I refer to as the ‘drop test’. Take a plastic saddle (or nut) and take a bone one. Drop each from the same height onto a cemented (hard) surface. While the plastic will have a dull ring to it, bone will have almost a ‘clinky’ ring to it because of its higher density.
Does bone last longer than plastic? All things considered (how much and how often you play, HOW you play, what strings you use, how often you change strings?), YES!
The flip side of using bone: it is more expensive than plastic. For the price of just a bone nut or just a saddle, you may get a plastic nut and saddle both!
Coming back to the quality of guitars under the Rs 6,000 – to put it simply and straight – there is no quality.
Yes! If you wish to gift a 3 – 4-year-old a toy, you got one!
The raw material used leaves a lot to be desired, the construction is pitiable and the hardware used is terrible too. At under 6K, if you want your guitar to play and sound like a 15k-guitar that’s expecting a mighty lot.
Recently, this guitar was brought to me for action correction, and the owner said it was a relatively new guitar. If a relatively new guitar needs action correction, it proves that either it was not set-up when it was bought, or, thanks to its woeful construction, it was in dire need of attention, OR, BOTH!!!!
Why a brand new guitar needs a set-up
Just like new vehicles are tuned up before they come onto the road, so also, guitars – electric, acoustic, basses – need a set-up for them to play best.
In the factories of the most well-known brands (Martin, Gibson, Taylor, etc), these instruments are built to generalised specifications and not just one or two a day. There are tens of guitars produced in a single day, where the aim is to get the instrument in the ‘general ok’ condition.
A set-up, while it ‘tunes-up’ the instrument to the minutest tolerances, also does so keeping in mind specific players. For example: if you bring your guitar to me, I set it up to ‘your playing style’, so that when you play it, it plays easy and sounds good to your ears.
So, if a Martin or a Gibson require a set-up, do you think a guitar under 6k will not require a set-up? It will require a set-up big time and more!
So, this 12-fret guitar (the position where the neck is joined to the body) had a plastic saddle, a plastic nut (you shouldn’t have expected anything else) and tuning machines with a gear ratio of 1:12. [To explain the last set of numbers, you would have to turn the tuning knob 12 times for the post around which the string is wound, to complete one whole rotation. Good tuning machines are those with a gear ratio of 1:18 and above. What a higher gear ratio ensures is tuning stability and more accurate tuning.]
I apologise, I was so appalled by the instrument that I forgot to click photographs of where the action stood and the amount of saddle exposed in the bridge. Take my word, the amount of saddle exposed was lesser than what I usually like to see in a guitar. What was more, the strings were rubbing against the bridge on their way up to the saddle and the action was a mile high.
After considering all options, all that was left to do was to shave the bridge down and also the saddle to bring the action down, and to ensure that the strings had an unrestricted run-up to the saddle. But it had to be done in such a way that it did not show and the geometry of the bridge did not get spoilt.
With some protection to the top and some 80-grit sandpaper stuck to a sanding beam, it was slow progress but progress nonetheless.
Then came the turn of the saddle. It wasn’t healthy when I began, when I was done with it, it was a little thicker than a toothpick.
A couple of trials later, it sported an action that I could be proud of and one which the owner would be happy to see. However, my advice to him was to sell off the toy as early as possible and buy himself a ‘guitar’!
This is one of those problems that can get you pulling your hair!
There is whole list of things that could cause it and you can’t just point to one and say ‘this is where the problem lies’. So, the way to go (at least I did), is to start at the beginning and go through the steps, loosening and tightening strings after each step, as you go along.
Unfortunately, there is no conviction in what you do, only hope that the step you are at will be the one that will banish that awful buzz. Side note: If you think that this is the step you can jump to and solve the problem once the next instrument with such a problem comes along, you are mighty wrong, my friend.
So, after that rather rambling preamble, I think you got my drift: one such instrument came to me. The 13th fret was buzzing on the thin ‘e’ string.
Unconsciously, I ‘pooh-pooed’ it and tightened the truss rod, half a turn. Problem solved? Nope! Then, I gave it another half turn. Solved? Nope!
As the neck began developing a back-bow, I released the truss rod a bit and decided to shim the saddle under the area where the first string sat, thinking that raising it would raise the entire string a wee bit. Solved? Nope!
Then I decided to spot dress the 14th fret. Sanded, crowned and polished it. Solved? Nope! In fact, now the ‘e’ string had developed a buzz on the 14th and 15th fret too!!!!!
Then I decided that the whole fretboard – at least on the treble side – needed a fret-dress. So that was done. Solved? Nope!
Then I thought maybe it was a single fret that was popped up. I tapped down every, single fret on the treble side. Solved? Nope!
As I stood scratching my head, I recalled that I had neither dressed the zero fret, nor did I hammer it in, so I did that. Solved? Nope!
Then, I looked at the nut, squinting with suspicion at it. The grooves were indeed deeper than I would have liked to see. So I did the baking soda-super glue trick ( a pinch of baking soda in the string groove with a drop of superglue holding it in). Problem solved? Nope!
Then I decided to pull out the old nut and put in a new one. So, out it came and I sat a new one in its place. But the new one would not sit properly at the treble end.
I looked at it and sure enough, there was a remnant of the old nut stuck there, as if not wanting to go away. Pins and needles refused to make it budge and I had to pull out my freshly sharpened chisel to dull its edge on it. After I stuck the new nut in place did that solve the problem? Nope!
Then, as I ran out of options, I decided to give the sides of the frets (along the side of the fretboard) a shave. They were sticking out but nothing that would send you rushing into the ER. Problem solved? Nope!
Then as I stood exasperated, I took off the strings one more time and began dressing the 14th, 15th 16th and 17th fret with a vengeance: sanded, crowned and polished them shiny new and strung up the guitar again. Problem solved? Yes!
Wait!!! What???
Yup! Problem solved. But hadn’t I done this before? I did, but maybe not enough the first time round.
This is in continuation from the last blog post – https://lkoguitargarage.com/chillyburst-in-hot-soup-i/
So, I stuck the bridgeplate, drilled out the holes (the view as seen reflected in a mirror)
but the top, where the bridge would sit was uncharacteristically warped. Thanks to the missing bridgeplate earlier, the top had been pulled out of whack – one side higher than the other.
Again, the ice-cream sticks came to my rescue. The view above is with them cut to size, stuck and sanded level to the plain of the rest of the top.
Yet, when I placed the bridge on it, there was enough gap to slip in a couple of ATM cards! The other side of the bridge – the one closest to the soundhole – sat fine.
Again some innovative thinking came to my rescue.
I marked the area (the thick red line) on the top where the bridge would not sit flush with the top and smeared it with glue. Next, I sprinkled a healthy dose of sawdust on it, let it set and then sanded it even. Then when I sat the bridge, it sat perfectly.
Glued, clamped and left to rest for 48 hours, it turned out like this:
Then, I turned my attention to the little touch-up areas. Not perfect, but the spots no longer catch your eye from a mile off.
The strap button was removed, its original hole sealed and painted, a new hole was drilled and the strap button installed
Before I threw on new .012″ – .052″ strings, I scrubbed clean the fretboard, oiled it, polished the tarnished frets, and it came out looking like this.
I stretched the strings and tuned up the guitar. Though I never played the guitar before, there is a lot of sustain that I noticed. Only the owner will be able to tell me if the sustain was new (and a result of the instrument acquiring a bridgeplate).
Here’s looking forward to a happy youngster! CHEERS!
This sunburst – chillyburst – came to me on its deathbed. A young friend’s first guitar, it is one of those inexpensive contraptions that cost double its actual cost, if repaired. But repair, I had to and yet not put in anything from my pocket.
But first what ailed it. Cheap guitars are cheap because of the (ply)wood used, its (lack of) craftsmanship and other throw-away material used in it. However, these instruments have a market here in India. For parents, they are an ideal choice, for they don’t cost an eye, a kneecap and your right toe, and the child gets to play out his/her infatuation. You never know when the child loses his/her infatuation with the instrument.
Knowing the many corners that ‘manufacturers’ cut in making these instruments, even for me, this instrument was nothing short of a shocker.
Change my name if you won’t be able to drive your truck through that! But it wasn’t an ordinary lifting bridge. Look at the photograph on the left. The right corner of the bridge continues to be attached while the left one is ready to fly off. Naturally, all that tension warped the bridge too.
The one bright spot – thankfully, the neck was straight and the truss rod worked.
I have always frowned at strap buttons installed right on top of the heel of the guitar (ideally, it should be on the left of the heel). So, it’s out and a hole would be drilled in the right place to take in the strap button.
Another thing I am not a great fan of: an adjustable saddle. While it might adjust the saddle height – which seems like a great feature – it actually does more harm to the top, eating into it and the bridgeplate sitting below it.
And then, there were minor touch-up issues.
But the biggest problem – what I earlier referred to as a shocker – was when I discovered that the instrument did not have a bridgeplate! A moving man without a heart???!!!
A rosewood/maple bridgeplate would have been way too expensive for the project, but repair I had to. So…
…ice-cream sticks! But before your smile broadens, this is not that variety that you are used to. These are special sticks used in aero-modelling, modelling, etc. I laid five horizontally and six of them cut into half, laid vertically, as the back.
Sanded, smoothed and cut to fit, my bridgeplate would rival a rosewood/maple bridgeplate in sturdiness!
And I wasn’t going to put the adjustable saddle back into the bridge, so…
…I used two bone saddle blanks, stuck them together and shaped a saddle by hand!
Now, all that was left to do was get everything together and hope it would hold!
If somebody shows you a ‘solid-wood’ acoustic guitar, what they mean to say is that the top of the guitar, its back and its sides are made of single pieces of wood.
In comparison, a ‘laminate-wood’ acoustic guitar – as the name suggests – is made up of thin layers of different woods stuck/pressed together. So, the top may have a thin slice of spruce/cedar and layers of ordinary wood underneath. Likewise, the back and sides may have a thin layer of rosewood/mahogany/walnut on the very outside and thin layers of other woods underneath.
So, what is the difference? The difference, my friends, lies in the quality of sound that each instrument produces.
Let me explain. Homogeneity and heterogeneity are paramount when sound and its transmission are being considered. Sound will travel through a single piece with ease and without any loss of energy, and yet, through different pieces – no matter how well they are stuck – there will certainly be loss in amplitude, sustain and overall sound quality.
Workmanship aside, why do you suppose the top end Martin and Taylor acoustic guitars cost so much? Because one VERY BIG factor influencing sound is the wood used. Top end models of these brands use only solid wood and they ring true.
In the US, an acoustic guitar with a solid top and laminated back and sides costs somewhere around $600-$700 (Rs 42,000 – Rs 49,000). A solid-wood guitar could cost $1300 – $1500 (Rs 91,000 – Rs 1,05,000).
In India, you can lay your hands on a six-string contraption for as little as Rs 1,500. I leave it to your imagination what wood manufacturers may be using in such instruments and what these instruments would be sounding like. And for those who wish to give the cheap-labour counterargument, how cheap is the labour in India that a decent instrument costs Rs 42,000 in the US and Rs 1,500-2,000 in the country?
Checking for solid/laminate wood
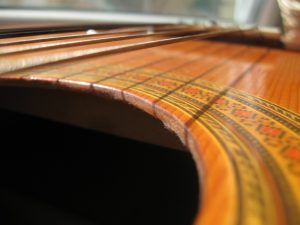
On the right is an instrument with solid-wood top and on the left, a laminate-wood topped instrument. How can I say that? By looking at the wood along the soundholes of the two guitars. The grain of wood (the pattern that wood forms) runs right through the wood and the side of the soundhole shows it too.
In contrast, the soundhole on the left, clearly shows that different woods have been used to make the top of the instrument.
While looking at a guitar, if for some reason you are unable to make out from the soundhole of an instrument whether it is a solid or laminate, shine a torch through the soundhole of your instrument. If you see a wood grain you are assured 50% that it is a solid-wood instrument. However, if you can match the pattern inside with the one directly outside, you can rest assured that it is a solid-wood instrument.
But then why did I say that seeing wood grain on the inside of a guitar makes you just 50% safe? That’s because people are smart. They use a thin veneer (slice) of rosewood/mahogany/walnut on the inside and on the outside, making up the thickness with ordinary wood in between!
The maintenance of both
Despite being a high-dollar guitar, the solid-wood instrument is the one that requires a lot of care though not too much of maintenance. Weather fluctuations and climate changes affect the homogeneous wood immensely. However, in the absence of that care, things can go awfully wrong, rectifying which can rip a huge hole in your pocket.
In contrast, the laminated acoustic guitar is a much more sturdy instrument, standing up to the vagaries of nature stoutly. The warping, bending so characteristic of the solid-wood instrument is not seen here. But then the quality of wood used takes a lot out of the sound that it produces.
So, which one should you buy?
The guitar made from laminated wood is (usually) like a contented child, not giving much trouble ever, but the solid-wood guitar is like that pampered brat who demands attention all the time, and is pricey to boot.
But once you play a solid-wood instrument for some time, no other guitar will match up to the quality of sound it produces and its projection. If you can stand the tantrums of this baby, there is no better.
In India, you can get a ‘proper’ guitar upwards of Rs 6,500 – Rs 7,000 which would have a solid top and some fairly decent tuning machines on it. A solid-wood guitar will cost upwards of Rs 18-20k.
But should you shell out that much? The cards are on the table, you decide!
This one is due next. Someone decided to throw on steel strings on a Classical Guitar and get a bigger bang for their buck: foolishness brought on by ignorance!
Every acoustic guitar – Western Flat Top (Steel String), the Resonator, Classical (Spanish), the Archtop – was made keeping a particular music in mind. That is to say each of their constituent elements vary a bit in size, shape and dimension to give it that characteristic sound, which is suited for THEIR kind of music.
The Classical Guitar is meant to play Flamenco, Gypsy Jazz and Western Classical music, though it would be wrong to say that you can play ONLY that kind of music on it. To produce that particular sound, the bracing pattern, the braces themselves, the thickness of the top of the guitar, the neck of the guitar and the strings are vastly different from any other guitar.
The Guitar Top and its Braces
According to Andrew Enns, head luthier at the classical-guitar company, Córdoba Guitars (a respected name in the Classical Guitar world), the bracing and thickness of the top play an important role in the difference between a classical and a steel-string guitar. “Nylon-string tops are thinner, with smaller, more flexible braces, while steel-string guitars have thicker tops with larger, more rigid braces. The principle behind both is the same, to make the guitar strong enough to hold the strings at pitch, yet flexible enough to vibrate when the strings are plucked,” Enns says.
The Bracing Pattern
Fan Bracing in a Classical Guitar. Pix courtesy: danielbrauchli.comX-Bracing in a Steel-string Guitar. Pix courtesy: maurysmusic.com
Again, to facilitate the greatest vibration of the top in response to the lightest touch of the strings, the Classical Guitar – classically – is braced with wood strips in a pattern that has come to be known as fan bracing. In contrast the steel string guitar has a (slightly) thicker top and heavier bracing, called ‘X-bracing’ which assists the working of steel strings.
Also, the lighter nylon strings that go on the Classical Guitar work best with that light bracing and light top. If you place the same strings on a steel-string top guitar, they will sound dead and useless.
The Neck
Classical guitar neckCross-section of Steel-string Guitar neck with truss rod. Pix courtesy: frets.comThe truss rod nut as seen from the soundhole
Under the fretboard/fingerboard, the common steel string guitar has a furrow running almost through the length of it. In this cavity sits the truss rod. The job of the truss rod is to counter the stress that the steel strings exert on the neck and can be worked from the outside to bend the neck in one direction or another.
Contrastively, the Classical Guitar neck has no such feature, for the possibility of it facing any such tension does not exist. New-age luthiers have begun experimenting with carbon fibre strips implanted in the neck, but then these cannot be worked like the truss rod can. They are just there to reinforce the neck and give it strength. Also, even with these implants, the Classical Guitar neck is incapable of taking the strain of steel strings.
The strings
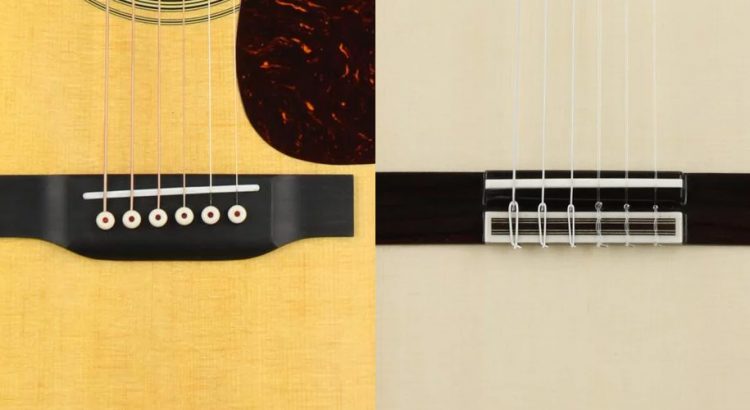
Steel-string (left) and Classical guitar bridges
The total tension that classical (nylon) strings exert on the guitar top is never more than 40 – 41 kg. Compare that to the 70-72 kg tension that (the lightest) steel strings exert.
Without the typical bracing pattern, the size of braces to support the top, and a truss rod countering that 72-kg force, any guitar will fold on itself.
And so…
If you do not want your instrument to fold on itself, PLEASE do not make the mistake of putting steel strings on a Classical Guitar!
Remember this? Well, it was back in exactly the same condition as when I first laid eyes on it – with its bridge lifting!!
And why? Because of one silly strip of useless wood in the wrong place.
What you see in the mirror is called the bridgeplate – the one with the six holes. I am afraid it is not a very good photograph but look closely at the top left corner of the strip and you can just about see that it is no more than 2 – 2.25 inches across. Also, it is not made of a hard wood like rosewood or maple but an inferior variety of spruce (I am guessing).
Its purpose is to help the top of the guitar bear the 70 – 80 kg tension that tuned-to-pitch strings exert, by providing support. So, a small, thin bridgeplate is incapable of doing its job, and thus, why this instrument returned.
The flip side is that if you put in too big or thick of a bridgeplate, it compromises the sound of the instrument, for it hampers the movement of the top.
After I took the bridge off the first time, the top was like this:
This time, when I took off the bridge, it looked like this:
Now there were two things that could be done: a) make a new, better bridgeplate, or, b) give it more, a lot more of the earlier treatment. With a more expensive guitar I would have ventured to replace the bridgeplate, but with this one I decided to take the second route.
But I needed something that would support and straighten the bridgeplate, as also the top to straighten out – something that would help the bridgeplate behave itself over at least half a decade of the instrument’s life. So, I had some fashioning to do: the right sized block of wood. To know that I marked the cross brace impression on the top with a whiteboard marker. In between the two red lines and under the top, my block should be able to fit in.
This piece of wood would sit against the bridgeplate, while another block of wood would sit against area where the bridge would be. But before I locked everything in, it needed some heat to give a chance to the bridgeplate and top a chance to straighten out. And so, boiling water to soak the bridge area as also the bridgeplate.
But before I soaked it, I pushed in an old tee-shirt to soak in the extra water and to protect the back of the guitar.
Clamp everything together and let it rest for a couple of days. And that is exactly what I did.
After clamping everything together and leaving it for three days, it turned out like this
I repeated the process and left it for another four days before I loosened the clamps and left it to dry for four days. Later, glueing the bridge back on was a piece of cake.
An oiling and cleaning of the fretboard and bridge, some new strings and Snow White’s ready to sing again!!
However, this time, the complaint was that when you played open chords, the instrument sounded a natural seventh!! I tried playing it and if I had played a major 7th, it wouldn’t have sounded any better! Unfortunately, I had played a G Maj chord.
My experience told me that it could only be a badly cut nut. But, how was it possible? Last time around, I had swapped the plastic nut and saddle for a swanky, new bone nut and saddle.
So, I looked at the nut and sure enough, someone had tried to file down the nut slots with a knife or a like tool. Firstly, do not touch the nut ever! You can sand the saddle down but the nut is a different story. Please don’t try this at home. Let an experienced hand handle it. Of course, if you have done such a job before, go right ahead.
Ideally, in a properly cut nut, individual strings should sit half in the slot and half out of it.
What was happening with Black Beauty II, strings in the badly cut slots were catching in them and sounding off.
There could have been two ways to rectify the problem. The easier way – replace the nut – would have cost the customer, the tougher way was to fill the slots with bone dust and super glue and then cut the nut slots again.
That is what I did. Also, I cleaned up the fretboard, oiled it and shone the frets. With new strings and stretched to hold tension and tune, the guitar played as good as new.
polished and oiled the fretboard tooStretching strings to help them hold tension
Your vehicle develops an odd sound when the engine is running. However, it does not affect the functioning of the vehicle. What do you do? Do you run to the mechanic, or, wait till the time that the engine ceases?
85% of us belong to the second category and the rest in the latter category, whereas, it should be the other way around – whether it is your vehicle or your acoustic guitar!
That sound that you are hearing in your acoustic guitar, might just be a loose tuning machine nut on the headstock, or, it could be a brace that has come loose at one end, inside the guitar. Visiting a guitar technician/repairman immediately will do two things: a) confirm which of the two things it is, and b) while the problem gets fixed then and there, other problems that may be developing are spotted and fixed too.
Whether it is the vehicle or the guitar, dismissing the sound can snowball into a problem which can cause great damage to your instrument, not to mention the huge hole in the pocket that it can create.
Besides, it is always nice to sit with your guitar tech – or your mechanic for that matter – for you stand to learn a lot through the interaction. Doubts can be cleared, unfounded beliefs and second-hand (incorrect) wisdom can be done away with.
Here are a couple of half-truths/untruths that I hope to correct/clarify.
NEVER TAKE OFF ALL STRINGS AT ONE GO: It is a much-touted belief that one must not take off all the strings from a guitar at once. For a guitar which has a truss rod – which most steel-string guitars today do – it is a fallacy to believe that taking off all your strings at one go, or cutting them off all at once, will damage the neck on your guitar. The truss rod in the neck of your instrument controls the sudden release of tension.
So where did this ‘wisdom’ come from? Much earlier in time, when classical guitars were made without truss rods (today, many classical models do boast of truss rods), the sudden release of tension by cutting off strings would damage guitar necks. It got recorded into luthiery books and was passed on from generation to generation, and even today, you should not be surprised to find people mouthing and passing it on.
However, it is also true that one has to be careful while changing strings in a stringed instrument without a truss-rod like mechanism.
YOU SHOULD NEVER LET WATER TOUCH YOUR INSTRUMENT: If you have been regularly cleaning your instrument, there is no reason for water to come in contact with your guitar. However, if your instrument hasn’t seen cleaning for eons, a soft, cotton t-shirt moistened in a very dilute liquid detergent and water solution, and loads of elbow grease is very helpful in cleaning the guitar.
Again, the idea is to work with a moistened cloth not a wet one. Therefore, the urge to scrub your guitar clean under a running tap must be suppressed at all costs.
These were just some points that came to mind off-hand. If you come to me with a doubt or a suspicion, you will be surprised at how much richer (in knowledge) you leave me, and at no cost!
This is something that I wrote, printed and pasted on some cardboard for my younger customers. It sits on my work counter and is as much for students as it is for the general player. A little care, a few precautions can improve string life – a recurring expense – and the overall life of your instrument dramatically.
Interestingly, these points are valid irrespective of the kind of guitar – acoustic or electric – that you possess.
The photograph is only for representation, and you can read the 10 points here:
Check your score
My guitar is always in its bag/case and after I finish playing, it returns there.
If I know that I won’t be playing for more than 2 weeks, I de-tune my guitar and keep it in its case.
I have a soft, 100% cotton, old t-shirt which I keep in my case to wipe body oils off my guitar – before and after playing it.
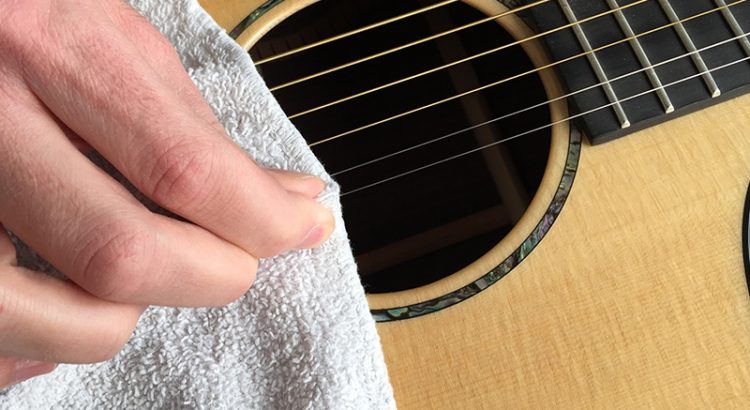
I have another, thicker piece of cloth with which I wipe each guitar string – before and after playing – pinching it between my thumb and forefingers.
I always wash my hands properly before touching my guitar.
I change strings at least every three months.
When I change strings, I give my guitar (especially the fretboard and headstock) a good cleaning.
When I change strings, I also check the hardware on the headstock – if it has got loose.
I know the specifications of my guitar: fretboard radius, action at the 1st fret, action at the 12th fret, nut and saddle height, width and radius.
I always keep a spare set of strings and a string winder in my case.
The penultimate point, I feel, merits an explanation.
Once you know the specifications of your guitar, you are better off in two ways:
Checking the specs once your guitar comes back from the repair guy, and
Being able to tell a new guitar repairman the specs that you would like to see on your instrument. By being able to quote the specifications on your guitar, suddenly, you will be seen as someone who ‘knows’. Rest assured, the chances of you being taken for a ride become near negligible.
I will be thrilled to know how much you scored, or, if you would like to add some points towards maintaining an acoustic instrument.
As promised, here is the metamorphosis of the Ibanez PF15-BK, though a tad delayed. In my opinion, for its price, it is a good guitar with some excellent features.
One thing that I will say though for the instrument is that it is a dust and fingerprint magnet!
(For those who would like to read my review of the instrument, they can do so here:
For all its ‘goodness’, it is also true that there is always room for improvement and to better things. With that thought I set about working on it and here are glimpses of the done piece.
The back of the guitar with the Kanji decal, ‘AI’, meaning Love
The biggest pain always is getting the equaliser installed, which in this case was not just one thing but a combination of four things: an under-saddle pick-up, the battery unit, the end-pin jack and the EQ itself.
For the end-pin jack, a proper-size hole had to be drilled first. And if any of you have tried this, getting the end-pin jack to come out through this hole, from inside the guitar…it’s like threading a needle with your hands tied behind your back!
Once it comes out, one has to dial in the right number of winds on the screw so that just enough of the jack peeks out for its cap to fit on. Let me explain this through a diagram.
Drilling the end block for the endpin jack
The under-the-saddle pick-up required two main things: holes to be drilled in the ends of the saddle slot in the bridge (for the piezo pick-up to come up through, and the other one to receive the end of the piezo pick-up – so that vibrations are picked up evenly, from all 6/12 strings), and shaving the saddle down to accommodate the piezo pick-up, ensuring that the action remains optimum.
Drilling the near end through which the piezo pick-up would be threaded from under the bridgeDrilling the far end to receive the end of the piezo pick-up
The battery unit and the EQ unit were simple enough, with stick-on attachments. I fixed the battery box to the heel block through the soundhole and the EQ unit to the very rim of the soundhole – for easy access. I must apologise, I didn’t take photos of those.
Then it was the turn of the hardware to be switched. Thankfully, the tuning machines sat perfectly and the holes did not need reaming. Also, the screw holes lined up perfectly.
As you admire the tuning machines, do take a look at the headstock decal
In the photo above, you can also catch a glimpse of the new bone nut that replaced the cheap, plastic factory-provided nut.
The wrongly placed strap button on the heel was removed, the hole was filled up and a new hole was drilled on the side of the heel to install a Schaller-style strap button.
The strap button is just one half of the unit. The other half gets screwed onto the belt itself. Did you miss the decal on the left shoulder of the guitar?
The shoulders of the guitar got ivory-coloured vine decals. Above, you can see what the left shoulder looks like. Here is how the right one looks.
The bone saddle required some real elbow grease to get it to the right height, but after a few misses, I did get it right so that the action is right. I also replaced the plastic bridgepins with chrome-coloured brass pins, to go along with the rest of the chrome hardware. Do also notice the lily decals for the bridge wings.
Underneath the bridge, I also put a matching aged-ivory decal. Not a great photograph, though!
PRETTY NEAT, EH?
For a closer look at all the parts I changed, go here:
I decided to buy the Ibanez PF15-BK online and on a hunch – going exactly against my own advice to youngsters: don’t buy musical instruments online. Play, listen to them, and then decide!!!
The fact of the matter is that I got lucky, you may not (maybe I wouldn’t, the next time!!).
I got done in by the looks of the instrument, the online (independent) reviews and the price of the instrument at Bajaao. Also, the no-questions asked policy of the company, IF there was a flaw in the instrument, made me take the plunge. Besides, they were paying for the shipping both ways!!
When the guitar arrived (Order Id 188580), sadly, there was a flaw! Of course, the well-packaged instrument carried the quality check and gave the check date as June 22, 2019, yet, the bridge was lifting on it – not much, but it was lifting all along the margin farthest from the soundhole.
Now, I typically use .013″ (thinnest e string) strings onmy instruments. Meaning? Greater stress on the bridge, neck and top of the guitar, but an overall bigger bang for your buck – if you get my drift. What I was not ready for is a defective guitar that would need serious attention 18 months down the line.
So, back it went, with the replacement coming in only on July 22! In between there were mails sent, frantic phone calls made and apologies made from the side of Bajaao but NOT ONE EXPLANATION about why the replacement took so long.
Whatever! It’s here now. It’s going to get an almighty upgrade, butfirst the review!
The replacement guitar carries this tag identifying it.
Like I said, the packaging was solid and Bajaao ensures that. Inside the guitar box, the instrument itself comes wrapped in the usual styrofoam bag with a rubberband holding its mouth at the headstock. Besides the instrument there is a plastic bag carrying product information, an extra bridge pin, a replacement saddle, a plastic/PVC shim – should somebody feel the need to raise saddle height and an Allen key for truss rod adjustments.
As you pull the instrument out of the styrofoam bag, the most pleasing thing to me was to see the tuning machines. Just their look and feel tell you that these are quality items and not just any old cheap stuff.
Tuning up the guitar only confirms that hunch.
The other pleasantly surprising thing is that this instrument comes with two – yes two – strap buttons. In all my guitar-playing/mending life, I am yet to come across a decent instrument with two strap buttons. If at all, manufacturers decide to put in just one strap button at the end block, while the one at the heel of the guitar is always missing. Why that should be so, I have never been able to fathom.
The other specifications (taken off the Ibanez site):
(Okoume is the wood of the Okoume tree [Aucoumea klaineana] found in west-central Africa, in particular Gabon, Equatorial Guinea and the Republic of Congo. The wood of this tree is known by many names: Acoume, Gaboon wood, Uume and Zouga.)
neck – PF Nyatoh
(Nyatoh is an Asian hardwood from the Sapotaceae family with a very similar look and characteristic to Honduras Mahogany, though totally unrelated.)
fretboard – Laurel (radius – 9.5″)
bridge – Laurel
(The laurel is probably Camphor laurel, which yields a beautiful, rich honey-coloured timber that is perfect for furniture, carving, and cabinetry. The tree is native to Taiwan, southern Japan, southeast China and Indochina. It is used as a valuable timber for furniture and carving icons.)
inlay – White dot
(Very insignificant markers. Ibanez could have put in slightly larger markers if they wanted the things to serve their purpose. One has to look really close to spot the markers – at least on the guitar that I have.)
soundhole rosette – Black & White multi
tuning machines – Chrome Die-cast Tuners
nut material – Plastic (42mm)
saddle material – Plastic (76 mm)
number of frets – 20
bridge pins – Ibanez Advantage™
(These are basically bridgepins with a slanted end – something that I always advise people to do on their guitars and something that I always do when I change bridgepins on an instrument. It is a simple process of filing one end of the bridgepin so that string ball-ends don’t catch on them.)
strings – Ibanez IACS6C
(These seem to be good strings – what the doctor ordered for dreadnoughts. Gauges: .012″, .016″, .024″, .032″, .042″, .053″. Material: 80/20 bronze).
The instrument itself plays well and surprisingly has a rather good setup and a low action. It is not all treble and not all bass, but the mid-section rings out too with some excellent sustain.
So, what you get for under Rs 12,500 is a quality brand name and the workmanship associated with it.
The upgrade that I announced so grandly in my last post is yet to take off. This post is an explanation of the whys.
But first, a little confession.The Ibanez PF15-BK that I was supposed to work on, was mine and had been bought from India’s exclusive music instruments’ e-commerce site, Bajaao. Sadly, the bridge on the instrument was lifting and had to be returned to Bajaao, which they promised to replace.
I sent out the flawed instrument to Bajaao on July 1 and the replacement came to me only late yesterday evening – all of 22 days. That after a lot of correspondence back and forth and, of course, calls to the helpline number listed on the Bajaao site.
Now that everything is in place, the upgrade shouldn’t be too long coming.
That is what fretwire sprout looks like and you can imagine what it feels like. (pix courtesy tdpri.com)
Last week, while dwelling upon humidity issues at length, I knew I had missed something. It came to me yesterday evening: fretwire sprout!
No! The fretwire does not sprout, as would seeds soaked overnight, but the shrinkage caused due to the loss of moisture in fretboard wood, forces the fretwires to poke out, making it seem as if the fretwire had sprouted. I can assure you fretwire sprout can be a very painful discovery, if not serious one, causing a cut and bleeding, and some serious enough to require medical attention!
If it is some solace, it can happen in any guitar – acoustic and electric!
The other day, I pulled out a guitar of mine from storage and while playing it discovered – rather painfully – that the fretwires on it had indeed sprouted. Thankfully, there was no cut or blood. That was when I got reminded of what I had missed mentioning in my last blog post.
So, like I mentioned above, fretwire sprouts primarily due to lack of humidity. However, humidity is not the only culprit. Sometimes, fretwires pop loose and move in their slot too. How do you figure out what caused it?
Simple! If along the length of the fretboard – on one or both sides – you find fretwires sprouted, rest assured that humidity is the culprit. In case of fretwires popping loose and moving, it is rare that you will find more than a couple.
If it is a humidity issue, you will have to take it to a specialist guitar tech/luthier, who will first humidify the guitar for at least 72 hours, and if afterwards the sprout still exists, he will even employ a specialised file to file away the ends.
A specialised file used by guitar techs and luthiers to file away sprouted fretwires. (pix courtesy fender.com)
Please don’t try this at home but even a simple bastard file will do the job – IF it happens to be an expert who is wielding it.
A simple wood file (pix courtesy lowes.com)
So, basically, this specialised file is rubbed along the length of the fretboard up and down, till the sprouts are ground level with the side of fretboard. Then follows a long and tedious process of cleaning up burrs, polishing and shining the fretwire, and, lo and behold, you are ready to rock and roll!
If it is just one or two frets popped up and dancing around in their slots, they are simply tapped into place and sometimes, even secured with a bit of super glue.
The summer in North India (at least the first few months) is a time for dry weather with the humidity wavering around the 40% mark. This is a bad time for your acoustic instruments. Why?
The wood of your instrument loses its moisture to the atmosphere when it is hot and dry. Add to it the tension of the six strings (and imagine the tension on the neck of a 12-string instrument). That twin effect can bend, bow and crack wood easily. Remember that’s 90% of your instrument that I am talking about. In extreme cases of neglect, the instrument may be damaged irreparably.
What lack of humidity does
The top and back of your guitar are actually two pieces each (in all four pieces) which are glued together. Look closely and you will be able to see the seam where the two pieces of your top or the back are glued.
pix courtesy: crawlsbackwards.blogspot.com
‘Dehydration’ shows up here first as the seams slowly start opening up as the wood shrinks, losing moisture. One day, running your fingers across the top or the back you may find your fingernail catch on something. A week or two later, you may actually ‘see’ the crack, and a month later, a toothpick may drop through it!
The fretboard – generally made of rosewood or ebony – is open-grain wood (without any finish on it) and thus, loses and absorbs moisture very quickly. A continued spell of dryness will certainly lead to cracks in the fretboard, which may lead to frets popping up, sinking, or simply hinder playability.
pix courtesy: thetopguitars.com
As the fretboard shrinks, the fretwires stick out (called fret sprout in technical jingo), making playing the instrument a difficult, if not a completely dangerous proposition.
pix courtesy: blog.zzounds.com
The shrinking wood even breaks away at places like right next to the fretboard extension on the top of the guitar, or, along where the pickguard is stuck. Old Martin guitars were notorious for acting up like this.
pix courtesy: fretnotguitarrepair.com
What can be done?
Acoustic instruments wish to remain in that optimum range of 45 to 60% humidity. The first thing, come March, is to keep a close watch on the hygrometer (in your smartphone). Otherwise, it is a relatively simple and not too expensive instrument. If you have an expensive instrument (money-wise or sentiment-wise) I will advise that you buy a proper hygrometer – both analogue and digital are available – and keep it your guitar case at all times.
However, keeping a hygrometer in the case does not measure the humidity ‘inside’ the guitar. It only measures the ambient humidity of the case. To keep proper tabs on the humidity in your instrument, you will need a small hygrometer that you can place through the soundhole of the guitar. Put it inside. Cover the soundhole and leave it like that for the next 48 hours. The reading that you get, then, is the real humidity of your instrument.
The first photograph of this post is of a hygrometer measuring 1.88″x1.12″x0.59”.
Even if you don’t wish to go through the above exercise, knowing that the outside humidity is at or below 40% should be enough to give your ‘thirsty’ instrument a drink of water. But don’t soak it in the bathtub yet!
Simply…
There are many, many implements available in the market to humidify your acoustic guitar, but then nothing as cheap and as effective as what I do. Take a small plastic container (that can go through your soundhole) and a piece of your old cotton t-shirt. Soak the t-shirt in water, put it in the container, and put the container through the soundhole into your guitar.
pix courtesy: bryankimsey.com
Cover the soundhole with something so that the moisture does not escape from the instrument but is absorbed into it. Leave it like that for at least 72 hours and then check the dampness of the cloth that you left inside. If the cloth dries out, wet it again and repeat the process till you find that the cloth continues to remain as wet as you put it in.
And, of course, you have the hygrometer inside to actually check the humidity reading.
To take care of the neck and fretboard, leave another dish of water-soaked rag in the case of your guitar. But be very careful that it does not topple and wet the case or the instrument.
How ‘the drink’ affects
Try and imagine a raisin. Try leaving it in a bowl of water for two nights. By the third day, it is swollen, with the water it has absorbed.
The wood on your guitar is pretty much like that. After it has had that ‘drink of water’, it will swell. What that will do is that if, earlier, your fingernail would catch on the seam of the top or the back, now it would smoothly glide over it. Cracks closed!
However, it would be wrong to think that just putting in a cup of water inside your guitar would cure it of its cracks. There might be some which may get better but not close completely. In that case, you will have to find a guitar tech and get it proper attention.
This particular post is for people who have been playing for more than a couple of years (and have never really cleaned their fretboard). A couple of years is enough time for a build up of body oils, grime, dirt and skin to get deposited on the fretboard.
Like the rest of your guitar, you need to clean the fretboard too. However, here is the cautionary note: the procedure that I am about to describe, is only meant for rosewood and ebony fretboards. NEVER try this on a maple fretboard!
Another cautionary note: if your acoustic guitar has a pick-up/equaliser installed (electro-acoustic guitar), then you need to mummify your guitar, like this:
Painter’s tape (called locally as Abro tape and available at paint shops) must be used to cover the side of the fretboard as also the soundhole. pix courtesy sixstringcoustic.com
What taping it up like this does, is prevents dust and dirt and other particles from getting into the soundhole and sticking to your pick-up/equaliser.
Once that is done you can get started working on the fretboard. You will need ‘0000’ steel wool. This is cheap and an excellent fretboard-cleaning tool, though it makes a royal mess.
pix courtesy: guitaranswerguy.com
Take the amount of steel wool shown in the photograph above and then go over each fret and each fret wire until you have managed to take off everything you saw earlier on your fretboard, using an up-and-down motion as shown below.
pix courtesy: guitaranswerguy.com
Despite the accumulated muck, you will notice that the fretwires on the fretboard bear a shine almost as if they were new. Indeed, ‘0000’ steel wool is a burnisher and works wonders on wood and metal.
If, however, you feel that there are still some stubborn bits of gunk left on the fretboard, you will need an old credit card. Sand at least two edges of the card to a knife-like edge.
pix courtesy: pinterest
Stick the sharpened edges right against the fretwire, as shown above and pull outwards. Whatever is settled in that little space between the fretwire and the fretboard is taken out, leaving your entire fretboard well and truly cleaned.
After you are fully satisfied with the results, it is time to nourish the fretboard with some oil or a fretboard conditioner. There are umpteen number of products available in the market, though the best is still BOILED linseed oil. If you can get some, a 300 ml bottle should last you a lifetime.
Take a little on a paper towel, a soft, cotton cloth and massage each fret. Leave it on for 5 or so minutes and then with a clean piece of paper towel, a soft, cotton cloth, wipe off the excess.
pix courtesy: guitaranswerguy.com
Look at the first four frets of the fretboard in the picture above. Look at the rest of the fretboard. That is the difference a conditioner/oil makes to it. Not only does it look great, it plays good too. HOWEVER, the oiling of the fretboard should not be repeated more than once a year IF it is oil that you are using to condition. Though oil is good but it does have a tendency to cake up.
The acoustic guitar is a rather simple instrument (though a lot of physics went into building it), and requires a very simple regimen to keep it singing for long. If you (are able to) do the following, suffice it to say that there won’t be any SOSs sent out, no frantic runs to the ER. But the operative word here is ‘IF’!!!
So simple are the pointers that oftentimes we tend to skip these simple steps and get straight into playing the instrument. Curb those instincts and follow the maintenance routine religiously.
What you will need:
Old denim
Old PURE cotton t-shirt(s)
A small jar of petroleum jelly
Some hot water
A soft make-up brush
Paper towels/tissues
The procedure:
If you have never properly cleaned your guitar, the first time is going to be a little time-consuming and will require a little more effort. The following are the steps to be taken in that situation. In any case, this should be your Sunday routine.
Take the fan brush (make-up brush) and dust areas that you can’t reach with your hands and fingers – under the strings before the bridge and at the headstock. This particular brush design is best suited for dusting.
Take a piece of the old, soft, cotton t-shirt moisten it with hot water. Wring dry. With the rag barely moist, wipe down the entire body of the guitar, paying special attention to areas that come in contact with the body. Once you think you are done, take a look at all surfaces of the instrument against light. Areas that you missed, or those that need more attention will show up. Go at them again until you are satisfied.
pix courtesy: acousticguitar.com
The tissues/paper towels are for particularly obstinate areas. Wet the towel and leave it on the spot for 30 seconds. Go at it with your dry t-shirt again.
Take another – larger – piece of an old, soft, cotton t-shirt, wipe the guitar dry completely to a light shine.
Loosen all strings. Take a bit of petroleum jelly and dab it onto a piece of old soft denim – just a pinch. Pinch each string so that the jelly comes in contact with the string. Run the pinch down the entire length of the string, paying greater attention to the thicker, wound strings. For each string take a different portion of the cloth so that you can clean the strings better.
pix courtesy: guitaranswerguy.com
Finally, take a clean, dry corner of the denim and wipe off whatever jelly you may have left off on any of the strings. Looking at the pieces of denim, you will realise how dirty those strings were, and when you play them, they may even surprise you with their brightness.
The daily routine BEFORE you start playing:
Take an old, soft, cotton t-shirt and wipe the guitar properly: especially those areas that come in contact with the skin the most.
Loosen strings and take a piece of denim and wipe each string clean. While you are at it, also clean the fretboard, giving it a rub at each fret under the strings.
Wipe each tuning machine properly, lifting off dust, grime and fingerprints.
Still holding the tuning machines with a soft cloth, tune guitar to pitch and have fun.
I know that I have talked about acoustic guitar steel strings and changing them and how to, etc. However, I failed to address this more fundamental question in that post.
The answer is, yes, you need to change strings even if they are not broken: whether they are new ones that you installed on your guitar months ago and stored away your guitar, or, those that you have played and played and they, fortuitously, have not broken.
What old and new strings look like (pix courtesy: hubguitar.com)
New strings and not played
Many people have more than one guitar. They feel that if they change the strings on an instrument, put it into storage, and whenever they take it out, the strings should play and feel brand new.
Logical in theory but not true in the real world.
The fact is that once strings are put in tension they will go dead from being under tension for extended periods of time – played or not played. The sustained tension stretches them out and deadens them. Unfortunately, you NEVER leave an acoustic instrument without strings (not necessarily tuned up to pitch, but tuned half a step down or a full step) on the neck. That would be bad for the guitar itself.
Dead strings (pix courtesy: hazeguitars.com)
Old used strings and played to death
No matter how clean your hands are, every time you play your guitar, know that you are depositing some DNA on the strings (and the fretboard too). The continued deposition of DNA – body oils and skin – deadens the strings. Old strings sound bad, are difficult to get in tune, and can break unexpectedly.
That old devil, Humidity, too, plays a huge part in the degradation of strings. Metal+Moisture=Rust!!!
The magic rule is to change strings every 100 hours or 3 months—whichever comes first – if you don’t play four or five hours daily. In that case, you need to change strings monthly.
What new strings should look like (pix courtesy: premierguitars.com)
What to do to lengthen string life
Simple things like wiping your strings before and after playing go a long way in lengthening the life of your strings. But then I have seldom seen that patience in guitar players.
There are also conditioning lotions for strings. You can apply them and they work – somewhat. The flip side is the added expense. The same thing is achieved – maybe better – by wiping your strings.
Also, in the market there are a variety of pre-coated strings and treated strings that do not let the body oils/material deposit on the strings. And if it all it does get deposited, it is unable to affect the strings. The downside? These strings are easily four times the price of ordinary strings!
To get the complete low down on strings, also read:
Look carefully at the saddle in your guitar. It is not placed in a straight line but angles backwards from the treble (thinner) to the bass (thicker) strings. The thicker the string, more is the length required to flatten it.
Also, when you play a string on a (any) guitar, by fretting it, you elongate it, even if it is very slightly. This causes the note to go sharp. To ‘compensate’ for the sharpness, changes are made, mostly to the saddle but often to the nut as well.
All the methods used to make a string play the same at every fret and in relation to each other is intonation and is the last step in the setting up of your guitar. Ideally, what you are looking for is for an open string to play a note and for the SAME string to play the SAME note – an octave above – when fretted at the 12th fret.
pix courtesy: beckwithstrings.com
Why 12th fret? Because from the nut to the 12th fret is half the length of the string and from the 12th fret to the saddle is the other half of the string – making the 12th fret the midway point of a string.
So, during a set-up, if the 12th fret note is flat, the point of contact on the saddle with the string is moved forward a little. If the 12th fret note is sharp, the point of contact on the saddle with the string is moved back a little. And the process is repeated till your tuner (or your ear) tells you that the open and fretted note are the same.
What this effectively does, is increase or decrease the length of a string, thus affecting intonation.
How is this point of contact moved forward or backward? By filing the top of the saddle forwards or backwards. This is referred to as compensating the saddle (sometimes even the nut). And thus, intonation is often also referred to as compensation.
Look at the picture below. The ‘straight’ saddle is how a traditional saddle on an acoustic guitar used to look. Later, as saddles started getting compensated, they began to look like the second one. Still later, they were changed to look like the third one.
pix courtesy: fretnotguitarrepair.com
In some cases, they look like this:
pix courtesy: strangeguitarworks.com
In some cases and models, the saddle is actually inserted in two parts to get the intonation correct.
pix courtesy: frets.com
And in rare cases and models, the saddle is not one or two pieces but six small pieces to get the intonation near perfect!
pix: acousticguitarforum.com
Once you have made all possible adjustments to the saddle and find that the guitar is still not intonated properly, then you turn your attention to the nut of the instrument. Nuts too are compensated by adding material to the nut, taking material away, or fashioning a nut (out of bone, Tusq, corian, etc) to have extra material.
Here is one with some fibre used to shorten or elongate the length of a particular string.
When you buy a new two-wheeler or four-wheeler, ideally, the showroom fine-tunes the vehicle before handing it over to you. What that little fine-tuning does is, it removes any small flaws that might have existed, making the vehicle perform to its optimum. Exactly in the same way, a new guitar – acoustic or electric – MUST BE SET UP TO THE PLAYER’S STYLE, for it to play the best that it can.
The set-up on a new guitar is ideally done in one of two ways: for the beginner and for the experienced player.
pix courtesy: musicalinstrumenthire.com
For the beginner
If you have started learning how to play a guitar, or intend to learn how to play it, and you purchase a new instrument, you MUST take it to an experienced guitar technician and have it set up. As explained earlier, this exercise will not only eliminate flaws in your instrument, but will also make it play the best that it can.
By spending a little extra money, the technician will improve the instrument’s playability, thus ensuring that you don’t fall out of love with playing your guitar. However, this is a job of approximation, a temporary set-up. He will call you back a year or 18 months later, ask you to play a little for him and watching your playing style, he will give the instrument a proper set-up.
For the intermediate player
Once you have played for a few years and have established a playing style, the luthier (guitar technician) will set up the guitar specifically to your style. Thus, the set-up for a finger-style player or a lead guitarist will get a much lower action, as compared to a rhythm guitarist or a country/folk style guitarist. The strings too, which he will suggest, will be suited to your playing style: thinner ones for the lead and finger-style artiste and thicker ones for the rhythm/country player.
The set-up proper
Everything related to or touching the strings has to be adjusted and/or modified when a proper set-up is given. Thus, the relief in the neck (how straight or curved the neck is), the action of the guitar at the 1st and 12th fret (distance of the lowest point of a string to the highest point of a fretwire), radius of the saddle and the nut (matching the curvature of the fretboard), the condition of the fretwires, tuning machines, the intonation of the instrument (whether an open string and the same string fretted at the 12th fret sound exactly the same), all need to be worked upon.
Getting the relief right
Relief in the neck of any stringed instrument allows the strings the space they need to vibrate. Once you take off the strings from the guitar, the neck of the instrument should be absolutely straight. If it still has relief – a concave bend in it – it must be taken out by adjusting the truss rod with a hex key (Allen wrench). Similarly, if the neck has a back bow in it – a convex bend – that too must be removed by adjusting the truss rod.
How much is the relief can be checked by either placing a long enough straight-edge on the fretboard or holding down a string at the 1st and the 12th fret and then trying to tap around the 7th or 8th fret. At these points you should have just enough space to hear the ‘clink’ of the string as it hits the fretwire when you tap.
The truss rod is seated in the neck of the guitar and runs just underneath the fretboard. It can be accessed either through the soundhole of the guitar, or from the headstock end in some guitars. And yes, the neck and the fretboard are two different things stuck together! Never confuse one for the other.
After the truss rod is adjusted, the neck should be straight. Once the guitar gets strings and they are tuned up, the pull of the strings will give the neck a natural concave bend, which, nine out of 10 times, is enough for the strings to vibrate freely without affecting action.
Matching the radius of the fretboard, saddle and nut
On steel-string guitars (as opposed to nylon-string guitars) the fretboard has a slight curvature. This curvature is measured and must be the same on the top of the saddle and the top of the nut. If it is not then the saddle or the nut, or both, have to be given this curvature by sanding/filing them along their tops. Once the nut, fretboard and saddle have the same curvature, playing of the instrument is indeed a pleasure.
pix courtesy: musicradar.com
Getting the action right
If the action on your guitar is high, then to bring it down, the saddle is pulled out from its slot and some material is removed from the bottom of the saddle by sanding it. You get a reading of the action by placing a well-calibrated ruler on the 12th fretwire. Know that if you wish to lower the action at the 12th fretwire by 1 mm, you have to take away 2mm from the saddle (The 12th fretwire is generally the halfway point of the string).
Once the saddle height is settled, we move to the nut end of the instrument. Again, the string height is measured at the 1st fretwire. This is measured by pressing a particular string on the 3rd fretwire.
The gap which is left at the 1st fretwire, should be just enough to let a business card pass through. Specialised two-sided files are used to deepen the nut sots so that the desired height of the string is attained at the 1st fret. This process is repeated for all the other five strings.
However, If the slots need to be filed down too much, and for all six strings, it is better to take matter off the bottom of the nut, just as in the case of the saddle.
Once done, strings should ideally sit half in the slot and half outside.
pix courtesy: leadingnotesseattle.com
Getting the fretwires right
Many times, fretwires have not been seated properly in their slots. This can cause string buzz – a squeak produced by a string which is fretted anywhere before the raised fretwire. These can easily be re-seated by a firm knock with a jeweller’s hammer.
pix courtesy: amazon.co.uk
Many times, a fretwire can be seated very properly but it is still higher than the rest. An implement called a thick five-sided, flattened piece of aluminium, called the Fret Rocker, is used to check whether all the frets are in level or not. The five edges of the Fret Rocker are all of different lengths, each length enough to sit on just three fretwires at a time.
If there are more than two or three fretwires standing out, all the fretwires on the fretboard are levelled, crowned and polished.
The fretwires have rounded tops. Once they are filed, they get flattened and rough. To put the ‘roundness’ back in them, a specialised crowning file is used which works on each fretwire individually. To remove the roughness from all that filing, fretwires are rubbed with different grits of sandpaper (500 to 2000), and finally polished with a good chrome polish.
pix courtesy: hazeguitars.com
Also, if the guitar has been sitting in the showroom for long, fretwires can get tarnished or dull, which can again majorly affect the sound the instrument produces. Again, the fretwires go through the polishing process to make them gleam like new.
Getting the hardware snug
The tuning machines and the jack-input points are basically held by screws. These can get loosened over time, or in the case of a new guitar, may not have been tightened well enough in the first place. These need to be checked and tightened. However, caution must be exercised. The hardware on your guitar should be just tight enough to be snug. One doesn’t need to use the same kind of effort used to tighten the nuts on the wheels of your car.
Checking the intonation
Once all the above steps have been carried out, it is time to condition the fretboard and put on the strings. One last thing – and probably the most important thing – to be done is to check the intonation. Play a string open and then play it placing a finger at the 12th fret. The two sounds should be the same except for their pitch. If not, the string is taken off and the top of the saddle is sanded in such a way that either the contact point of the string where it rides the saddle, either moves forward or goes back. This process is repeated till the unfretted and fretted string sounds the same. And then the process is repeated for all the other five strings.
pix courtesy: fretnotguitarrepair.com
That is the basic set-up process, a very labour and time-intensive process but well worth it. Without it, you would be either playing a wrong-sounding guitar or wasting way too much energy playing it.
This was the process for a new guitar. Older guitars need set-ups too – if they move from or to different climate conditions, or when the weather changes, or when fretwires develop furrows from where strings rub against them constantly. A change in the thickness of strings also requires a set-up anew.
When you put on new strings and are tuning it up, have you noticed how some strings go ‘twang’ and lose tension completely? It happens because the ball-end of the string was not seated properly and was actually stuck to the end of the bridgepin. The tension that you give it while tuning it up, pulls it off the bridgepin and it hits the bridgeplate (where it was supposed to rest in the first place). Fine! Where’s the problem?
Two, actually! One, strings are liable to break due to the sudden loss of tension. Also, when you start tightening them again, you may break them then too.
Secondly, the force with which the ball-end of the string hits the bridgeplate is liable to damage it badly if it happens every time you change strings.
Let’s do it right the first time and every time!
So, it’s time to change strings on your guitar. Old strings are off, the guitar has been thoroughly cleaned, polished, hardware given a tightening, polish and you are ready to put on new strings.
courtesy frets.com
As you slip this bent string into the slot – with the ball-end longitudinal to the hole – the curvature in it forces it on to the bridgeplate and away from the bridgepin.
Also, it is a good idea to take a look at the ends of your bridgepins.
Notice the one on the right has a slight angle to it. It is on the face that has the groove in it, in which groove the string sits. What that angle does is help the ball-end of the string slip off the bridgepin end and rest naturally on the bridgeplate.
Now, notice the one on the left. That is how you get a bridgepin from the shop. That is how they came in your guitar when you bought it new. You have to make the left one look like the right one. How do you do that? Take a small, flat hobby file and file away at an approximate angle of 45 degrees. It should not take you more than 10-15 seconds to get it into shape.
If it is so necessary why don’t guitar manufacturers do this? It increases the time and cost, darling!
Do this for all the strings and all the bridgepins. Once you are through, you are ready to put on new strings and tune up your instrument.
Notice the position of the ball-end as it is going into the hole
No unneeded ‘twangs’ and bangs and you are ready to rock ’n’ roll!