Resophonic? Resonator? Dobro…whateva! I did it!!!

Remember how in the India of the 80s, the craze among musicians was owning a ‘Casio’? Music shops stocked them as many prospective customers came asking for a ‘Casio’. What those people actually wanted was a ‘keyboard’ but since the Japanese electronics giant, Casio, was among the first to come out with the instrument, somehow, the brand name became its name.

Another example of the phenomenon is Xerox. You don’t get a document xeroxed, you get it photo-copied. Xerox was the company that produced the machine.

Much in the same vein is the Resophonic or Resonator guitar. (As far as I understand it) Dobro is the name of the company and the name of a particular guitar model it produced.

Here are some facts about Resophonic/Resonator/Dobro guitars and an interesting bit of history.

A resonator guitar or resophonic guitar is an acoustic guitar that produces sound by conducting string vibrations through the bridge to one or more spun/pressed metal cones (resonators), instead of to the guitar’s sounding board (top). Resonator guitars are particularly popular with bluegrass and blues musicians.

Resonator guitars are of two styles:

  1. Square-neck guitars played in lap steel guitar style
  2. Round-neck guitars played in conventional guitar style or steel guitar style

There are three main resonator designs:

  • The tri-cone, with three metal cones connected by a metal brace in which the saddle stands, designed by the first National company
  • The single-cone ‘biscuit’ (saddle) design of other National instruments
  • The single inverted-cone design (also known as a spider bridge) of Dobro brand instruments and instruments that copy the Dobro design

The name Dobro was derived from its inventors, the Dopyera Brothers (DoBro), back in the 1920s, a play on words derived from the ‘Do’ in Dopyera and ‘bro’ from Brothers, and a word which means ‘good’ in Slovak.

In 1925, John Dopyera, a Slovak immigrant to California, US, and an instrument repairman/inventor, invented a guitar with three aluminum cones known as resonators (similar to diaphragms inside a speaker) mounted beneath the bridge. This resonator guitar turned out to be much louder than the regular acoustic guitar. The tone of the guitar was rich and metallic.
In 1928, Dopyera and his brothers Rudy and Emil, as well as other investors, founded the National String Instrument Corporation to manufacture the new type of ‘resophonic’ guitar, which was sold mainly to musicians working in cinemas and jazz clubs in the USA. After several years, the three brothers left the corporation and started a new company, Dobro (the name they also gave to the instrument). Their slogan was: ‘Dobro means good in any language!’

And this long-winded preamble just to let you know that I recently worked on my first resonator guitar!!

This Ashton was the single inverted-cone design type (also known as a spider bridge). The owner, an accomplished musician and a professional one at that, wanted to replace the plastic nut with a bone one.

Also, there was an ugly break along the seam where the top met the side, near the end block: a result of the instrument falling and hitting the ground.

And then, there was general maintenance to be done, an extra-large dose of love to be given!

The cover of the spider-bridge and the tail piece (through which the strings were fed), which must have been shiny chrome a few years ago, were tarnished and dull, as were the tuning machines.

So, off they came.

And as I suspected, underneath the hood, there was more dust than there is sand in the Thar.

The last photograph gives you an idea about the saddle. A split saddle with space in between to adjust the screw holding the spider-bridge to the inverted, spun-aluminium cone. By tightening or loosening the screw, one can dramatically change the sound of an instrument.

Returning to the saddle, you will notice that its top has grooves cut into it for the strings to hold it down, for better sound energy transfer. This is the only type of steel string acoustic guitar which has grooves cut into it. No other type of steel-string, acoustic guitar needs to have notches to hold strings in.

But I was a bit surprised to find simple rosewood pieces as the saddle. Generally, in ‘proper’ instruments, each saddle piece has actually a maple base and an ebony cap.

The idea is that both of these hard woods put together, will better aid sound transfer.

Anyway, I removed the saddle, being careful to make a mark behind each, at which end it would be put in. Check, you may be able to make out the ‘B’ (bass) and the ‘T’ (treble)

and then began the process of cleaning the dust-caked innards of the instrument. First, the spider-bridge itself was unscrewed, taken off, cleaned and kept aside.

But I had problems removing the cone from its cavity and I had to take this awl to prise it out.

It is the cone which vibrates once the strings are plucked and the vibrating diaphragm-like cone is what produces sound – much like the diaphragm in a speaker.

Ideally, you want the cone to just sit on the ledge meant for that. However, its sides should not touch anywhere.

The fact that the cone was not coming out on its own and needed to be prised from its spot meant that when played, the cone would not have been vibrating freely, and thus, not giving the volume and sustain as it should.

So, the first thing I did was to sand the rim of the cavity such that the cone just fell into it. Also, it could easily drop out if need be.

What followed was a thorough cleaning of the cone, for any dust on either surface would act as a damper.

Then, I turned my attention to the nut and try as hard as I might, it would not budge. Finally, when I managed to knock it out, I wondered what was holding it so good. It was super-glue, as I had suspected!

Just cleaning the slot with this specialised carbide chisel took 30-40 minutes. First use a plastic, hollow piece for a nut and then use super-glue to hold it in place. Why, Ashton, why?

And then began work on cutting to size and refining the bone piece that would go in its place. Of course, all measurements were taken and the nut sized to those dimensions.

With the nut in place, I turned my attention to the fretboard, caked with grime and DNA. The fretwires too, were tarnished and dull.

It’s always a good idea to get into the very corners of the fretwires and dislodge any dirt, grime, etc that may be lodged there. And a little re-crowning of the fretwires never harmed anybody.

Then, it was the turn of the headstock and the hardware there. The tuning machines were snugged-up and then given a healthy dose of the ‘love potion’.

And they came out looking like this

Later, I turned my attention to the damage in the body. The binding and the side had pushed in, pushing the top out and up, and no matter how much pressure I tried to apply, the top refused to go in. Afraid of making the damage more severe, I let it be and proceeded to fill the ugly break with a paste of sawdust and wood glue. 

Very pretty, right?

Yeah! I know, it must turn ugly before things start to look better. Here is the finished job, with varnish covering the sawdust-wood glue filling.

Certainly not an invisible repair but it is no longer in the state where it’s eye-catching and blot on the looks of the guitar.

The cover of the spider-bridge and the tail piece had been buffed to a mirror finish and re-installed with new, shiny little screws. As I looked, the strap buttons became eyesores and so, I swapped these

for these

The position on the heel was marked, drilled and the new strap button installed.

Everything was put back together and the guitar was strung up.

I was happy with the way things turned out, but more importantly, the customer was more than happy. It is that much more satisfying when you are able to satisfy someone who understands music and instruments, and about the work undertaken to achieve a certain result.

There was however, one sore spot. Right on the heel of the guitar, it seemed as if either the joint was opening up, or, worse still, the wood had cracked. I could not get the thinnest blade into it but I could certainly feel a lip when I ran my finger over it.

I have asked the owner to watch it carefully and bring it back to me the day he sees a larger crack, or, if he feels that the action on the instrument has increased.


Ghost in the ‘B’ string of this Martin exorcised!

Recently, I worked on my first Martin in India – one from the X Series. This was not the high dollar D-28 or D-35, but featured high-pressure laminate (HPL) back and sides and a Richlite fretboard and bridge.

Richlite is an incredibly durable, extremely versatile, and highly sustainable material made from resin-infused paper –  65% recycled paper content and 35% phenolic resin. Applications include furniture, cabinetry, cladding, skateparks, consumer products, signage, retail displays, restaurant tables, bar tops, and worktops, and is a choice material for a wide range of architects, designers, industrial manufacturers and product developers. 

I would be lying if I said that the guitar was not pretty to look at. Solid Sitka Spruce top, back and sides all in a matte/satin finish, the GPCX1RAE is a 20-fret Grand Performance model which sports a cutaway, rust Birch laminate neck, scalloped spruce bracing, a corian nut and a Tusq saddle (actually glorified plastic both), Fishman Sonitone electronics, chrome Martin closed tuning machines and the iconic Martin logo on the headstock in gold script ink.

It came to me because the intonation was shot on the ‘B’ string. And that meant only one thing: the saddle was not cut right. It was eyebrow-raising to see a Martin suffering from intonation issues, not that their guitars can’t have intonation issues, but because CF Martin & Co are usually very meticulous about everything.

As I pulled out the saddle from the bridge and measured it, to my horror, I found that the radius on it was 16 inches. I checked the radius on the fretboard: 16 inches!

Fretboards on steel string guitars (acoustic and electric) generally have a certain radius that is sanded into it by the  manufacturer and that radius is then mirrored in the tops of the fretwires, the saddle as well as the nut. When all of these elements carry the same radius, playing the instrument is that much easy and pleasurable. And acoustic instruments generally have a radius of 10, 12 or 16 inches. My problem was that I did not have nuts and saddles with a 16-inch radius! 

The way out was to take my 16-inch sanding block

glue on some #320 grit sandpaper

and with the top of the saddle facing the sandpaper and completely centred, go up and down the block (lengthwise) till I got a 16″ radius. By the time (some 45 mins later) I could dial in that radius, the new sandpaper looked like this

but the saddle looked like this

And this was the easy part. All that sanding on the top of the saddle meant that the grooves cut into the saddle for intonation were all but gone, and without those, this new saddle was useless. There was no way out but to re-cut the grooves on the saddle.

Then I turned my attention to the fretboard. Like I said, it was Richlite but it looked every bit ebony – though a very dirty ebony, for it carried enough DNA on it to map the entire family tree of the owner! Just out of curiosity, I checked the straightness of the neck and was a little surprised to see a little fall-away. 

Do you see the gap under the notches where the ruler ends? Compare that to the extreme left.

But there was nothing that could be done about it right away. This would require taking off the fretboard extension (the part stuck to the top of the guitar), making a shim to size and sticking it to the extension and then sticking the whole thing back to the top. Me not doing!

Instead, I decided to clean the fretboard. The thing about Richlite is that it is cleaned very easily. So, I took some warm water, some liquid soap and moistening an old t-shirt rubbed the fretboard and bridge clean.

That done, I turned my attention to the hardware on the headstock and snugged up everything as it should be. This exercise should be done by everybody, each time you change strings.

Everything in place, it was time to string this baby up. The owner prefers to use these strings and so they were put on.

But before I put the strings on, I did bevel the bridgepins so that string ball-ends would not catch on them.

The moment of truth had arrived. Now, to check the intonation on the ‘B’ string.

As I sat down to tune the guitar, I was very taken up by this little electronic tuner clipped to the edge of the soundhole. It was sensitive and very accurate.

You cannot even imagine how thrilled I was seeing this ‘dead-on-the-money’ reading of the open ‘B’ string and fretted at the 12th fret. All that effort had not gone to waste.


As I played the instrument, I was actually surprised at the instrument’s very warm, mellow, almost Martin-esque sound; beautiful sustain too. I had not expected this, for I had my doubts about how the HPL body would sound. 

I guess, we can owe the sound to the Martin expertise. Whatever the material, expect a Martin to sound like one. Maybe that is what you get when an enterprise as big as Martin, stays within the family for four (five?) generations.


Green Hornet in trouble; guitar neck a casualty when you leave instrument tuned!

SILLY ME!

Last time, I talked about how the bridge, the top get affected when you leave your instrument tuned to pitch, standing in a corner (or lying in its case) for months.

I was so taken up by Luc’s shattered bridge that it slipped me that besides the bridge and the top of the guitar, the neck of the guitar too is under a great deal of stress, and one of the many casualties of string tension.

As if to remind me, this guitar landed up on my counter, hours after last Sunday’s post went public.

And it was not just the joint near the heel of the neck opening up. As a result of that joint opening, even the fretboard joint to the neck was cracking open on every side.

The heel itself was showing the strain that it was under with the paint cracking at the joint. As a cumulative result of all that the action on the instrument – as you can see – was sky high!

This was actually a new instrument that had been bought and forgotten about.

This is another cheap clone of the Indian-ised Hofner. To know more, read this:

New strings and some TLC for this Hobner!

So, ‘The Green Hornet’ had a zero fret

and a very interesting bridge and saddle(s)

individual saddles for each string. The advantage: more accurate intonation. The disadvantage: God help you if you lose one of those plastic thingys!

And usually, such bridges are made of rosewood or ebony, and not stuck to the top but held down only by string tension, which also helps in the transfer of sound. However, this one was plastic with hollowed out ‘feet’.

How much sound was being transferred, you can well imagine.

In the last photograph, notice the tape? That was me trying to mark where the bridge would go, once I had managed to secure the instrument structurally.

Naturally, standing unloved in some corner, the fretwires were tarnished and depicted in what classic luthiery terms is referred to as ‘fret-sprout’. The fretboard wood on a dehydrated guitar shrinks, leaving the fretwires ‘sprouting’ out of it.

As can be imagined, it hurts the fingers playing an instrument with fret-sporut, and can, in fact, be a dangerous proposition.

Even the tuning machines were dry (without oil) and rough to turn.

With the bridge already off, I decided to take the pickguard off too, so that when I would lay the guitar upside down (to work on the neck), the instrument would lie straight.

Now, I was ready to operate upon the patient. A generous amount of good quality wood glue shot into the opening seemed to do the trick, for as I closed the opening, glue squeezed out of every crack.

And when I clamped it, there was more squeeze-out!

Once the guitar was clamped and the squeeze-out cleaned, there was little else to do except wait. But since I had the tuning machines exposed, I decided to put a drop of oil into them each and work it in.

I know you can’t see the oil but believe me it is there!

Still under clamps, I used painter’s tape to cover the repair area, except the seam line and a thin margin on either side. Then I proceeded to sand the exposed area with #1500 and #2000 sandpaper to remove any lip that may have developed during the glueing process.

And while the tape was still on, I did a touch-up job as well.

After the clamps came off, I was happy to note that the joint was near perfect and except if you saw it from very close, was nearly invisible. However, you must understand that this was a budget job and not meant to be invisible.

I opened up the truss rod cover

expecting the need to adjust the relief in the neck but I was pleasantly surprised to find that without the strings, the neck was very straight. That is what you wish to see.

Thereafter, I proceeded to work on the fret-sprout. This double-angled file was among the first few tools I made many years ago.

The 90 degree file cuts the fretwires very close to the fretboard, while the 45 degree file puts a nice little bevel on the ends. I erred and used just the edge to put the bevel on the fretwires: usually it works. However, this time, after going up and down the neck a couple of times, I could still feel the fret-ends.

And that forced me to bring out my little three-cornered file to (ad)dress just the fret-ends.

Instead of just polishing frets, I decided to give them a little crown

and that is the ‘star dust’ I collected

And then I wondered: if I had done so much, might as well clean up the fretboard before I proceeded to oil it.

Body buffed out, new strings, and the Green Hornet had been saved to sing another day!

Here are some ‘after’ photographs of the repair I undertook

Bottom line: DON’T LEAVE YOUR GUITAR TUNED UP IF YOU’RE NOT GOING TO PLAY IT FOR 2-3 WEEKS!


Whoa!! Not just suicide but hara-kiri!

Taking a break from reporting on repairs, I decided to dedicate this post to something that I have stressed off and on, but something the importance of which cannot be stressed enough.

I found the photograph above in one of the many guitar groups on Facebook. I wrote to the author, seeking his permission to use it as part of this blog and he kindly consented.

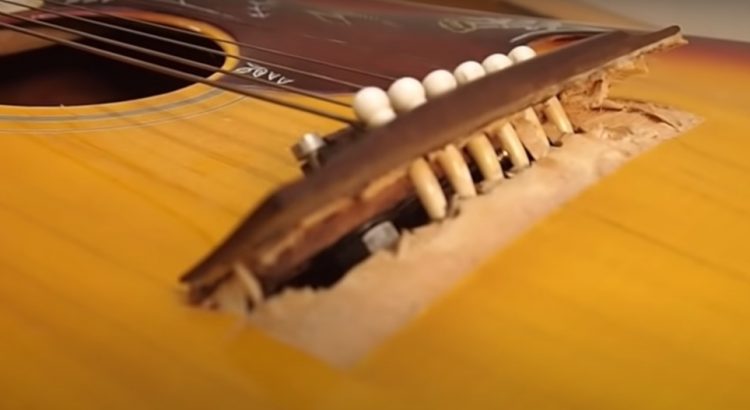
If you can’t read, Luc Barbeau wrote: ‘Shit happens! I had not played this guitar for a few months. I open up the case and this is what I found.’

This is not a frighteningly expensive Epiphone guitar, but then even the lowest Epiphone model isn’t exactly a cheapo. To Luc and all the readers of this blog, I say, “You should have de-tuned the guitar before keeping it away!”

What this means is that Luc now has to shell out money to have the old bridge removed, buy a new one and have it installed.

Let’s take another look at the photo that Luc posted and compare it to what the guitar may have looked like whole.

On the left is Luc’s guitar while on the right is another guitar which sports a bridge just like the one on Luc’s guitar (if you disregard the split saddle).

Personally speaking, I am not a great fan of string-through bridges, and feel more comfortable with bridges with holes and pins. My logic: under-tension strings (exerting a force of 60 to 80 kg) are always trying to pull away the bridge from the guitar top. The string-through design of the bridge only worsens the force of the strings by creating a fault line exactly where Luc’s bridge failed.

You could say that maybe the bridge had a faulty construction. Maybe! You could say that not all string-through bridges fail. True! But my point here is whatever the reason, why add to it by leaving the guitar fully tuned?

If you know that you are not going to be playing it even for two or three weeks, tune down your guitar half a step or one full step (for eg, E to D#, or D). But completely loosening the strings and having them flopping around on the fretboard, is a different recipe for disaster.

In Luc’s case, he was unfortunate that the strings ripped the bridge apart, but I have known cases (both string-through bridges and those with bridgeholes) where the strings not only pulled off the bridge but a portion of the guitar top as well!

And then there are degrees of damage that under-tension strings can do. If the bridge is not glued on properly to the guitar top, you will find the bridge lifting.

If the bridge is glued on properly, you will find the guitar bellying (guitar top lifting in the area behind the saddle). Admittedly, this is partly a fault of an inadequately constructed bridgeplate (size and/or material used), but then the string tension’s handiwork cannot be denied!

Generally, whenever bellying is seen in a guitar, you can be sure that there is some corresponding sinking in the area after the soundhole and before the bridge.

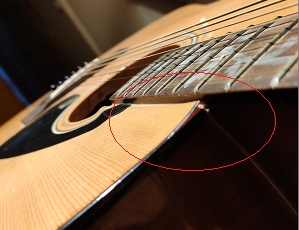
Do you see it? Again, while this could be the instrument counteracting the bellying, it could also be that one of the braces under the top have come loose/dropped off.

In any case, the fingerboard extension displays a phenomenon, what in luthiery is referred to as ‘dropping off’. (If it is) Stuck well to the guitar top, the fingerboard extension falls with the sinking top. You can see some of it in the picture above, and it is more evident below. Major operation correcting that too.

So, do not commit hara-kiri; in order to save yourself pain and money, de-tune your guitar before you stow it away for some time.

Do you recognise this logo? And why a set-up is important

After religiously striving for excellence in 50 instruments, made pretty much from firewood, does one get to work on a Martin, Gibson or a Guild guitar.

The photograph above is the Guild logo, embroidered on the semi-hard case of the Guild guitar I worked on recently. But more on that later.

If you ask me, CF Martin and Co, Gibson Brands Inc (formerly Gibson Guitar Corporation) and Guild together form the Holy Trinity of Guitar Manufacturers. Owning a guitar of any of the three brands is like owning a Rolls Royce or a Bentley. And yes, instruments from any of the three brands don’t come cheap.

Compared to Martin (1833) and Gibson (1902), Guild is a youngster, founded as late as 1952-53, when Alfred Dronge, a Polish immigrant to America, set up shop along with George Mann, former Vice President of Epiphone Company. Epiphone had moved out of New York and had left stranded many, many craftsmen and workers.

The Guild Company was registered on October 24th, 1952 with the stranded Epiphone craftsmen forming the work force backbone. The name was drawn from the craft Guilds of the Middle Ages and implied tradition and quality. Six months later, the first guitars emerged.

The company has changed ownership thrice till date but the tradition of guitar-making has continued without compromising build quality.

This guitar which came to me

was indeed a beautiful instrument. The M-240E, a petite guitar, is ideal for finger-style playing and light strumming, and that is what the owner excelled at.

Solid spruce top in satin finish and open-pore mahogany back and sides also in satin finish, the guitar was a stunner. Wouldn’t you say so?

Additionally, it sported a bone nut and bone saddle, provided by the manufacturers.

Though, I could not try out the electronics on board, I am sure they do wonders to the sound.

These chrome butterbean tuning machines had a gear ratio of 1:16, which made tuning a breeze, and then there was the the company-provided gig bag.

I know in the photograph it looks like any other padded case, but believe me when I say that I have never felt thicker padding on a guitar case…and I have seen a few. This thing was built to stop a missile!

But if everything is so good, what did the guitar come in for (and here I might add that it was just five or six months old)? 

Well, the owner, an accomplished player himself, was unhappy with how fretting ‘F’ and ‘Am’ was near impossible, and how the strings seemed ‘stiff’ on the first fret.

Immediately, I looked at the nut and even though it seemed fine from above, I knew the nut was the problem. As I turned the guitar to take a look at the nut sideways…

That gap should not have been there, and considering it was a Guild, it was almost shocking. That would have to be changed.

Another culprit could be the strings themselves. Three months is ample time for a set to be changed and the set on the instrument had lived there double that time. So, a string change was also in order.

As I took off the strings, I noticed the play-wear on the fretwires

while the fretboard looked a bit dry to me. Now that I had the strings off, I decided to give the fretboard some love potion and a buffing to the fretwires.

That is how the fretboard and bridge came out after I was done with it. 

However, as I touched the saddle to pull it out of its slot, so that I could clean the bridge, it moved in its slot. Not a good sign. I touched it again and again it moved. For sound transfer to be perfect, saddles should sit as snug as a bug in a rug in its slot.

One should never have the need to force a saddle into its slot, or, for pliers to be used to unseat it. Yet, without strings, if you turn the guitar over, the saddle should stay in its slot, and not fall out.

I took my X-acto knife and tried to insert its blade in the slot with the saddle still in there. Sure enough, not only was the saddle thinner, it was a shade smaller than the saddle slot.

While the photographs above show the space around the saddle, they are proof to the owner too. I just called him and told him about the problem and that ideally, the saddle should be changed to get the best sound. He took my word for it and asked me to change the saddle too.

As I took the nut out, I noticed an odd shine in its slot. It seemed like someone had put some super glue, let it dry and then put the nut in, as if to raise it up in its slot.

The darker portions in the slot are not shadows but what appeared to be super glue. Frowning, I went to work on the slot with my special miniature chisels. As I scraped the slot clean, whatever was in the slot, flaked off just like super glue would.

A lot of measuring and some marking followed, and I got ready to sand the nut to my markings.

Likewise the saddle

Once done, everything was near perfect and the guitar was ready to be strung up. The owner chose these.

Tuned to pitch, the guitar sounded fine to me, its intonation was slightly off, which a little bit of tweaking brought near perfect. The relief in the neck and its action was also brought down very slightly.

And this is why I keep repeating that an initial set-up by someone who knows what he/she is doing, is imperative for the instrument to play well. After that it is advisable to bring in the instrument once a year to have it checked that everything is where everything should be.

Provided that the instrument is built properly, a set-up will ensure that it plays easy and gives the player as much joy as it should. 

For those of you who feel that their guitar plays well, wait till I have worked on it, and then you can decide when it played best: then or now!

As such, the set-up includes adjusting neck relief, giving the best action possible (given the instrument’s neck angle), working on the nut slots (if they are too shallow, or if they are not cut right), checking the hardware on the headstock (for any loose screws, etc), oiling the fretboard and the bridge, and burnishing the fretwires. 

For a small fee, you will be amazed at how good your guitar can play. Of course, you can get all of this done at any time of the instrument’s life but ideally, you should get it done as soon as you buy the instrument. Why? So that you don’t get put off by high action, fret buzz (which is not always strings hitting against the fretwires), or a badly cut saddle which does not sit very well in its slot.   

The owner was pleased with the results and conceded – rather grudgingly – that the guitar was playing “much better”. He promised to contact me after a few days with a complete report, when the guitar settled down a bit. 

This is how this baby looks now

If only floating bridges weren’t so much work!

Though archtops and floating bridges go back to the early 1890s, it wasn’t until Gibson came up with the ES-150 (the first electric archtop, in 1936) and its later variants, that they became popular. Whether swing and jazz movements, a rage during that time, were a result of this evolution, or whether the music craze of the times necessitated the arrival of the ES-150 – we’ll let the historians settle that one.

The Gibson ES-150

Two, maybe three decades later, the guitar design must have landed in India and from that time to date, cheap imitations masquerading as guitars, with zero frets and floating bridges, keep entering the market month after month. With each lot, the corners are cut some more, making them bigger nightmares for gullible (ill-informed?) customers and yet bigger nightmares for repair persons like Yours Humbly.

One landed on my counter recently, one which probably had been stood in a corner and was forgotten about. In the interim, it managed to lose half of its floating bridge – the top portion on which the strings ride.

The other half would have got lost in time too, had not the young owner, innocently, super-glued it!

With a sudden awakening of a passion for getting on with his guitar journey, he brought me the instrument…and a replacement bridge.

He also brought me other parts

And, of course, after all this time, the fretboard was very dry and the fretwires were badly tarnished.

But what needed attention the most was the nut on the instrument – plastic needless to say – but one which had fallen prey to the experiments of the young man. No matter how hard I tried to pry, prise and knock it out of its slot, it refused to budge. A phone call confirmed that indeed the reason for it being so unmoving, was super glue!

Out it had to come – dead or alive – and it did.

And even after coming out in pieces, it insisted on leaving its mark – a matchstick: probably used to raise it on the treble side.

Finally, after much filing, sanding and even more persuasion, I got the nut slot clean of all extra pieces of wood and glue. However, when I placed a new nut in the slot, there remained a gap between the top of the nut and the fretboard enough for you to sink the Titanic in. The bottom of the nut, however, sat flush in its slot.

Now what? I turned to my discarded plastic cards and shimmed it and filed in a slope that would make the nut sit perfectly in its slot throughout its height.

The last photograph in the sequence shows you just how much wood glue (no other glue!) is to be used to keep the nut from slipping and sliding in its slot.

Then it was the turn of the fretboard and fretwires to get the much-needed attention. Some ‘0000’ steel wool, some boiled linseed oil and lots of elbow grease and the result was 

And at that point, my friends, I knew my troubles were about to begin. Removing the (super-glued) bridge and then having to bring down the new one to the height required, it wasn’t going to be as easy as tic-tac-toe!

In a normal steel-string guitar, you adjust action by pulling out the plastic/bone/tusq saddle and sanding it. Here, I had to sand the entire bridge!

With weakening pulse, I sharpened the edge on my screwdriver and gently got it under a corner of the glued-on foot of the bridge. A little tap and the bridge popped off, and as I expected, took a bit of the paint with it. I wasn’t too worried about that for the new bridge would ideally sit exactly at that place.

However, I did not take off the old bridge before marking where exactly it sat (with some painter’s tape).

Looking at what I had just pulled off, I just shook my head.

The two portions of the bridge with the rectangular hollows are called the feet of the bridge, for the bridge ‘stands’ on the top of the guitar with these. The function of these is primarily to conduct the energy of the strings to the top of the guitar. But when you have hollows, how much conduction was happening, is anybody’s guess.

Now would begin the really painful stuff, sanding the new bridge to the correct height. For that, I would have to string the guitar, because without the strings how would one know how tall the bridge was and how much it needed to be brought down. And because the strings would have to be strung through the tail piece, I would have to leave them on and then work.

The tailpiece

But why all that hassle? The top had an arch to it (and thus, the name ‘archtop’) and the feet of the bridge needed to conform to it for the bridge to function properly and for it to transmit sound properly. So, all the sanding that had to be done, would have to be done ON the top itself!

Taking measurements with the new bridge in place, I noticed that the treble side was much higher than the bass side (in normal guitars it is the other way around because the thicker strings need a bit more room to vibrate than their plain peers). So, what it translated to was that the treble side foot would need to be sanded much more than the bass side. One more problem!

I started off like this to get some curvature on the feet

and soon taped off the area of the sandpaper falling under the bass side foot of the bridge.

For six hours, over two days, I rubbed the treble side foot of the bridge on the sandpaper, going only as fast as the strings chaffing my knuckles would allow.

What made the job even more difficult was the fact that the bridge was made of ebony. Ebony is a beautiful wood but it is also the hardest wood around. Sanding ebony is like trying to chip steel with your spoon, and it is exactly for this quality of hardness that ebony is the preferred choice of high-end guitar makers: the hardness helps in a wonderful transmission of sound.

In between I would pull out the bridge and mark the treble foot like this

and then rub some more, pull it out and check if I was sanding correct, checking if inadvertently, I wasn’t sanding one side or one corner more than the other. If I would have been, the pencil marks would have remained on the portion coming least in contact with the sandpaper. Thankfully, each time I checked, the pencil marks had disappeared.

When I was satisfied with the bridge height, I finally strung up the guitar. The nut-end of the guitar looked like this

To clarify, a floating bridge is given that name because it is NEVER fixed to the top but only held down by string tension.

But it was all worth it because the young man was happy with the action, with the overall sound of the guitar and how it looked.

I think I heard him mumble ‘Very playable’!


A damaged bridgeplate & the evolution of Jolly JIMM!

Regular readers of this blog are familiar with how peeved I get with cheap (Rs 3K – 3.5K) toys that masquerade as guitars.

New readers may understand it this way: granted that you wish to learn how to play the guitar and you aren’t sure whether you will be able to sustain the drive to learn it, is it alright to buy a toy to experiment, or does it make sense to buy something in the Rs 10 – 12K range? PARENTS, PAY ATTENTION!!!!

Not all cheap instruments are bad, but generally speaking, a cheap guitar is always going to give problems because it’s constructed by cutting corners (literally) to cut down production costs. A (relatively) expensive guitar (pricey ones start above 25 -28K and there is no upper limit!) will cause fewer problems and serve you a lifetime and then some. What was that Hindi saying about a cheap buy making you cry every step of the way, and an expensive buy making you cry just once??!!

So, if you buy a (relatively) expensive guitar but are unable to sustain interest in it, has the investment gone down the drain? Not so. You can always pass it on to a younger sibling/nephew/ niece, or sell it online on exchange, buy/sell websites, or sell it to a music school. You should be able to recover most of your investment, if not all of it.

In contrast to all that I have said above (and now that my rant is over and I am breathing much easier), let me introduce you to Jolly JIMM, an exception to the cheap=bad rule. It was bought for Rs 3.5 K some half-a-decade ago and came in for action correction and attention to a crack along the bass-side seam of the lower bout, caused by the guitar being accidentally dropped.

As I inspected it, I noticed that while it was a long crack, only at some places did it move under pressure. I wicked in some thin CA glue to stabilise it, and then put on some spool clamps that I had made many years ago.

I also noticed that the instrument wasn’t the usual ply-board that it was constructed out of but what looked like basswood to me. Nice! Usually guitars in this range are built out of ply-board.

Also, the bridge was lifting. The front line on the chit of paper shows how much it went under on the treble side of the guitar, while the bottom line shows how much that end went under the bass side of the guitar. But since I felt it would be some time before the lifting bridge would cause any problems, I decided to leave it be.

Of course, it had the ‘mandatory’ plastic nut and saddle. Those would go and be replaced by bone elements. The guitar seemed built well enough to be able to sport them.

Also, the bridgeplate inspection revealed that it was woefully inadequate in its dimensions. Consequently, while some bridgepin holes were half on it and half on the top, others were completely on the top. But all through, the ball ends had eaten into wherever they came in contact with. These indentations were deep enough for the ball ends to get stuck in, and while one was trying to take off the strings, they refused to budge!

What a proper size bridgeplate should look like

Can you make out? Anyway, that needed to be attended to.

But what caught my attention immediately was the strap tied to the neck of the guitar.

And here I will go off on another bender. The tying of the strap to the neck like this, IS NEVER TO BE DONE!

Why? Understand this! Often, guitar necks are made of three pieces of wood glued together, rather than from a single piece of wood. The idea is that the joints make the neck stronger than a single-piece neck.

Try and see if you can catch the joint line in between the two red lines. So, there is a joint right where the headstock meets the neck, and a second joint where the neck meets the heel. By tying the strap along the headstock, you will be forcing the entire weight of the guitar on that joint, and it is not uncommon in such instruments for the neck to break just at this joint.

So, included in the work on the instrument, was the addition of a strap button too. The plastic one went and a steel one replaced it at the base of the guitar, while a strap button was screwed on the side of the heel of the guitar.

Now for the serious bit: attending to the bridgeplate. Initially, I had thought of adding a thin, long piece of wood and stick it against the bridgeplate along the side, and to the top along the width of the piece.

But I had to drop the idea because I would never be able to make a piece of exact thickness and would have to plane it down to the thickness of the bridgeplate once the piece was stuck inside. The problem: I didn’t have a plane that small which would be able to go inside through the soundhole (my hand and arm included).

So, I thought up this: saw dust and wood glue mixed together and applied to the deep indentations.

And what would I apply it with? Ice-cream sticks! But I failed with various lengths of sticks because I could not straighten my arm enough inside the guitar.

And so, the trusty fingers it was with which I applied the mixture.

Once I was satisfied that I had applied enough, I let the instrument sit easy and breathe for a good five or six hours before even looking in its direction.

Then, the rest of the work was relatively simple. Clean the fretboard and bridge and oil it, and polish the frets. Amazing what a little bit of attention and love does.

A new bone nut and saddle were installed and the nut was lubricated with graphite to facilitate easy string movement.

And when you have invested so much time and effort into it, a little more wouldn’t harm. So, the front of the headstock was cleaned very properly.

Meanwhile, the open tuning machines were oiled and the oil was worked into them properly

and a brand new set of strings was put on.

That is how Jolly JIMM looks now and it “sure sounds good”. And that is not me saying it, but the owner!


A broken truss rod and straightening a bowed neck!

GREETINGS GUITAR GEEKS! As promised, I’m back! 

I hope all of you had a great time putting 2020 to sleep and a wonderful time ushering in 2021. May it be a year of health, happiness and prosperity for all.

During this ‘break period’ I worked on a clutch of guitars, but allow me to begin on the note I signed off: 

With that being reiterated, let’s introduce you to the job at hand.


There’s one instrument on the bench and its mirror image stands in the corner. The one in the corner I can take apart – part by part – and have allowed it to take up premium space for the sole purpose of explaining to customers and people in general, guitar anatomy and pointing out problem areas in other instruments.

One look at it and it was clear that the owner was conscious about the evils of counterfeiting. This one was called ‘Fendar’ but the owner had taken the time and effort to cover up all branding. 

To the owner: Even though the style in which the name is printed is very similar to the famous American brand, you needn’t have worried about copyright infringement. The original is spelt ‘Fender’!

So, the young man who brought in this guitar sheepishly admitted to it having been a hurried purchase some years ago. Now, more informed and wiser, he understood his mistake but still wanted to see if this instrument could be salvaged. 

The problem, as he explained it, was two-fold. One: the truss rod didn’t work, and two, the neck had way too much relief (and thus very high action) for the instrument to be played comfortably. 

Yeah! The action was reeee-ally high. Here you can also see another effort to hide the branding on the instrument.

He also mentioned something about either the ‘B’ or the ‘G’ string not intonating properly or going out of tune (I forget).

One look at the bridge/saddle area and a very discriminatory ‘Humph!’ escaped my lips.

You see why? 

Those of you who have been regular readers of this blog, know about the angst caused to me by nuts and bolts in bridges and plastic nut and saddles . Here I was seeing both in the same frame! The area encircled in red is where I could see a hairline crack in the saddle. 

I had decided to throw out this saddle and put in a new plastic one in its place to keep the budget as low as possible. Using only fingers, I tried to remove the saddle from its seating, but it would not budge. Gripping it with pliers, this is how it came out.

I was convinced that there was something gripping the saddle in the seating and closer inspection revealed remnants of  what could have been some sort of glue. Measuring the saddle length and width, I was surprised that it was much, much smaller than what I had. In order to put in a new one, I would have to shave down a new saddle much in height and length and thickness. Too much work!

I just super-glued the two parts of the old saddle and polished it up, and it was as good as new. However, the seating did need attention which I gave with 80 grit sandpaper and some elbow grease.

All this was the easy part. Now, began the real work.

Trying to work the truss rod, indeed, it did not work. My guess is, it never did, even in the shop from where it was bought. If I tried fiddling with it too much, the nut capping the truss rod would come off. So, I left the truss rod alone almost as if it did not exist!

The process that I tried to straighten the neck, works (usually) when you take off the fretboard, and actually focus on the wood of the neck. But then, on this instrument, investing so much time and effort would have been a waste. I still tried it with the fretboard on because I wanted to see if it would work, and besides, there was nothing to lose.

It’s a process of applying clamp pressure under hot and moist conditions. Moisture was provided by a portion of a leg of a pair of jeans soaking in water, while the heat was radiated through heat guns.

As fate would have it, one heat gun got so hot that it caught fire, melted, burnt the guitar neck rest (the block of wood) it was resting on. The molten plastic burnt the mat that I lay instruments on, and while I was fighting the fire, some of the molten plastic landed on me too.

Suffice it to say that disaster was averted, and I ordered another (better, sturdier) device to carry on with the work. For four or five days, I kept feeding the guitar neck water and heat intermittently and then let it cool completely.

Thereafter, when I released the neck from bondage, it had a bit of a bow in the reverse direction, such that it would certainly make the strings buzz. Believe me, I was very happy to see that because I knew that once I strung up the guitar, string tension would pull the neck straight.

With just the stringing left to be done, I cleaned up the fretwires and the fretboard and oiled it, exposing the pretty wood grain of the fretboard.

Look carefully at the background and you can probably see the burnt neck rest and the portion of the matting that got burnt in the fire episode.

As I strung up the instrument, I noticed to my horror that the neck not just straightened but much of the bow returned in it. Ah, well, I tried!

But I was pleasantly surprised when the owner came to pick up the guitar and pronounced that it was much better and very playable.

So much for happy endings!

With prayers for a blessed New Year!

Just a short note this time to announce that I am taking a break from the blog to rejuvenate myself, to collect my thoughts, and to spend some time with my family. The next blog post will appear on January 10, 2021.

However, your favourite acoustic guitar repair shop – Lucknow Guitar Garage – will continue to remain in your service to the best of its resources and my abilities.

But I would like to leave you with a smile and a thought to ponder over:


Have a great year-end, enjoy yourselves but do take care of yourself and your loved ones!  

Yama-ha-aa-aa-ha-ha-ha – the one that refused treatment

In all my years into guitar repair, I finally met the guitar that refused to be treated and was as obstinate as only it could be.

You will recall that I had put this F310 into three types of vices and for 14 days.

But, I am sorry to report that it spurned all my advances and its belly sprang back to where it was, as soon as I put on a single string.

You will also recall that I had decided to put on .010″ – .046″ (ultra light) strings but still…

Sadly, it left me with that awful belly that leaves the action a mile high. I didn’t even bother to measure it. You can see that in the photographs.

However, there is still one treatment that can be given, which will be like a permanent fix and one which can be adjusted too, should the belly start sprouting after a few years. It’s called the JLD Bridge Doctor.

It is a little wood contraption that screws on to the underside of the top through the bridge and the bridgeplate. It has a wooden dowel that extends through this device and rests against the end block of the guitar.

A hex screw in the unit allows you to dial in the amount of tension required (working through the soundhole) in the dowel which pushes against the end block, pulling the top down flat.

BUT…I wouldn’t have recommended it on THIS guitar, or any guitar below 25-30K – or – if you are not totally, completely, sentimentally attached to your instrument. On Amazon, the contraption retails for around Rs 8K!!!! And then, there is the cost of having it installed.

For those of you who would like to understand how this functions, here is a good link:


3/4th Ibanez in for string change but danger lurking nigh!

I consider myself to be a professional and so, I do exactly what the customer wants me to do: not one bit less, nor one bit more. However, I do go over the instrument with a fine-tooth comb and if I find something that requires attention, I bring it to the notice of the customer. And that is where my job ends.

If the customer takes my advice, the instrument will go back in ship shape; if not, the second visit is likely to cost him/her a lot more, because in the time that would have elapsed between visits, the problem would have certainly deteriorated, causing greater damage!

But, frankly speaking, such situations are a predicament for me. If I insist on a job too much, I come out appearing money-minded, as if I want to make as much money out of him/her as is possible. If I do not, I feel the instrument will suffer, as will the customer (financially, later), most especially when there is a sentimental value attached to it.

I came face-to-face with my dilemma recently when this Ibanez (model no MD39C-NT 3U-04) came in with a broken G string, for new strings and for action correction.

As I poured over the instrument, the micarta nut and saddle caught my eye and I suggested to the customer that it would be a good idea to switch to bone. Since the customer politely refused, I did not press the matter further.

While the customer was there, I got so involved with the minutiae that I failed to spot the thing staring me in the eye: the crack in the bridge! Later, I called up the customer and asked him whether he knew about the huge crack in the bridge? He did and he did not want me to work on it.

I even suggested that I could put in an old G string and get the guitar functional, but the bridge needed immediate attention. However, the customer, again, very politely, decided that that work could be done another day. So be it!

My reading of the situation is that the bridge on this instrument is going to last unattended a maximum of 12-18 months. After that the instrument itself will be good firewood – unless we can get Ibanez to send us a replacement bridge. Possible, but not entirely sure whether they do that.

Anyway, as I tuned up the instrument and played it a bit, I noticed that there was an odd flatness to its tone (sans resonance). And even though it was not a full-size guitar (it was 39″, called a 3/4th guitar) and had a cutaway too, I have played other instruments of the same model. I didn’t remember the tone being so without oomph.

I put it down to the material of the nut and saddle and possibly a badly cut nut (the slots). But since the customer had refused the suggestion of a bone swap…(shrugs!!!).

You must have heard of that saying: there’s many a slip between the cup and the lip. Well, here was my slip between the cup and lip.

Just as I was set to take off the strings, my mechanised string winder went kaput! There was little else that could be done except take the manual route, and so the old string winder was pulled out, dusted and put to work!

As far as action correction went, the action wasn’t too bad to start with.

But since the customer wanted it lowered, lower I did. Thankfully, the saddle had enough height in it for me to perform the operation.

And while the strings were off, and as I repeatedly advocate, this was the perfect time to get to places where one can’t get to with the strings in place. Also, the perfect time to snug up the hardware on the headstock.

Again, there wan’t much tightening required, and if at all, some keys needed loosening a bit.

That done, I turned my attention to the fretwires and the fretboard. It is amazing what a little bit of attention, some boiled linseed oil and lots of elbow grease can do.

With snazzy new strings, the guitar looked good and to the owner, sounded well. He was very happy with where I had got the action to rest. He was happier when he got 20 per cent off the cost of the strings I put on.

But my fears for the guitar persist.


POSTSCRIPT: This was the third guitar to come in as part of the ‘Diwali Bonanza’ campaign being run at Lucknow Guitar Garage. For those who don’t know about it, there is a free guitar care camp on since Diwali day (Nov 14) and will last till the end of the month. You can get your guitar’s tuning machines tuned up, or get its body buffed, or fretboard nourished, or action corrected, or all of the above for FREE. Additionally, you get 20 per cent off on whatever accessories you purchase – except bone saddles and nuts!

So, what are you waiting for?????  

Compensation, intonation & what a truly compensated bone saddle can do

It struck me just the day before yesterday that all these years, while I have been talking about swapping plastic elements for a bone compensated saddle and nut, I have never really explained compensation, what it is, its importance; intonation, and what part a compensated saddle plays in intonation and all of that.

Before we launch into any of that let me put this out there that these are issues best left to experts – people who really know what they are doing – as opposed to music shop salespersons.

Simply put, compensation means that the saddle is placed at an angle to the strings rather than perpendicular to them, to give more length to the thicker (lower) strings and lesser for the thinner (high) ones.

Whenever a string is pressed to a fretboard, the tension in the string increases. This causes the fretted note to become sharp (slightly) compared to the open string note. This must be ‘compensated’ for. To compensate for this sharpness, the distance from the nut to the bridge saddle is made slightly longer than the stated scale length for the instrument. This lowers the pitch of the fretted notes slightly.

In an acoustic guitar, there are the many ifs and buts that must be factored in before we can say that a saddle is truly compensated. These include how far the string must be pressed to the fingerboard (action), the thickness (gauge) of the string, the tension (tightness) of the string, the scale length, and a person’s playing technique.

In the process of addressing a player’s particular playing style, a knowledgeable guitar technician will cut more accurate notches into the saddle, to properly  ‘compensate’ each string. After the tech finishes working on the saddle, the top of it will have a shape akin to a lightning bolt.

Compensating notches on a saddle are generally seen where the e, B and G strings rest. This adjusts the length of the string ‘compensating’ for accurate ‘intonation’ so the guitar sounds in tune when notes are played down the fretboard (closer to the guitar body). The biggest culprit is the B string, which is quite a thick plain-steel string, and on a compensated saddle, it is given a bit more length compared to its neighbours (e and G strings).

A non-compensated saddle doesn’t have any grooves and is flat across the surface.

The guitar tech is then supposed to check the pitch of each string at the 12th fret (the halfway point of a string’s length) to ensure that it’s in tune with the pitch of the open string.

Intonation is the extent to which a particular note continues to remain in tune – down the fretboard – as opposed to sounding flat (lower) or sharp (higher). Usually, intonation issues are seen while playing down the fretboard.

The closer a string is to the frets, the less it needs to stretch since it doesn’t have far to go. This means that low action tends to produce more accurate intonation. And thus, intonation issues can be subtle or dramatic depending on a guitar’s set-up.

And that is why it is imperative to have a guitar set up by someone who knows what he/she is doing as opposed to someone who is just a salesman in a guitar store.


Did you know there are compensated nuts too?

At the nut, where the strings rest before being held by the tuning machines, a thorough inspection is critical. String slots that are not shaped properly, too shallow, or too deep, and the improper placement of the nut, will adversely affect intonation on an instrument.

So, when the compensation on the saddle is near perfect, and yet the intonation on the guitar is off, then compensation in the nut is dialled in. That generally happens because the construction of the guitar itself – the placement of the bridge on the top – is faulty. 

The only way to tackle compensation at the nut is to throw the old nut and put in a fresh bone piece, which is then cut to the specific needs of that guitar. The comparative price of taking off the bridge and re-glueing it in the right place vis-a-vis making a compensated bone nut is more or less the same, BUT, a compensated nut is not so big an eyesore as a bridge that has been shifted from its original position. That can be seen from a mile off, unless you decide to refinish the top.  

The photographs below show you (clockwise from left) a regular nut and the various modifications that can be made to nuts (compensation) to make the instrument play perfectly in tune.

An initial set-up on this beauty! Did you get one done on yours?

Before you drive your swanky new two-wheeler/four-wheeler out of the showroom, the mechanic there, almost always, makes some very small adjustments to the engine that makes the vehicle run the best that it can.

No two vehicles, even the same variants from the same manufacturer, are the same. And so, some may require a little more attention than the last one.

Guitars (acoustic ones especially) are not very different. They too MUST be ‘tuned-up’ before you tune them up.

I often draw this parallel, and I’m going to again, just to emphasise the rationale behind it.

Except for boutique guitar makers (who typically make no more than a couple of dozen guitars in a year), guitars roll out in the hundreds. Do you think manufacturers can possibly ‘tune up’ guitars before shipping them out? In the time they spend on these minor alterations, they’d be able to roll out 10 more guitars!

And even if they did, would it suit YOU, specifically?

What about retail music stores? Don’t they do it?  In the West, they do it without saying. However, here, in India, a salesperson who doubles up as a ‘guitar technician’ can do precious else except change strings and work the truss rod. Chances are that he won’t be able to pick out a solid top instrument from a bunch of guitars. Now, I am sure there are exceptions to the sweeping generalisation that I have made, but they are few and far between.


So, why is that fine-tuning required at all?

As I explained, the assembly line keeps pumping out acoustic guitars and the one you buy could well have been taken by the previous customer, or the one coming in next. You play finger-style (for example) but the next person is a hardcore rhythm guy. Though both of you may be able to play that instrument, you certainly won’t relish playing it because it has not been ‘set-up’ to your playing style.

A new guitar – and especially for a learner – MUST be set-up so that the play-ability and the instrument’s sound appeals to him/her, and does not become the reason for him/her becoming disenchanted with it.


Can only new guitars be set up?

The short answer is ‘No’! Guitars can be set up at any age. If you have never got your guitar set-up, you’ve learned to play on it, and you have acquired a certain degree of proficiency, you’ll be amazed at how well and how comfortably a guitar can play once it has been set up.

In fact, serious players take their guitar in for a set-up at least once a year. It’s like your routine check-up by the doctor. If there is something that needs tackling, it gets done then and there, before it turns into a bigger problem.

Getting your guitar checked periodically by a person who knows what he or she is doing, is a good habit because wood is an organic substance and it keeps changing with changing seasons, weather patterns, temperatures and humidity. The slightest expansion, contraction of wood can have a big impact on the instrument’s action and play-ability.

And now to this beauty lying on my counter (and apologies for the long lecture).  This is a three-piece back (usually backs are made of two pieces) and like the rest of the guitar – beautiful!

Some of the tuning machines were slightly loose – some screws and some ferrules – and were duly snugged up.

It’s a brand new, very well-constructed guitar. There was lots of extra relief in the neck (the curvature of it) which had raised the action (the gap between the bottom of the string and the top of the frets). All it needed was for the extra relief to be taken out.

Once the relief was where I wished it to be, I checked the intonation and it was off by some distance on the B, A and D strings. I also noticed that despite dialling in the right relief, the action was still a bit high – both at the nut (1st fret action) and at the 12th fret. That called for the nut and saddle to be pulled out and shaved down a bit.

I did notice that the nut and saddle were made of micarta – a man-made material which is much better than plastic, but still, not a patch on bone. (While you’re looking at the nut, do admire the fine binding on the fretboard).

So, I talked to the owner and convinced him to have a bone nut and saddle put in place of the micarta elements. I removed those and put in a truly compensated bone saddle and a matching bone nut.

Once I was through, the instrument had a wonderful action – one that the owner would love to play on.

But as I ran my finger along the fretwire ends, I noticed many were catching the finger: a very dangerous situation. I took the fretwire-end file that I made myself and sanded the ends flush with the fretboard.

And while I was at it, I took off the strings and oiled the fretboard and gave a little rub to the fretwires too. Purrr…fect!!!!!!!!!!

Also, I noticed that the strapbuttons on the guitar matched the tuning machines – gold – and there were two of them and not just one as most manufacturers provide.

What made me happier was the fact that the shoulder strap button was exactly at the spot where I like to see it: on the side of the heel farthest from the player (right-handed in this case), when held in the playing position.


You may have noticed that nowhere in this post have I mentioned the name of the instrument that I worked on. No photographs, no nothing! That is because the owner requested that the identity of the guitar be kept secret as far as possible. However, he did allow me to document the work that I did on it!


Bolts in bridges – a recipe for disaster; when will Indian guitar manufacturers learn?

Around the time when America was at the peak of The Great Depression (1929-39), Gibson, then a 30-something-year-old guitar manufacturer, incorporated a few design changes that stuck on for a few decades. One of these was the use of nuts and bolts as fastners in an acoustic guitar bridge.

How do you know if your bridge has nuts and bolts in it? Look for two white dots, one each on either side of the bridgepin holes (In the photo below, there are three).

When Gibson launched the concept, they covered up the bolt heads with a little, round piece of Mother of Pearl. The economics of it soon forced them to discard Mother of Pearl as an option, and later versions used celluloid instead.

Luthiers and the global guitar community is still debating whether the rationale was for the bolts to act as locators or fastners. Gibson itself says that the idea of the bolts was to locate the bridge exactly where it needed to go.

As fastners, the idea was that the hardware would help hold the bridge securely to the top, even if the glue dried up. How wrong that thinking was, we’ll soon see.

As locators, the idea seemed to be that the nuts and bolts would help keep the bridge in exactly the spot that it needed to be, disallowing the possibility of bridge creep under clamp pressure (If too much glue is used in bridge glue-up jobs, before it cures, the glue acts more like a lubricant, allowing the bridge to shift from its actual position).

That, according to me, is flawed reasoning. The same job could be done easier and almost as well with two bridgepins stuck in the 1st and 6th bridgepin hole. If there was a fear that the pins would get stuck in their holes, they could have been waxed.

Seen with the help of a mirror taken into the guitar body through the soundhole, the whole bridgeplate assembly would look something like this.

Those backing the use of nuts and bolts aver that it improves sound quality. I will not dare comment on that for I have never had the occasion to study differences in sound of a guitar with a bridge affixed with nuts and bolts, and one without.

What I will say with a certain degree of conviction is that the difference in sound – if any – would be so minuscule that the average player would never be able to make out the difference in sound of a guitar with the hardware and without it.

In fact, I will go out on a limb and say that if the hardware is removed from an instrument and it is given to the owner to play, not even he/she will be able to perceive the so-called change in sound!

Why nuts ‘n’ bolts are dangerous

In any acoustic steel string guitar, the force exerted by the strings is nearly 80 kg. Due to that constant 80-kg tension that the strings exert, it is a natural process that with the passage of time, the belly of the guitar (the area directly behind the bridge) starts lifting. Nothing very dramatic, but it is a very gradual but perceptible change. This happens when the bridge is stuck very well to the top.

In instruments that do not use nuts and bolts and the bridge is not stuck very well, the bridge just lifts and finally comes unstuck.

However, in case the bridge is not stuck very well and lifts, and it is being held down with nuts and bolts (yes, even with nuts and bolts, the string tension will lift the bridge), the hardware will rip through the bridgeplate (below the top) and the top. The owner, then, is left with two options: throw the guitar away, or, have it repaired at great expense. This is major surgery we are talking here!

So, why do manufacturers continue to hold down bridges with nuts and bolts? The world over, most manufacturers have given it up as a bad idea. Only in India, do we find manufacturers clinging on to it. Simply put, there are two reasons for them doing so. 1) It is easier to use nuts and bolts than to REALLY clean the two glueing surfaces of all paint and finish to get a good wood-to-wood joint, and 2) in the mistaken belief that they are lending solidity to the structure!

Here’s one from an Indian manufacturer that I had the misfortune of looking at. Not right away, but a couple of years or so down the line, I won’t be surprised if it comes to me with a ripped top. The lines on the paper strips represent the amount the strips slip under the bridge.

I won’t name the manufacturer here, but I am sure they will be able to recognise their product.

The famed Gibson company may have learned its lesson and discontinued the practice of fastening bridges with nuts and bolts. When will Indian guitar manufacturers learn?

A facelift after taking ‘Irene’ out of a spot of bother

This Fender CD-60 came in with a complaint of higher than comfortable action.

Sure enough, as I checked it, the bridge was rising under string tension and even without it.

Not much, but it was.

As I went about checking out the guitar, I could only nod my head in appreciation. What added to the pleasure, was the fact that the owner was an aware individual and had taken good care of the instrument.

What pleased me most was the discovery of a proper-sized piece of hardwood used as a bridgeplate (reflected in the mirror).

I know I have said this before, but let me repeat myself for the sake of first-time readers of my blog. The bridgeplate in your instrument determines how your top will respond to string tension after a few years: how soon it will develop a belly. That the bridgeplate also plays a sure part in the quality of sound produced also cannot be debated.

Thus, the bridgeplate is the most important thing in an instrument to be looked at while buying a new one, after the quality of the top and its braces. And since most people don’t know this fact, manufacturers (Indians especially) will use anything – plywood included – to put a ‘piece of wood’ there. No wonder then that you don’t find a ‘bridgeplate’ entry in the product brochure of even the most acclaimed names in the business!

What a proper size, hardwood bridgeplate should look like

A healthy sized, hardwood bridgeplate will easily counter string tension and prevent a belly from developing (thus keeping string action in check) for at least 8 – 10 years. An instrument with an inadequate (-ly sized or constructed) bridgeplate will start sporting a belly in six months or even less!

But back to the instrument on the counter-top, the first order of repair was to re-glue the lifting bridge.

But for that I needed to take the saddle out of its slot. As I touched the saddle, it moved, showing that it wasn’t sitting in its slot very snugly. Sure enough, I could slip in a fret protector behind the saddle, while it was still in its slot.

In any case, I had convinced the owner to swap the Nubone saddle and nut for bone, so they had to go. Nubone is the name the company Graphtech gives to its TUSQ-like nuts and saddles. Basically a shade better than plastic, both  TUSQ and Nubone are man-made materials with some tonal qualities – buth nothing to match bone.

Their places would be taken by plush bone elements that sat perfectly snug as a bug in a rug!

Here, I would like to elaborate the strategy that I employ in all repairs. I like to do the easy thing first and if it doesn’t work the complicated (and expensive) route is always available. Going the easy way is not only easy for me, but easy on the pocket of the customer too.

In the process of repairing the bridge, I pumped wood glue under the bridge, clamped it down and let it rest for a day. Taking the bridge off completely, cleaning the mating surfaces and re-glueing them again is the proper way to do it but then it takes quite a bit to go that route. And if the bridge has not lifted too much, getting glue under the offending areas and clamping it down, does work alright.

The customer also wished for a different pickguard to be put on the guitar. For that, I had to remove the manufacturer-installed one. And boy, what a royal pain that was!

Stuck with double-sided tape, while the original pickguard came off without much protest, cleaning the tape residue off the area was the real deal – I have learned through experience. I have tried petrol, nail polish remover, lighter fluid, white vinegar, after shave lotion/perfume (alcohol), and either they have only a marginal impact, or manage to make a bigger mess.

So, rubbing with fingertips is all I could do – painstakingly slowly!

Finally…finally, the top was clean again and I put on the new pickguard.

While I was at it, I buffed out the entire guitar and paid special attention to the headstock area and the fretboard. I tightened up the hardware, polished up the fretwires and oiled the fretboard.

I strung her up with 13s that the owner provided and the overall look and how the instrument played appealed much to the owner. A few days later, he messaged, telling me how much he was enjoying the ‘new’ sound of his guitar.  

While I was impressed by the overall construction of the guitar, one thing left me shaking my head in disbelief. Why would anyone put a strap button on the shoulder of the guitar – and that too on the shoulder closest to the player? The propensity of the instrument, then, is to fall forward.

I asked the owner if he had had the button installed and he said that it was factory-installed. Not to take his word, I checked the Fender site, and sure enough, there was the button sitting proudly on the shoulder. But since the owner never played standing, I let sleeping dogs lie.

What brought a smile to my face was the lettering by the owner on the label of the guitar. At one end was the name ‘IRENE’ and on the other ‘G.R.A.C.E.F.U.L’. Care had been taken that the lettering would be legible to a listener sitting right in front: ‘Graceful Irene’. Who was/is Irene who inspired the owner to christen his guitar thus, I never asked. 

 What would we guitarists be without such etchings? 


Wait, save, buy – the LAGT88D (a review)

As promised, here is a review of LAG Guitars’ T88D, which I repaired last week.

At the outset, let me clarify that I am not linked to LAG Guitars in any way, and by doing this review, I am not benefiting in any way.

However, I will go on record to say that I (personally speaking) have not played a prettier sounding guitar. The balance (between the treble and the bass response) of the instrument, its resonance, sustain, construction, looks…it just blew me away.

As I played it, I was reminded of my childhood and how my father had bought me a parchment bat. I was thrilled with it until, a few years later, he bought me an English willow bat. I can still recall the awe and sheer pleasure I felt the first time I played with it and saw the ball race to boundary. Effortless ease!

The difference in performance between a Rs-3,000 guitar and the LAG T88D is exactly the same as what it was between my parchment bat and the English willow! Everyone will wish to own the LAG T88D but only a few will be able to, for priced at (around Rs 30,000), it is certainly not your run-of-the-mill Rs-3,000 guitar.

And thus, the headline to this post, and my advice to all.

But let’s start from the start, shall we?

LAG Guitars started off 39 years ago in the picturesque Southern France region, producing ONLY electric guitars. At the turn of the century, in what seems a magical transformation, the factory switched to making acoustic instruments, COMPLETELY! Some four years ago, master craftsman and luthier Maurice Dupont joined them, and after that there has been no looking back for them, literally!

So, what’s so great about the T88D? I would like to break it up under a few heads. But first the name. The ‘T’ stands for the model name Tradition (under the Tramontane series), 88 is the model number, while the ‘D’ stands for Dreadnought (the style and shape of the guitar).

  1. Material used
  2. Construction
  3. Hardware

MATERIAL USED

The LAG T88D sports a solid Englemann Spruce top and Khaya (African Mahogany – ) back, sides and neck. Englemann Spruce, a soft wood, has traditionally been the choice of luthiers because of its acoustic qualities, while Khaya displays all the qualities of genuine Mahogany.

The fretboard and bridge is of Brownwood, a revolutionary wood which is a worthy substitute for rosewood. Brownwood has also been used in the detailing in the rosette around the soundhole and in the faceplate of the headstock. At 5% moisture content, your worries about warping in a totally dry or exceedingly wet climate are set at rest – not so with rosewood.

Also featuring on the guitar is maple – in the rosette and on the faceplate, spelling out ‘LAG’. And here I would like to attract your attention to the shape of the rosette – an oval one – recognisable among hundreds of guitars.

Brownwood and Blackwood

The addition of mahogany and rosewood to the list of species protected by CITES (Convention in International Trade in Endangered Species) has seriously complicated the work of luthiers.

Two decades of research has been necessary for Blackwood Tek company to achieve a revolutionary process that began with the planting of short-cycle pine forests in New Zealand (radiata pine).

First, the wood is dried to contain only 10% moisture and is then impregnated with catalyst and pigmentation agents in pressure vessels. Then, the wood is dried again to reduce its moisture by 2 or 3% before undergoing a second impregnation stage, this time with resin, in a pressure vessel. Then it is compressed in a hot press, which reduces by 40% its thickness, thus increasing its density. Last step: a fine sanding which gives the pieces of wood a perfect look and feel.

The result is a dense, hard, stable wood (5% moisture constant) which not only resists perfectly to humidity and temperature changes but also to UV radiation, termites and fire. Another important advantage is that it can be used immediately in the music instrument industry without requiring any prior drying. An adequate colouring achieves an ideal substitution for ebony (blackwood) and rosewood (brownwood) while offering the same acoustic characteristics.

Accentuating the woods is a graphite nut (43mm) and saddle (72mm). Now graphite, if you remember, is basically carbon and is known for its denseness and lubrication properties. So, what you get with graphite nuts and saddles is excellent sustain, and with its lubricant properties, there is no fear of strings catching in nut slots or on the saddle.

CONSTRUCTION

Going hand-in-hand with the choice of materials used is the quality of construction of the T88D. Scalloped braces in a forward-shifted pattern gives the guitar its characteristic tone. When we say ‘forward-shifted’, we are basically referring to the position of the X-brace under the guitar’s top, vis-a-vis the soundhole. Forward-shifted thus brings the main X-brace towards the soundhole. This increases the area of the top behind the bracing, freeing that area to move, resulting in a louder, responsive and more bass-accentuated instrument.

In contrast, an instrument with a backward-shifted bracing pattern would accentuate the treble response.

The Khaya neck is fashioned in a comfortable ‘C’ shape and with a satin finish, fitting in your palm easily, it makes movement up and down the neck a breeze. The neck also has a two-way truss rod, accessible through the soundhole.

HARDWARE

The fretboard sports 20 silver-nickle, very even frets, while the very handsome tuning machines on the headstock are die cast satin black, matching the black of the graphte nut and saddle. And don’t just go by the looks. These tuning machines have a gear ratio of 1:18, helping you tune your guitar that much more accurately.

To explain this a little, tuning machines have little gears installed inside them.

The more the number of teeth, higher is the ratio (1:12; 1:14; 1:18; 1:21) and thus, higher is the tuning ability and stability, for the gear moves a smaller distance from one tooth to another.

Also in the same brushed satin finish are provided the shoulder strap button and end block strap button.

What’s not right (according to me)

Strap button placement on the neck heel cap: It may appear as just something cosmetic, but it isn’t. Let me explain. Placing the strap button on the neck heel cap gives the instrument – any instrument – a tendency to fall forward. Nothing wrong there too, until it starts straining at the strap, which then slips off, and your guitar comes crashing down to the ground. OUCH!!!!!!!!!

When the strap buttoned is positioned on the farther side of the heel itself,  the strap tends to ‘lock’ the guitar into place, not allowing it to fall forward.

And if you would like to listen to how the instrument sounds:

If you’ve liked the T88D and would like to purchase it, in Lucknow, you will only get it at Seven Notes Musical Instrument Shop in Gomti Nagar.

LAG guitars are exclusively marketed in India by RV Distribution, Delhi ( www.rvdistribution.in)


T88D specs at a glance


– Top: Solid Engelmann Spruce

– Strings: Metal

– Fingerboard & Bridge: Brownwood

– Nut & saddle: graphite

– Finish: glossy 

– Body type: Dreadnought

– Tuning pegs: Satin black Die Cast

– Neck: khaya

– Back & Sides: Khaya

– Letfty : No

– Cutaway : No

– Radius: 350 mm

– Nut Width: 43 mm

– Number of frets: 20

– Scale length: 650 mm (25.5″)


With a shattered top, is it ‘Bye-bye, Beauty’?

This beauty was being shipped outstation to its owner when an in-transit mishap caused a massive break in the top board. Though in two parts, the break, thankfully, was along the grain of the wood and in one plane.

This France-made guitar, available only at a single outlet in Lucknow, was being shipped by the local dealer to the customer who had bought it. Just going by the way the top had broken open, it would be safe to surmise that something heavy had been thrown – and not just kept – on top of the box containing the guitar.

In defence of the dealer, the instrument was in its case and in two cardboard boxes, and separating the two boxes were stacks of newspapers, specifically to avoid such an eventuality!

For those who are not being able to make out from the photographs above, this is the treble side of the guitar: below the shoulder of the guitar and (right) in the same plane, in the lower bout.

A little something about this instrument: this was the T88D from the house of LAG, an all-wood instrument with a solid, AAA  Engleman Spruce top, with back and sides of solid honey Khaya (one of the five species in the Mahogany family). The elegantly designed and clean lines of the headstock and bridge were represented in Brownwood. The fretboard too was Brownwood (read about what this is in next week’s post).

The first order of business was to see whether the two sides along the cracks matched up and came together seamlessly. If they did not, it would be quite a job, removing the offending shards of wood, bringing the two planes together, and then filling the gap created with slivers of spruce wood. Just the thought of that rigour made me sweat!

When I pulled the two seams together, they did come together without a problem but without an external force acting on the two sides, they returned to their original position. What that meant was that while glueing, the two sides would need to be propped up in such a way that the joint was a seamless one.

I took wooden dowels thick enough and long enough to stand up inside the guitar, with a piece of wood wrapped in butter paper above them, used to level the two sides. With proper wood glue shot into the crack, the rods pushing against the butter-paper-wrapped piece of wood, it was time to wait patiently to see how the guitar would heal up.

It healed up fine but to make doubly sure, I decided to cleat the crack too. Cleats are little pieces of the wood that help hold two sides of a break and are put from the inside of the guitar. They must be of the same wood as the one in which the crack has developed, only, care has to be taken that while cleating the crack, the grain orientation of the cleat should be opposite to what it is in the area of the crack.

This is just to show you where the cleats are on the inside of the guitar, since I couldn’t show you inside the guitar.

The instrument was now structurally sound. Needed now were some cosmetic touches. So, I took some superthin cynoacralyte glue and ran a bead down the length of the crack. While the CA glue added strength and sealed whatever little opening there was, it needed to be sanded down and polished to come in level with the rest of the top.

Nothing that #2000, #3000, #4000 and #5000 sandpaper wouldn’t do but then these had to be soaked in water overnight for them to function right.

To minimise the area which would be acted upon by these, I taped off the affected area and worked within the confines of the taping. A large eraser served as the perfect sanding block.

After four grits of sandpaper worked their magic, you couldn’t feel a thing if you ran your hand over the surface of where the break once was.

Re-stringing this beauty, I could not help be amazed by the mellow strains it produced. Beautiful indeed!


Don’t forget to catch next week’s post when I review the LAG T88D!


Split bridges – here’s an Ibanez!

What was that I said about guitars/problems/brands coming in twos and threes? 

So, here’s an Ibanez with a bridge that could have been split right into half, but just to complicate the problem, it is split in two places which is almost in line.

Though this was a laminate guitar (top, back and sides), it was well constructed and had a preamp attached (was an electro-acoustic guitar). 

Thankfully, the bridgeplate seemed solid with little to no signs of wear and tear.

And for those of you who like to look up model numbers, etc… 

…it’s 2Y-02 GS151202881.

The first order of business was glueing the lifting corner of the bridge from the bass side. I shot in diluted wood glue and clamped that corner of the bridge down and left it to cure for a good 36 hours.

That square black piece is leather, cut from an old belt that I almost threw out!

And as you can see, the instrument carried more than a couple of ‘endorsements’. 

What would we guitarists be without such ‘endorsements’?

Once that had cured and I pulled the clamp off it, I turned my attention to the bridge crack. I filled it up with my tea and coffee-stained saw dust, sanded it level and then polished it up such that even a person who knew there was a crack in the bridge, would never be able to make out.

Once this was done, I went about reaming the bridgepin holes that strangely looked more oblong than round to me (it doesn’t show up very clearly here in the photo, but in truth, they were). That was another reason to take the reamer to the bridgepin holes.

Oblong/oval bridgepin holes are a sure sign that the bridgepins don’t fit the holes very well and together with string tension, are a strain on the bridge. And that is what led to the bridge cracking. Q.E.D.!!!!!!!!!!!!!

There were other big and small problems that I saw. More than a couple of tuning machine heads (buttons) were loose, there were divets (grooves) in the first five frets (along the ‘B’ string), there was a degree of DNA and body oil deposition on the fretboard, the whole body was in dire need of cleaning and some TLC, and the nut and saddle were plastic.

The saddle, particularly, was in a pitiable condition and not even in one piece.

With that kind of a saddle, I doubt if the transmission of sound would be as good as it could be if a bone saddle, or, at least a single piece of anything was used as a saddle.

However, my brief was to work on the bridge and the bridge alone. So, I played as if I hadn’t even noticed those problems!   

But there’s a sweet little story that you all should know. 

I was told that this guitar was a young man’s first instrument. He has since graduated to ‘better’ guitars while this was sitting around. 

Meanwhile, the young man’s mother expressed a desire to learn to play the guitar. Respecting his mother’s wishes, the young man decided to get this instrument in playing condition, and hand it over to his mother.

Three cheers for the son, and bigger cheers for the lady for deciding to take up music!

From the Lucknow Guitar Garage, may your journey into the world of music be full of discovery and happy learning! 


Soothing the pain of another F310!

Remember, how I had said that guitars (brands/models/similar problems) come in twos and threes? Well, here is another Yamaha F310!

Problems: Bellying, cracked bridge, saddle too low and miscellaneous.

ADVICE: Whenever you feel that you will not be playing your acoustic guitar for the next couple of weeks, tune down the strings. DON’T LOOSEN COMPLETELY, but tune down. You will prevent many problems from plaguing your instrument in times to come. For one, that belly, which is inevitable, will get delayed a few years at least.

So, how does a crack in the bridge, along the line of the bridgepins, appear? Just like too slim a saddle or too stout a saddle in the saddle slot will inevitably lead to the bridge splitting at the saddle slot, so also with bridgepins.

At the factory, when the holes for the bridgepins are drilled, bridgepins are pushed into the holes to check for fit. The fun begins when strings are thrown on. The pins that were fitting snugly without the strings, now, naturally, become too tight, holding the strings in their holes.

That combined with the string tension and multiplied by time and with weather changes, will ultimately lead to a hairline crack appearing, which, if not treated immediately, will either lead to a chasm so wide that it cannot be filled, or, in the worst case, split the bridge into two.

Thankfully, this instrument came to me while the split wasn’t too terrible.

I have told you that I collect all sorts of odds and ends, even pick up things from the road. So, the fact that I swept up and strained sawdust from work in the house, shouldn’t come as a surprise to you . I have a 1-litre pet jar full of it. It has been saved for jobs like these.

A quarter of that sawdust I have dyed, soaking it first in tea and then coffee and then dried . The result is that when I needed to repair this bridge, I just took a few pinches of that dyed saw dust, pushed it into the crack and sealed it in with super glue.

Then began the real work: hiding the repair! Ten grits of sandpaper from #80 to #3000 and a lot of elbow grease, some boiled linseed oil, and you tell me where the crack was!

Right! So, the bridge was fixed, almost as good as new but what would prevent a crack from not developing again?

I took my trustee reamer and reamed out the holes just a bit so that the bridgepins would sit in their holes a little easier and not exert as much pressure.

That taken care of, I turned my attention to the belly in the instrument. Into the jig it went and stayed there a good two weeks before I even looked towards it. When I took it out of its restraints, all seemed flat and good. I was keeping my fingers crossed for when I would throw on strings. Again, no 11s or 12s, it would have to be 10s.

The owner, looking for a lower action, had managed to sand the saddle down so much that the ‘B’ string was buzzing. To tackle the situation he had forced in a piece of paper on the saddle, under the string. Hello, string buzz! Bye-bye, intonation!

ADVICE: YouTube is full of videos telling you how to shave down a saddle. No harm trying but if you measure incorrectly, or go too far, there is nothing that can be done, except throw out the old saddle and start from scratch. Please, leave such exercises to the experts!

Thankfully, the saddle and nut on the instrument were cheap plastic and I wasn’t sad to see them find their way into the dustbin.

A swanky, compensated piece of polished bone replaced this straight, plastic saddle, while at the other end, the plastic nut was swapped out for a good, bone nut.

Then I turned my attention towards the other ‘problems’ that I saw in the instrument.

If you play your guitar standing and feel the need for a strap, this is NOT the place to attach the end of your strap. Usually necks are built out of three pieces joined together. This area of the headstock is in the vicinity of one joint. If you tie your strap here, you are letting undue amounts of stress act on that joint which can open up under pressure.

Yes, I know that you have seen many big stars tie their guitar straps at the headstock but they are those who have not had their guitar neck joint open up, just yet, or, they are just plain lucky. Since the time I have been repairing guitars, I have seen at least half a dozen such instruments.

To attach the strap, you require a strap button, which should be fixed on the side of the heel

and not ON the heel cap.

And so, a strap button was fixed on the side of the heel

While looking at the fretboard I had noticed serious divets in the fretwires along the ‘B’ string. These I removed by levelling, sanding and re-crowning the first five frets. Unfortunately, I forgot to charge the customer for it! #$&*%^%!!!

I also saw this and questioned the customer about it

Ladies and gentlemen, just 2 – 3 winds of the wound string and 5 – 6 of the unwound strings are enough to keep your strings in place. If you start wrapping the entire length of the string around the tuning peg post, your intonation will suffer, but first it will be a huge pain cranking that machine head those many times to get it all wrapped up!

I threw on 10s on this baby and I am happy to report that unlike the other Yamaha with a belly, this one’s belly did not spring back.

I had a very happy customer indeed!

The curse of the Yama-ha-ha-ha-ha-aha-aa-ha-ha-ha!!!!!!!!!

OK! So, I called it a joke, laughed my head off at it, and now it has turned around and bitten me you know where. So, I am typing this standing; I can’t sit!

For those of you who don’t know what I am talking about, this happened last week:


https://lkoguitargarage.com/yama-ha-ha-ha-ha-aha-aa-ha-ha-ha/


I received a tonne  of email saying how wrong I was pointing fingers at the ‘Ha-ha-ha-ha’ for calling a laminate top a ‘Spruce’ top. They said that that is what all builders are calling laminate tops.

I was shocked and I checked. Indeed, terms like ‘select spruce’, ‘spruce tonewood’, etc had disappeared from the sites of all big-name acoustic guitar makers. It was as if those terms had never existed!

Instead, when manufacturers wanted to convey that it was a laminated-top guitar, they preferred using ‘spruce’, and when they wanted to tell you that a particular model had a solid top, they used the word ‘solid’.

All of this has happened in the span of two or three years. Don’t believe me? Surf the Net and ask Google to search for ‘Select Spruce’, ‘Tonewood’…

The pages and pages of discussion about it will confirm to you that ‘Select Spruce/Oak/Cedar…’ was a term much in currency and very accepted. It wasn’t a figment of my imagination.

So, where, how did the term disappear? When and why did the terminology change?

My reasoning (and mine alone) is that after all those online forums let the manufacturers’  cat out of the bag, explaining what ‘Select Spruce’ actually stood for, manufacturers didn’t find it profitable to say ‘Select Spruce’ on their product brochures. Instead, it seemed like a good idea to fool people into believing that ‘Spruce’ meant solid Spruce. Enter ‘Spruce’, exit ‘Select Spruce’!!!

Understand this: (In India) If you have a budget of Rs7,000-8,000 to buy an acoustic guitar and want to a brand name, Yama-ha-ha-ha-ha it is!!!!

No one, who wishes to buy a 7K guitar, will look at Yama-ha-ha-ha-ha instruments that cost 20 – 30K. If they do, they would realise the difference.  On the company’s website and in the 7K price range, you have just two (popular) models. From my viewpoint, it is a choice between the devil and the deep, but you, as a prospective buyer, feel you are spoiled for choice!

WHATEVA!!!!!!!!!!!!!

Back to the repair that I was at last week, I had put the instrument in that vice grip

on September 12 (Saturday). I pulled it out of the vice on September 18 (Friday), glued in the nut and strung it up with .010″ strings, just like I said I would. The instrument would never be able to bear the strain of .011” or .012″ strings again.

It was a disaster! Even with just the 6th and 5th string on, you could drive a double, double decker bus under the strings.

The saddle height was exactly what the original saddle was, and the action at the 1st fret was within specification. But as I observed, the belly was returning to the instrument, even as I watched.

It was very disheartening but there were two routes that one could take: return it the way it was to the customer, or, have another go at it, with renewed vigour.

I decided to take the the second route, called the customer, explained things to him, and he was most understanding about me wanting to try and correct whatever lapses in construction there may be.

As my effort continues, stay tuned for updates!

Yama-ha-ha-ha-ha-aha-aa-ha-ha-ha!!!!!!!!!

This landed up on the counter needing attention seriously.

The owner said that he had got the instrument previously repaired at that big music shop in the vicinity of Fun Republic but besides the old fault lines opening up, new ones developed (encircled in red).

If you hadn’t guessed it, the guitar was

But, more than the damage, I was surprised that it was a Yamaha. I had always thought that Yamaha’s F310 and F310P were solid top guitars. How wrong I was!

The ‘spruce’ veneer on the top was thinner even than the useless pickguard that had been put on.

Not to rest, I searched on the company website, and sure enough, I found that the company wants prospective customers to believe that they are putting solid spruce tops on these models. See for yourself:


https://in.yamaha.com/en/products/musical_instruments/guitars_basses/ac_guitars/f_fx/specs.html#product-tabs


Now to the problem at hand. The lifting of the top and the veneer peeling off like this was most likely due to two reasons: a) inadequate construction (read bridgeplate not big enough, or of good, hard wood), and

b) instrument not cared for. It seemed that the guitar had been left standing tuned up where the heat and humidity had got to it.

PLEASE…don’t let your acoustic instruments stand (or lie) in places where you wouldn’t like to be.

The bridge lifting under string tension and consequent cracking of the top veneer was proof that poor quality wood had been used to make the bridgeplate, or, that the bridgeplate was inadequately sized to perform its function properly.

Having said that it should also be noted that after a period of time, the best of guitars see a bit of ‘belly bulge’ (a rising of the area of the top behind the bridge). However, if the bridgeplate is made out of a good hard wood (mahogany, rosewood, maple, walnut, etc) and has proper dimensions, you will never find accidents like these happening. In fact, a ‘good’ bridgeplate will minimise belly bulge in an instrument to a great extent.

As you can see, the size of the bridgeplate (the trapezium-shaped piece of wood with six holes) is almost alright. It is the quality of wood used that is suspect. It is a practice with reputable manufacturers to use the same wood as the back and sides (in solid wood instruments) to make the bridgeplate too.

Even in laminate guitars from reputable makers, much importance is given to the size of the bridgeplate and the wood used in making it.

So, why would a manufacturer put in a useless piece of wood as bridgeplate? It cuts the cost of production!

In this particular guitar, nothing can be done now, except change the bridgeplate, which is a very troublesome process and expensive for the customer. Unless one is emotionally attached to the instrument and wishes for it to play perfectly, I never advise such operations.

Inspecting the instrument, I saw more than the normal ‘bellying’. At either end of the ruler there was at least 1 to 1.5 mm of space. Ideally, you’d want no space at the ends and the ruler to touch the top all along its length.

As a result of the bellying, the action was a whopping 7-8 mm!

So, the strings came off, the bridgepins went into their hold and I pulled out the plastic saddle and nut to replace them with a proper, compensated bone saddle and a bone nut.

But while I was taking the strings off, I saw this. The string was in two parts, yet attached to the tuning peg!

Relieved of string tension, suddenly the cracks in the top did not look as ugly. But they still needed to get treated. An injection of glue was what the doctor ordered.

This is your regular wood glue, but with water added to it to make it flow better. This was injected (read flooded into the crack) and it looked something like this

Then to ensure that the glue reached even the smallest recess, I pumped it with my fingers and thumb just like this

and then putting a flat piece of wood over some butter paper, I clamped it down good.

To take some of the belly out of the instrument, I did not just clamp the repaired area but the entire bridge region.

After 48 hours, I turned my attention to the lifting veneer at the shoulder of the guitar.

The process was repeated near the fretboard extension

Six days later, all the ‘open gaps’ had been closed and the guitar no longer looked like an instrument that was going to fall apart any moment.

But while the instrument was clamped up, I continued working on other parts that were still accessible.

I had noticed that the fretwires – especially the first five – had managed to develop rather large divets. If these grooves are not removed, they have the power to alter your intonation. So, I gave all the fretwires attention, with special focus on the first five.

After that the fretboard was cleaned and oiled and the old plastic saddle and nut measured. These measurements were then transferred to the bone elements, and these elements installed.

What I also did was to take my biggest and heaviest clamp and clamp down the belly. Every 6 hours or so, I would go and give the clamp a one-and-a-half twist and increase the pressure on the top.

But after a few days, I decided to remove this clamp and put the guitar in the vice grip of a contraption that I made many years ago.

These are basically two lengths of hard wood with cork lining underneath so that the top and back do not get damaged. 

I don’t promise that the belly will go away completely, but it will certainly be reduced far greater than what it came in with.

Now, I await the customer to hand me the strings that he wishes to throw on. A simple set-up and I am sure this baby will sing again.

So, how tough is installing a pickup in a guitar?

I think I have said this before but during the period of the lockdown, and even now – when people are avoiding physical contact – embers of lost passions are being rekindled: gardening, cooking, writing, music…Nice!

People are getting reminded of musical instruments that they had left standing in store rooms, years ago. They are being pulled out, being burnished and refurbished to breathe new life into them again. 

Take this one for example:

It came to me in this state. I have cringed at the sight of such so often that my face muscles refuse to contort into a cringe any more. Instead, I only smiled in amusement.

Whateva!!

This came in for a pick-up system to be installed but while I looked the guitar over (after not just cleaning but disinfecting it properly), I saw something that I have never seen: an instrument with serious identity issues!

 So, after scratching my chin for long and trying to figure out what may have happened to this poor guitar, I was still scratching my chin! So, I left my chin and the name of the guitar alone and decided to get on with the work at hand.

The pick-up paraphernalia had been provided to me, but some low-tack tape is excellent for such jobs. Why? It helps the marking process and all measurements and sundry jottings can be made on it. Measurements were taken and markings made.

Once it was decided where the pre-amp unit would sit, I drilled four holes at the four corners of my marking with a tiny drill-bit and graduated to bigger, thicker bits. I then sawed off the portion within those holes. A very painful process to watch for an owner, but thankfully, this one’s wasn’t around. 

Even after the space was created for the preamp unit to sit in, it had to be cleaned up to produce clean, sharp boundaries. Again, the tape played a role in protecting the surrounding area from slipping drill-bits, saws and files. 

Then there were holes to be drilled for the jack input and the piezo element (which was to run in the saddle slot, under the saddle).

A step-bit is a wonderful tool but requires careful handling. Marking off the distance I had to drill with tape, helped immensely.

The rest was just about putting in things where each needed to go. 

And now for some oddities that I found in the guitar.

I found this inside the guitar

You will recognise this from the shoe box and other such. It is a desiccant and its job is to keep the surroundings nice and dry. I wonder if someone had dumped a cup of tea or coffee inside and had dropped the silica gel sachet in too, to keep things nice and dry, OR…had deliberately put it in?

Never leave a desiccant inside your acoustic guitar, or you might go to sleep having played it, and wake up to find the guitar open at its seams!!!!    

On the left is the bridge with two extra spots on either side of the bridgepin holes. These plastic dots (in this case black) generally hide screws which hold it to the top. However, a peek inside showed just one screw and a dry wall type screw at that, clearly hanging down from the top. Staying with the bridge, it was lifting

and oddly enough, seemed to have moved from its place. It could be either – that the strings had pulled it forward, or, that it had been stuck in the wrong place originally.

However, it was not my brief to correct these aberrations, so I let sleeping devils lie.


DO NOT TOUCH the nut slots…ever!

I am outside the country for a little break, but while here, an interested reader raised a query which has resulted in this blog post. His question was which tool I used to lower the string slots of a nut.

I told him I used nothing, because I never lower the slots!

As eyebrow-raising as you might find it, I don’t like to touch nut slots. If I have to lower the first fret action, I take measurements of how much lower I want the strings, loosen them, knock the nut out, and sand its bottom as much as I wish to lower the strings, just like I would work on a saddle.

Let me explain this a little more clearly. When reducing the action on an acoustic guitar, changes have to be made at three places:

  1. The truss rod (for dialing in the exact amount of relief required),
  2. The saddle (shaving it to bring down the action to the required height at the 12th fret), and lastly
  3. The saddle slots (to get the required action at the 1st fret)

While the first two procedures are relatively straightforward, the third one is seriously tricky. Ideally, you want the strings to sit just half their diameter in their respective slots.

So, if you bring down the action by lowering the nut slots, what happens to the half-and-half rule?

Yes, I know that the world over, action at the 1st fret is brought down by filing down the nut slots. But is there any harm in taking a different route from the known and recognised wisdom which may yield better results?

Of course, taking the first route, you loosen a single string, work on its slot, put the string back and tune up. In the second case, you loosen all strings, take the nut out and sand its bottom.

But it is quite possible that you may have to take off a little more from either the bass or the treble side than the other one. All that one needs to do is measure properly, mark accurately and sand slowly…you overshoot the lines and you are looking at making a new nut! 

But what is the problem in filing the nut slots, you may ask? The problem lies in the angles that you create with whichever tool you use to file down the slots. Instead of the slots being just lowered, your tool may deepen the slot at one side more than the other. It may even alter the points of contact of the string in the nut, affecting intonation.

Badly cut nut slots may also pinch strings in them, which is a major cause of tuning issues, string breakage. How often have you heard a string go ‘pinnnnggggggggg’ while you’re tuning it up? That sound is the effect of a string caught in nut slot and finally releasing. You may also recall the nightmare you experienced tuning that particular string.

The (bone) nuts I use, are cut through a CNC, and have near perfect string slots. The only alteration I need to make to them is to dial in the exact height they need to stand to, to give the perfect 1st fret action.

The only time that I work on the string slots, is if I have to lower between .004″ and .002″! Then, I just use old strings as saws! It takes a lot of attention and lots of elbow grease but the job gets done.

This was one helluva job III (the add-ons)

When you do such extensive work, like what I did on this Hobner, a little extra effort, a little something from my side, helps sweeten the deal for the customer. Plus, if there is something that does not sit easy in your eye, how can you just let it go?

After I had swapped the old, drab tuners for those snazzy, sexy things, I looked around at the guitar and decided that the old strap button was an eyesore with the rest of the flashy steel on the guitar.

So I swapped this

for this.

I looked at the headstock and in all that beauty, what stood out dirty and a blemish was the trussrod cover and the the oxidised screw holding it in place.

I cleaned up the piece of plastic and installed a shiny new screw that matched the rest of the glitz on the headstock.

Of course, the love potions – for the fretboard, bridge and frets – were mandatory

and the 12-string received these strings, as this is the customer’s preferred brand and gauge.

As I was stringing the instrument up, I noticed the nut

Not in the most healthy state but I was unwilling to pop it out and replace it with a bone nut that would have to be cut down to half its height. Let me explain. In an instrument with a zero fret, it is that fret that takes care of the intonation part. The nut merely serves to hold the strings in place so that they don’t fall off.

To cut down a bone nut just for the purpose of holding strings, I did not have the heart to do. I have ordered a plastic nut and as soon as it comes in, I shall call the instrument in and replace it.

I was still looking at the guitar, debating whether or not I should put a pickguard on it or not.

Finally, I decided to put one on because where the pickguard would go, was a crack in the top that ran the entire length of the top. The left picture shows the crack at the top, while the right photo shows the crack running right down to the very bottom of the guitar (the black line farthest from you).

Though the crack had been sealed but the pickguard would be added protection, holding things together.

I could have easily decided to throw on a ready-made, teardrop-style pickguard but that would have gone against the character of this instrument. This one was different, and thus, required something different.

So, I decided to design one, cut and fashion one by hand. But first, I had to put down on paper, what I had in mind.

After this was done, I traced the outline on the pickguard plate

continuing to make modifications to the design as I thought were necessary.

A new blade was put into the X-acto knife for a good clean cut and extra, focused light was arranged for

Once cut,

there followed the smoothing of edges so that nothing would catch on the edges.

Some sandpaper
A fresh single-edge blade

Those two things helped me get things smooth and bevelled. Installing the prepared pickguard was no big deal.

I also noticed that the name of the guitar (on its shoulder) was disappearing. So, I pulled out my calligraphy pens and my lighted lens set-up and went to work

I could have left it like that but it was not a brand new guitar, so, before the ink dried, I gently brushed it off, giving it an aged look.

The pickguard, strap button, screw and filling in the name, I did not charge for.

With this, the three-episode serial ends, and I hope that the Hobner goes on to sing many, many more tunes.