Soothing the pain of another F310!

Remember, how I had said that guitars (brands/models/similar problems) come in twos and threes? Well, here is another Yamaha F310!

Problems: Bellying, cracked bridge, saddle too low and miscellaneous.

ADVICE: Whenever you feel that you will not be playing your acoustic guitar for the next couple of weeks, tune down the strings. DON’T LOOSEN COMPLETELY, but tune down. You will prevent many problems from plaguing your instrument in times to come. For one, that belly, which is inevitable, will get delayed a few years at least.

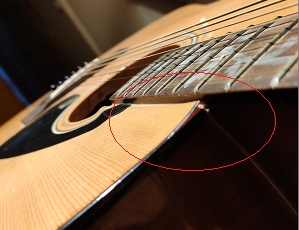
So, how does a crack in the bridge, along the line of the bridgepins, appear? Just like too slim a saddle or too stout a saddle in the saddle slot will inevitably lead to the bridge splitting at the saddle slot, so also with bridgepins.

At the factory, when the holes for the bridgepins are drilled, bridgepins are pushed into the holes to check for fit. The fun begins when strings are thrown on. The pins that were fitting snugly without the strings, now, naturally, become too tight, holding the strings in their holes.

That combined with the string tension and multiplied by time and with weather changes, will ultimately lead to a hairline crack appearing, which, if not treated immediately, will either lead to a chasm so wide that it cannot be filled, or, in the worst case, split the bridge into two.

Thankfully, this instrument came to me while the split wasn’t too terrible.

I have told you that I collect all sorts of odds and ends, even pick up things from the road. So, the fact that I swept up and strained sawdust from work in the house, shouldn’t come as a surprise to you . I have a 1-litre pet jar full of it. It has been saved for jobs like these.

A quarter of that sawdust I have dyed, soaking it first in tea and then coffee and then dried . The result is that when I needed to repair this bridge, I just took a few pinches of that dyed saw dust, pushed it into the crack and sealed it in with super glue.

Then began the real work: hiding the repair! Ten grits of sandpaper from #80 to #3000 and a lot of elbow grease, some boiled linseed oil, and you tell me where the crack was!

Right! So, the bridge was fixed, almost as good as new but what would prevent a crack from not developing again?

I took my trustee reamer and reamed out the holes just a bit so that the bridgepins would sit in their holes a little easier and not exert as much pressure.

That taken care of, I turned my attention to the belly in the instrument. Into the jig it went and stayed there a good two weeks before I even looked towards it. When I took it out of its restraints, all seemed flat and good. I was keeping my fingers crossed for when I would throw on strings. Again, no 11s or 12s, it would have to be 10s.

The owner, looking for a lower action, had managed to sand the saddle down so much that the ‘B’ string was buzzing. To tackle the situation he had forced in a piece of paper on the saddle, under the string. Hello, string buzz! Bye-bye, intonation!

ADVICE: YouTube is full of videos telling you how to shave down a saddle. No harm trying but if you measure incorrectly, or go too far, there is nothing that can be done, except throw out the old saddle and start from scratch. Please, leave such exercises to the experts!

Thankfully, the saddle and nut on the instrument were cheap plastic and I wasn’t sad to see them find their way into the dustbin.

A swanky, compensated piece of polished bone replaced this straight, plastic saddle, while at the other end, the plastic nut was swapped out for a good, bone nut.

Then I turned my attention towards the other ‘problems’ that I saw in the instrument.

If you play your guitar standing and feel the need for a strap, this is NOT the place to attach the end of your strap. Usually necks are built out of three pieces joined together. This area of the headstock is in the vicinity of one joint. If you tie your strap here, you are letting undue amounts of stress act on that joint which can open up under pressure.

Yes, I know that you have seen many big stars tie their guitar straps at the headstock but they are those who have not had their guitar neck joint open up, just yet, or, they are just plain lucky. Since the time I have been repairing guitars, I have seen at least half a dozen such instruments.

To attach the strap, you require a strap button, which should be fixed on the side of the heel

and not ON the heel cap.

And so, a strap button was fixed on the side of the heel

While looking at the fretboard I had noticed serious divets in the fretwires along the ‘B’ string. These I removed by levelling, sanding and re-crowning the first five frets. Unfortunately, I forgot to charge the customer for it! #$&*%^%!!!

I also saw this and questioned the customer about it

Ladies and gentlemen, just 2 – 3 winds of the wound string and 5 – 6 of the unwound strings are enough to keep your strings in place. If you start wrapping the entire length of the string around the tuning peg post, your intonation will suffer, but first it will be a huge pain cranking that machine head those many times to get it all wrapped up!

I threw on 10s on this baby and I am happy to report that unlike the other Yamaha with a belly, this one’s belly did not spring back.

I had a very happy customer indeed!

The curse of the Yama-ha-ha-ha-ha-aha-aa-ha-ha-ha!!!!!!!!!

OK! So, I called it a joke, laughed my head off at it, and now it has turned around and bitten me you know where. So, I am typing this standing; I can’t sit!

For those of you who don’t know what I am talking about, this happened last week:


https://lkoguitargarage.com/yama-ha-ha-ha-ha-aha-aa-ha-ha-ha/


I received a tonne  of email saying how wrong I was pointing fingers at the ‘Ha-ha-ha-ha’ for calling a laminate top a ‘Spruce’ top. They said that that is what all builders are calling laminate tops.

I was shocked and I checked. Indeed, terms like ‘select spruce’, ‘spruce tonewood’, etc had disappeared from the sites of all big-name acoustic guitar makers. It was as if those terms had never existed!

Instead, when manufacturers wanted to convey that it was a laminated-top guitar, they preferred using ‘spruce’, and when they wanted to tell you that a particular model had a solid top, they used the word ‘solid’.

All of this has happened in the span of two or three years. Don’t believe me? Surf the Net and ask Google to search for ‘Select Spruce’, ‘Tonewood’…

The pages and pages of discussion about it will confirm to you that ‘Select Spruce/Oak/Cedar…’ was a term much in currency and very accepted. It wasn’t a figment of my imagination.

So, where, how did the term disappear? When and why did the terminology change?

My reasoning (and mine alone) is that after all those online forums let the manufacturers’  cat out of the bag, explaining what ‘Select Spruce’ actually stood for, manufacturers didn’t find it profitable to say ‘Select Spruce’ on their product brochures. Instead, it seemed like a good idea to fool people into believing that ‘Spruce’ meant solid Spruce. Enter ‘Spruce’, exit ‘Select Spruce’!!!

Understand this: (In India) If you have a budget of Rs7,000-8,000 to buy an acoustic guitar and want to a brand name, Yama-ha-ha-ha-ha it is!!!!

No one, who wishes to buy a 7K guitar, will look at Yama-ha-ha-ha-ha instruments that cost 20 – 30K. If they do, they would realise the difference.  On the company’s website and in the 7K price range, you have just two (popular) models. From my viewpoint, it is a choice between the devil and the deep, but you, as a prospective buyer, feel you are spoiled for choice!

WHATEVA!!!!!!!!!!!!!

Back to the repair that I was at last week, I had put the instrument in that vice grip

on September 12 (Saturday). I pulled it out of the vice on September 18 (Friday), glued in the nut and strung it up with .010″ strings, just like I said I would. The instrument would never be able to bear the strain of .011” or .012″ strings again.

It was a disaster! Even with just the 6th and 5th string on, you could drive a double, double decker bus under the strings.

The saddle height was exactly what the original saddle was, and the action at the 1st fret was within specification. But as I observed, the belly was returning to the instrument, even as I watched.

It was very disheartening but there were two routes that one could take: return it the way it was to the customer, or, have another go at it, with renewed vigour.

I decided to take the the second route, called the customer, explained things to him, and he was most understanding about me wanting to try and correct whatever lapses in construction there may be.

As my effort continues, stay tuned for updates!

Yama-ha-ha-ha-ha-aha-aa-ha-ha-ha!!!!!!!!!

This landed up on the counter needing attention seriously.

The owner said that he had got the instrument previously repaired at that big music shop in the vicinity of Fun Republic but besides the old fault lines opening up, new ones developed (encircled in red).

If you hadn’t guessed it, the guitar was

But, more than the damage, I was surprised that it was a Yamaha. I had always thought that Yamaha’s F310 and F310P were solid top guitars. How wrong I was!

The ‘spruce’ veneer on the top was thinner even than the useless pickguard that had been put on.

Not to rest, I searched on the company website, and sure enough, I found that the company wants prospective customers to believe that they are putting solid spruce tops on these models. See for yourself:


https://in.yamaha.com/en/products/musical_instruments/guitars_basses/ac_guitars/f_fx/specs.html#product-tabs


Now to the problem at hand. The lifting of the top and the veneer peeling off like this was most likely due to two reasons: a) inadequate construction (read bridgeplate not big enough, or of good, hard wood), and

b) instrument not cared for. It seemed that the guitar had been left standing tuned up where the heat and humidity had got to it.

PLEASE…don’t let your acoustic instruments stand (or lie) in places where you wouldn’t like to be.

The bridge lifting under string tension and consequent cracking of the top veneer was proof that poor quality wood had been used to make the bridgeplate, or, that the bridgeplate was inadequately sized to perform its function properly.

Having said that it should also be noted that after a period of time, the best of guitars see a bit of ‘belly bulge’ (a rising of the area of the top behind the bridge). However, if the bridgeplate is made out of a good hard wood (mahogany, rosewood, maple, walnut, etc) and has proper dimensions, you will never find accidents like these happening. In fact, a ‘good’ bridgeplate will minimise belly bulge in an instrument to a great extent.

As you can see, the size of the bridgeplate (the trapezium-shaped piece of wood with six holes) is almost alright. It is the quality of wood used that is suspect. It is a practice with reputable manufacturers to use the same wood as the back and sides (in solid wood instruments) to make the bridgeplate too.

Even in laminate guitars from reputable makers, much importance is given to the size of the bridgeplate and the wood used in making it.

So, why would a manufacturer put in a useless piece of wood as bridgeplate? It cuts the cost of production!

In this particular guitar, nothing can be done now, except change the bridgeplate, which is a very troublesome process and expensive for the customer. Unless one is emotionally attached to the instrument and wishes for it to play perfectly, I never advise such operations.

Inspecting the instrument, I saw more than the normal ‘bellying’. At either end of the ruler there was at least 1 to 1.5 mm of space. Ideally, you’d want no space at the ends and the ruler to touch the top all along its length.

As a result of the bellying, the action was a whopping 7-8 mm!

So, the strings came off, the bridgepins went into their hold and I pulled out the plastic saddle and nut to replace them with a proper, compensated bone saddle and a bone nut.

But while I was taking the strings off, I saw this. The string was in two parts, yet attached to the tuning peg!

Relieved of string tension, suddenly the cracks in the top did not look as ugly. But they still needed to get treated. An injection of glue was what the doctor ordered.

This is your regular wood glue, but with water added to it to make it flow better. This was injected (read flooded into the crack) and it looked something like this

Then to ensure that the glue reached even the smallest recess, I pumped it with my fingers and thumb just like this

and then putting a flat piece of wood over some butter paper, I clamped it down good.

To take some of the belly out of the instrument, I did not just clamp the repaired area but the entire bridge region.

After 48 hours, I turned my attention to the lifting veneer at the shoulder of the guitar.

The process was repeated near the fretboard extension

Six days later, all the ‘open gaps’ had been closed and the guitar no longer looked like an instrument that was going to fall apart any moment.

But while the instrument was clamped up, I continued working on other parts that were still accessible.

I had noticed that the fretwires – especially the first five – had managed to develop rather large divets. If these grooves are not removed, they have the power to alter your intonation. So, I gave all the fretwires attention, with special focus on the first five.

After that the fretboard was cleaned and oiled and the old plastic saddle and nut measured. These measurements were then transferred to the bone elements, and these elements installed.

What I also did was to take my biggest and heaviest clamp and clamp down the belly. Every 6 hours or so, I would go and give the clamp a one-and-a-half twist and increase the pressure on the top.

But after a few days, I decided to remove this clamp and put the guitar in the vice grip of a contraption that I made many years ago.

These are basically two lengths of hard wood with cork lining underneath so that the top and back do not get damaged. 

I don’t promise that the belly will go away completely, but it will certainly be reduced far greater than what it came in with.

Now, I await the customer to hand me the strings that he wishes to throw on. A simple set-up and I am sure this baby will sing again.

So, how tough is installing a pickup in a guitar?

I think I have said this before but during the period of the lockdown, and even now – when people are avoiding physical contact – embers of lost passions are being rekindled: gardening, cooking, writing, music…Nice!

People are getting reminded of musical instruments that they had left standing in store rooms, years ago. They are being pulled out, being burnished and refurbished to breathe new life into them again. 

Take this one for example:

It came to me in this state. I have cringed at the sight of such so often that my face muscles refuse to contort into a cringe any more. Instead, I only smiled in amusement.

Whateva!!

This came in for a pick-up system to be installed but while I looked the guitar over (after not just cleaning but disinfecting it properly), I saw something that I have never seen: an instrument with serious identity issues!

 So, after scratching my chin for long and trying to figure out what may have happened to this poor guitar, I was still scratching my chin! So, I left my chin and the name of the guitar alone and decided to get on with the work at hand.

The pick-up paraphernalia had been provided to me, but some low-tack tape is excellent for such jobs. Why? It helps the marking process and all measurements and sundry jottings can be made on it. Measurements were taken and markings made.

Once it was decided where the pre-amp unit would sit, I drilled four holes at the four corners of my marking with a tiny drill-bit and graduated to bigger, thicker bits. I then sawed off the portion within those holes. A very painful process to watch for an owner, but thankfully, this one’s wasn’t around. 

Even after the space was created for the preamp unit to sit in, it had to be cleaned up to produce clean, sharp boundaries. Again, the tape played a role in protecting the surrounding area from slipping drill-bits, saws and files. 

Then there were holes to be drilled for the jack input and the piezo element (which was to run in the saddle slot, under the saddle).

A step-bit is a wonderful tool but requires careful handling. Marking off the distance I had to drill with tape, helped immensely.

The rest was just about putting in things where each needed to go. 

And now for some oddities that I found in the guitar.

I found this inside the guitar

You will recognise this from the shoe box and other such. It is a desiccant and its job is to keep the surroundings nice and dry. I wonder if someone had dumped a cup of tea or coffee inside and had dropped the silica gel sachet in too, to keep things nice and dry, OR…had deliberately put it in?

Never leave a desiccant inside your acoustic guitar, or you might go to sleep having played it, and wake up to find the guitar open at its seams!!!!    

On the left is the bridge with two extra spots on either side of the bridgepin holes. These plastic dots (in this case black) generally hide screws which hold it to the top. However, a peek inside showed just one screw and a dry wall type screw at that, clearly hanging down from the top. Staying with the bridge, it was lifting

and oddly enough, seemed to have moved from its place. It could be either – that the strings had pulled it forward, or, that it had been stuck in the wrong place originally.

However, it was not my brief to correct these aberrations, so I let sleeping devils lie.