

After a long, long time, a proper guitar on the counter top and as you can probably notice, not too used also: the pickguard still carried the skin from the manufacturers!
The lady player brought it in on the recommendation of an acquaintance, who is my customer and also an avid reader of this blog.
The trouble, as she said, was that she noticed that the action had got increasingly high over the period (around 1 year) she had owned it. She also complained of a certain ‘dulling’ of the sound.


As I measured the action (left photograph) at the 12th fret, it was 3.25 mm. Ideally, I like to see 2.25 mm or better still 2 mm at the 12th fret. So yeah, the saddle would need to be pulled out and given some amount of shaving.
Meanwhile, in the photograph on the right, I am trying to measure the action at the 1st fret. I know you can’t see it but I am holding a .025″ feeler gauge when ideally, I like to read between .016″ – .018″. Again, the nut height would need to be reduced.
As far as the ‘dulling’ of the sound was concerned, though I did not feel the same when I played the guitar, but I took the young lady’s word for it. If you look closely at the photograph on the right, you see even the thickest string buried in the nut, while the 1st string is deeper inside.
What you should see on your guitar nut is that all strings – thick or thin – sit just half their circumference in their respective slots. Since these weren’t, that could be the possible reason for a certain deadening of the tone.
So, I advised the customer to have both the saddle and the nut replaced with bone elements and with new strings, everything should be sorted out. She agreed.
I took off the strings, pulled out the bridgepins and kept them, each in its respective slot in my block, so that when they went back into the guitar, each pin went back into the hole it came out of.

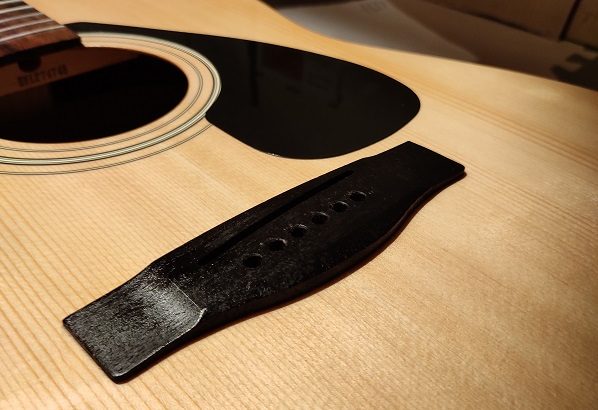
As I took out the saddle, I realised that there wasn’t much meat in it. I measured and marked, and this is how much I had to take off it. Likewise, I measured and marked the nut too.

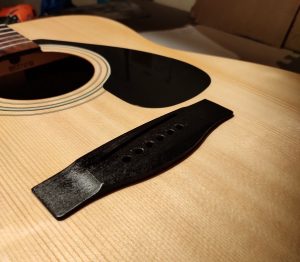
This, of course, is the saddle that was installed in the guitar. I shaved it, put it back in, put back the old strings, just to see if everything measured up.
Since everything added up, I took off the strings again, took out the saddle and the nut, took a swanky new set of bone elements, marked them with the old, plastic elements and shaved off to the required height.
After I put those in and left the glue to dry on the nut (you never glue in the saddle!), I decided to give the fretwires a shine and oil the fretboard too with boiled linseed oil (Alsi ka Tel I think, it’s called). Here, you can even catch a glimpse of the new bone nut installed to the correct height.

Along with the fretboard, I also decided to pay attention to the bridge and gave it a little drink of oil. Doesn’t it look pretty?
After the glue had dried, and the excess oil had been taken off, it was time to restring this beauty. To give the owner a bigger bang for her buck, I had suggested that she try .013″ to .056″ gauge strings. The strings chosen by the owner were these:

Of course, I did point out that while the volume will increase appreciably and there will be better sustain, initially, these strings will be painful and will need a little getting-used-to.
But before actually stringing the guitar, there was one little step to be done: shaving the bridgepin ends at an angle so that the ball-end of the strings did not catch on the pin ends but slip off them to rest against the bridgeplate, where they ideally should.
This is what the bridgepins and ball-ends of the strings looked like at the end of the exercise:


And as each string went in, it got a little 90° bend in it, again so that the ball ends did not rest on the pin ends but against the bridgeplate.
After stringing it up and tuning it to pitch, the strings needed to be stretched to bring them out of their ‘Inertia of Rest’ and get them used to the tension that they would be living under.

The reason why you often find new strings losing tune fast is because new strings are not stretched, or not enough. Do this one little step and your guitar should never fall out of tune again.
The customer had also requested that I install a strap button on the heel of the guitar. This is how it looks now.

And the guitar itself? Here it is:


The F310 is a lovely starter guitar and I have long suspected it would punch way above its weight with a bone nut and saddle.
Great job.
Thanks for your comment, Pete!
However, here in India, the Yamaha F310/F310P are the crappiest guitars around (frankly speaking)!!!
Interestingly, these models are the most sold too because of their price points!
Wherever you’re placed in the world, maybe, Yamaha does a better job with these models but not so in India.
Within six months these guitars start sporting a belly, which leads to a raised action: all because the bridgeplate that the company puts into the guitars leaves a lot to be desired!
Hey Amit. Beautiful posts. I noticed that you return the pins to their respective slots. I have seen people do this for Martins. Is that relevant for Yamaha also? Are the pins differently sized ?
Hi Dheeraj!
For any guitar which employs pins to hold strings, pins should return into the hole from which they came out – whether a Martin, a Taylor, a Seagull, a Maton, or a Yamaha.
Thank you.
Where can I buy a bone saddle which fits F310? I see ones in Amazon have intonation adjustments for B and E strings, whereas Yamaha it is one straight blank.
There is nothing wrong with a saddle having intonation adjustments: your instrument plays that much true!
Try using the intonated saddle and you’ll be pleasantly surprised with the results.
However, I can only wish you luck with the ware available on Amazon!!
Can you please tell me the bridge saddle measurement of yamaha f 310. Ver informative article.
Can’t remember completely but I think it’s 72mm
What is the nut measurement for the replacement?
It’s different for different instruments but generally around 43mm.
I thing u can make this possible..and u hv sorted out all the problems one by one in a serial manner..which is very important.
Thank you, Ritesh!
Stay in touch!
An awesome person and perfectionist
You are most kind, Dev!