Guitar repair – Bridgeplates: Introduction and functions!

Wonder if you all remember me saying that instruments come to me in twos or threes. Either two or three of the same brand, or, two or three with the same problem.

After I finished working on two instruments with a belly bulge and lifting bridge, I thought it was time to talk about the whys and wherefores, guitar anatomy, strings and all that good stuff.

In the last two posts, I have touched upon the issue, causes and remedies but a detailed post was in order. So, here goes!

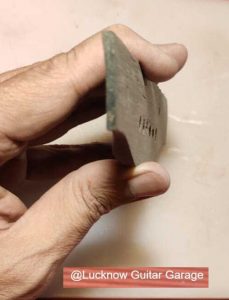
The second photo shows you a bridgeplate and where it is situated in the guitar, while the first photograph is a diagrammatic representation. There is no one design of the bridgeplate, but it usually fits into the ‘X’ brace.

As you can make out, a bridgeplate is placed on the underside of the top of the guitar, right below the bridge, and its job is to buttress this area where there is most tension – due to the strings.

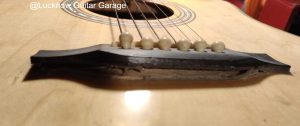
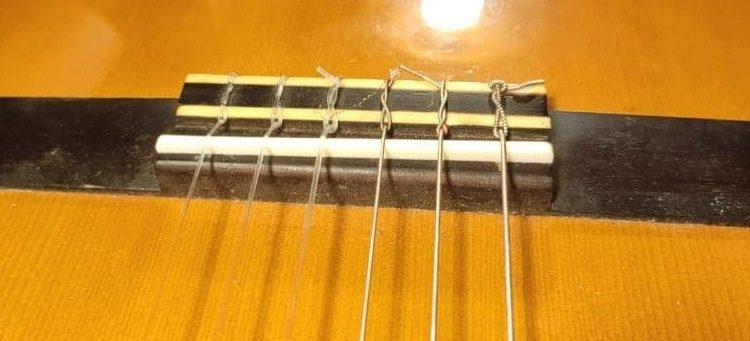
The two photographs above show the bridge area with the strings and bridgepins, and the underside with the ball ends of the strings sitting resting on the bridgeplate.

Now, imagine the strings tuned up to pitch. They are pulling up with a force equivalent to almost 80kg. Their effort is to rip the strings right out of the top. The only thing preventing that from happening is the bridgeplate. If any of the following – size, thickness and material – is not up to the mark, the bridgeplate will surely give in, resulting in a belly bulge, high action, and the bridge lifting under stress – much like this

NOTE:  A little bit of belly is normal EVEN in the best guitars (the Martins, the Guilds, the Taylors and the Gibsons), but the difference from budget guitars is that the belly will appear after a decade or so of playing.

In extreme cases, the tension of the strings even breaks the bridgeplate.

I find it strange that guitar ‘pundits’ and so called experts speak about everything under the sun but seldom refer to the bridgeplate as one of the first things to check when you’re buying a guitar – new or used!

The bridgeplates that I have seen are light-coloured woods, which tells me that these are not hard woods, and thus, susceptible to buckling under the tension of the strings.

Even a maple bridgeplate (as seen above) – the wood is considered a hard wood – is incapable of bearing the strain of the strings.

Instead what you want to see inside your acoustic guitar is a piece of a dark wood


SIZE, THICKNESS & MATERIAL

A piece of hardwood – rosewood, mahogany, ebony, walnut and paduk – no lesser than 1.4 mm thick and no thicker than 1.8 mm is said to be of the appropriate thickness.

The length and breath of the plate should be such that the ‘X’-brace pocket is relatively filled. Look at the first two photographs. That is the general ‘popular’ shape of the bridgeplate. However, I would prefer to see the area right from the point where the arms of the ‘X’-brace cross to at least some portion in line with the tone brace being covered by the bridgeplate.

Make it too large, or too thick and it will not let the top vibrate, resulting in a dull, muffled tone!

Why the emphasis on a hard wood for a bridgeplate? Because the top itself is made of soft wood which can vibrate much easier as compared to a hard wood. Basically, the hard wood compensates the vibrating top and lends a lot of structural integrity.


STRINGS PLAY A HUGE ROLE

The gauge of strings that you usually string your instrument with plays a huge part in how quickly the neck starts creeping up (warranting a neck reset), whether the neck-to-heel joint starts separating, how quickly a belly develops and how much damage is caused to your fingers.  

The lighter the gauge, the smaller the effect and vice versa. To think that by putting on the lightest gauge there is you can delay the inevitable, is true to quite an extent. HOWEVER, what about the sound? Can you really appreciate and enjoy the tone of your guitar?

Thinner strings will always give you an amplified treble response while thicker strings will accentuate the bass response. 

If you are a purely rhythm player and own a dreadnought guitar, the thicker the strings used, the bigger is the bang for your buck! But then you know string tension is playing havoc with your guitar.

The path to take is the middle road. Not too thick strings and not too thin.

Here’s to the health of your acoustic guitar!


Guitar repair – Spalted beauty gets bone-embellished!

Recently, I had the pleasure of working on a Fender auditorium-style guitar (all-laminate construction) sporting a spalted maple top. It had the same beautiful spalted maple as headplate.

For those interested in these things, the model no. was FA-345CE SP MPL FSR LR and the serial no. was IWA1913137.

I’ll talk about its problems later but first the appointments on this baby. It had laminated Lacewood back and sides, a cutaway and some very pretty tortoiseshell binding.

The fretboard and bridge were Indian Laurel while the neck was Nato. And while the Viking bridge lent it character, the Fishman electronics on it just brought it all out. The factory-fitted nut and saddle were Tusq.

Oh, and did I tell you that it had my favourite butter bean tuners on it?!

It was in because the owner felt that the instrument had lost much of its ring and sustain. As I looked at it, I thought the action was a little high for my liking. I glanced at the bridge and I saw this

Not too much of a gap but there was one and it could be seen plainly by eye. There also was a belly in the instrument which it must have developed over time – nothing alarming but put together with a rising bridge, enough to put the action beyond playable limits.

The owner understood that bridge-correction would lead to action correction and so we decided to take the bridge off completely and re-glue it. Also, the problem of the instrument losing its sustain could only be sorted out by replacing the Tusq saddle with a bone nut and saddle. That been said, it was a bit flummoxing how and why the instrument lost tone over time.

I started by chucking the nut and saddle. But before that lots of measurements and math…

I cut the new saddle and nut to the correct dimensions and set them aside. First, I needed to pull off the bridge.

It came off with a little effort

but I failed to recognise the glue used to stick the bridge to the top. Whatever the glue, it was very clear that it had not reached the very extremities of the bridge (as you see in the last photograph). More importantly, lacquer/varnish had been sprayed over the bridge area, on which the bridge was glued directly: always a recipe for disaster!

And then began the slow and steady battle of chipping away at the lacquer – millimetre by millimetre!

In the last photograph you can truly admire the spalted character of the maple veneer.

But now that the bridge was off, I decided to try and take the belly out of the guitar. Heat, moisture and clamping was the way to go.

48 hours later, the results were very encouraging and I was happy that I would be glueing the bridge onto a flat surface – imperative for a solid, permanent glue-job.

The glueing went without a hitch. The more the number of dry runs, better is the actual job. Once complete, glueing commenced.

After three days, the clamps came off and all was flat and good. Another 12 hours and then it was time for strings.

Before I threw the strings on I decided to give some love to the fretboard and bridge

But as I threw on a fresh set of strings and tuned them up, the belly slowly returned, throwing out of whack all the calculations and shaping the saddle had received. Cest la vie!!

A whole new set of calculations and another round of sanding later, the action came down to a comfortable level. Time for the nut end of the guitar to get some attention. Each string slot was worked till each string sat perfectly in its slot. After the final shaping of the nut, here is what the saddle and nut looked like

And here’s what the action looked like

Before I let the guitar go, here are some final views of this beauty

Guitar repair – Time to bid adieu to Snow White?

I have said this before but I will say it again: wood has a memory. Once it attains a shape, it likes to stay in that shape. You can give it all the heat and moisture that you want and try to bend it the other way but soon after the external factors (heat, moisture, clamping pressure) are removed, it returns to its original position.

This could be a warped table top, cupboard door, arm rest on your favourite chair and just about anything made of wood.

In the case of acoustic guitars, try and think of a twisted neck or a tensioned-out-of-whack bridgeplate: they too shall return to the ‘normal’ they know as soon as the external factors are removed.

If it’s the bridgeplate and you throw on strings on your guitar, it is a surety that if the warp in the bridgeplate would have returned in 90 days, under  string tension, it will return in 45.

And here I am, doling out wisdom after I suffered at the hands of a particularly truant bridgeplate!

The antecedents of this naughty bridgeplate are recorded here

A date with troubled Snow White!

and here

Snow White ready to go home

Snow White returned and I noticed that someone else had tried something with it for the bridge was lifting – gaping actually – and in the yawning gap I could clearly see something like epoxy.

The owner explained that the bridge had begun to lift again and so another repair person was consulted. So, after this repair person’s luck failed him, Snow White seemed to have been stood in a corner and forgotten about! And so it accumulated dust and dust worms one too many.


The accumulation on the saddle is rather telling, wouldn’t you say so? Whateva!

But as I looked at the guitar, it was apparent that string tension had more than played its part in all the days that the instrument had been left standing. The bridge was completely contorted.

As I tried to pull out the bridgepins and remove the strings, this happened

As I took the bridge off, this is what I saw – my old friend, Epoxy!

Meanwhile, the bridge itself was on an almighty curl.

Do you see it too?

Since it was in my hands, I started working first on the bridge itself. I first cleaned the under surface and then went about trying to straighten the bridge. It wasn’t heat, moisture and clamping but just plain sanding.

Mark the bridge, lay it flat on a sandpaper and keep sanding till the marks disappear. Have a second go at it and then a third till all the marks go in two or three strokes.

The last few photographs show how flat I was able to get it. Yes, if you see clearly, you will notice that one of the wings is thinner than the other. But that had to happen if one wanted to straighten the bridge out.

But this was just half the job. The other half entailed that I flatten the belly in the top too.

However, as I looked, it seemed to me as if the there was  a crack running right through the bridgepin holes in the top. A closer inspection proved I was correct.

Before anything else, this needed to be rectified; and rectified it was.

To remove the belly from the top and taking into consideration the past of the instrument, this time, I chose a thicker, longer board, wet both the bridgeplate as well as the top and clamped up everything tight before you could breathe!

After 36 hours, there was some change but not as much as I would have liked to see. So, I had another go at it and changed the position of the clamps.

After 48 hours, the results were more encouraging.

With a relatively flat belly, the stage was set for the mating of the two surfaces: the bridge and the top.

Lots of glue, lots of planning and even more clamps later

After 48 hours, it looked like time to release the stranglehold on the instrument. The clamps were taken off and the instrument set aside to let it breathe.

As it breathed, it was just the right time to buff out the body.

And a little love potion on the fretboard and some TLC for the fretwires and Snow White was resplendent again and ready for strings.

After stringing it up, I left it for another 2 -3 days to see how the instrument was coping with the stress of the strings.

It was doing fine for that period but soon the action started rising and as I looked at the bridge…

Ah, well…! You can’t win always!


Guitar repair – The mystery of the missing saddle and a classical set-up!

It is always such a pleasure to know that not all people owning classical guitars (slotted headstocks and nylon strings) bought the instrument by mistake.

90% of classical guitars that come to me are people wanting an ‘upgrade’ – steel strings instead of nylon and other such. They wish to sling the guitar over their shoulders and rock out. It takes a lot of patient talking for them to realise that what they own is an altogether different beast from the one they were dreaming of owning.

And so, it is a pleasure when a person comes along who knows exactly how to hold a classical guitar, how to play it and what to play on it.

One such young man landed up at the Lucknow Guitar Garage with a peculiar problem. He had the strings in place but somehow, the saddle had dropped out and had gone missing! That was a new one, even for me.

And, of course, there were other minor irritants: the string ends on the headstock could have been a whole lot neater.

The guitar itself could have been a lot cleaner – the black spots that you see (if you can), are basically dirt deposited on the top of the guitar.

And, of course, the fretboard was a filth dump!

Also, the owner wished for the action on the first fret to come down: so, it was basically a set-up and clean-up job.

With the strings off, I went to work and it is truly amazing to realise how a little bit of time and some elbow grease can make your guitar look like a totally different instrument.

Then came the harder bit of fitting bone in the saddle slot. The saddle blank was a whole lot taller and wider than the slot. Incremental reductions in both dimensions left the saddle standing exactly where I needed it to be.

A fresh set of strings and all was well with the world, only except I broke a string!!!

The owner was quite forgiving though and said he had already ordered a fresh set of strings online. He was happy with where the action sat with the five strings.

Guitar repair – Bone nut, saddle & a set-up for Mr Fender!

The process of my blog posts is basically through photographs that I take of the job at hand and then try to spin a story out of them, trying my best to remember what happened and how. It had worked for me till now.

I must confess that in the best of times, recalling events, sometimes from two months ago, is no mean task. Today is Saturday, dinner time, and the fever I ran through the week has impaired my thought process terribly. As I sit down to look at the photographs, I am scratching my head – ‘Was it this’, or, ‘Was it that’???

Fair warning for a post full of inconsistencies! Here, I must appeal to the owner to write in and correct me wherever he feels I have gone wrong in documenting the facts.

On my part, I have decided, henceforth, not to rely only on photographs but to make more detailed notes while I am working.

With that out of the way, let us begin today’s saga.

This Fender CD-60 landed up on my counter almost a month back for a set-up and some new strings

Yeah! It wasn’t the cleanest guitar I have seen

but that could be remedied.

But paper shoved into the ‘e’ string hole to hold the bridgepin in, was a new one for me

And yeah, that is a plastic saddle

In the first photograph, you can see the cobwebs on the machineheads, but I failed to capture the nut there.

So, since the two had to go and were to be replaced by healthy, bone elements, let’s just cut to the chase and say that the swap took place without too much time or effort being wasted.

What I must mention here is that the owner decided to go for an unbleached nut (yellowish) instead of the usual bleached one (white). But before those got popped in, there was other work to be done. 

With the strings off, I cleaned up the fretboard, burnished the tarnished fretwires and oiled the fretboard and bridge.

Then came the fitting of the nut and the saddle: lots of measuring and sanding and measuring again before they sat in their respective slots.

With strings on, there came another few rounds of measurements and sandings. 

Finally, it was done

The issue of the paper stuck in the bridgepin hole of the ‘e’ string to keep the bridgepin from popping out, was simple enough. Once the ball end of the string sits right on the end of the bridgepin, the pin is bound to pop out as you tune up the string.

If it is ensured that the ball end is not caught on the end of the bridgepin, I see no reason why the pin should pop out.

I think I scored another happy customer!