Guitar repair – Setting right Humpty Dumpty – I

Humpty Dumpty…er…this Epiphone DR-100 VS came to me like this


‘Some of the king’s horses and some of the king’s men’ (with apologies to Lewis Carroll), had tried to put ‘Humpty together again’ (four times, according to the owner) but had failed in making the fix a permanent one. And so, it finally landed on my counter.

The owner said that he was willing to give it one last shot at trying to save the instrument, and I had my work cut out for me. No repair would be possible without first removing the old glue. This was no mean task for the glue tends to get into crevices and corners which not only impedes proper contact but also a proper glue-up later.

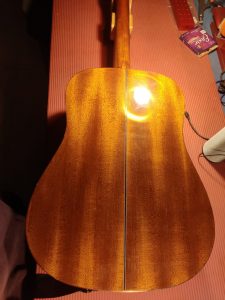
But as I assessed the instrument, I noticed that it had a rather pretty tobacco-burst. In the photograph it comes across much darker than it is.

I was also pleasantly surprised to see that even the back and sides were solid mahogany, while the top was solid spruce.

The build quality was nice except that not a great deal of care had been taken in glueing on the braces, for there was loads of squeeze-out on either side of all the braces. Also, the bridgeplate looked to me as if it had been made out of some leftover spruce. If that is the case, I don’t expect it to last too long and should give way in nine to 12 months – provided this repair effort comes through.


The glue

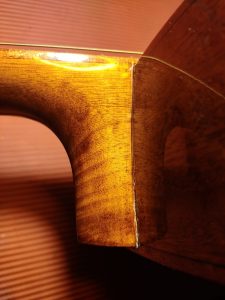
To soften the glue, in order to have the best chance at removing it, I gave it a lot of heat. And as I heated it, I got a very familiar but terrible smell. I picked at the glue for sometime, before I realised what it was – Araldite!

I let out a string of expletives but that was all I could do and it did nothing to make the Araldite go away!

To have the best shot at removing the glue, I put on my magnifying head gear and began removing the glue. After a good 45 mins of labour, I had this to show for results. This is just one corner cleaned of the glue that was very obvious.

After one-and-a-half hours of effort there was more mess on my table but the mess on the two surfaces of the headstock was clearing.

This morning I finally managed to clear all the Araldite in sight (under magnification) from both surfaces. I had to go over the two surfaces twice each so that I could remove as much glue as I could see. Did I manage to remove all the Araldite? No way, but this is how the two surfaces looked!

I tried mating the two surfaces but there were certainly gaps. I expected nothing else considering that this was the fifth attempt at glueing the headstock. However, I wasn’t too worried about the gaps. Those would be filled with my saw dust and wood glue paste and sanded flush.

Would all this make a permanent joint? Nope! Pieces of wood would need to be installed at strategic points to actually hold the two parts together. The proper way of tackling a break like this is to cut two channels running from behind the headstock to the neck (leaving a gap where the truss rod would be) and installing splines. But that requires a proper jig which would help cut proper channels, taking into consideration the headstock angle, shape of the neck, etc. Too involved!

I have done these repairs before with just pieces of wood shoved in at strategic places and have never had a complaint. I see no reason why it shouldn’t work this time. 

But that is for later. First the two parts must be brought together – even if temporarily – so that the part two of the surgery can be performed. So, I put on a generous dab of glue on one surface and held on the mating surface where I felt it should go. 

A brad nail helped hold things together.

Now, a wait of 48 hours before I remove the nail and see how well things have bonded.

Next week: the second part of the reconstructive surgery!


Guitar repair – why instruments should not be left tuned up

Here’s a perfect example of why I keep stressing upon guitar players to de-tune their instruments if they know that they will not be playing it for three weeks or more.

String tension is a very bad thing for the health of the guitar but when a guitar is being played, some of that stress is counteracted by the movement of the various parts of the instrument (top, neck and back). However, if left standing with nothing to counter that force, string tension can have disastrous effects, as this owner learned.

Let me begin by congratulating Kadence for building the very aesthetic, all-mahogany KAD-SH-103 EQ (a part of the Slowhand series). I must confess that I am not a very big fan of guitars built entirely of the same wood (mahogany, koa, etc), but after having played the SH-103, it changed my point of view (kinda)!

Besides the sturdy construction, I was very pleased to see a nice bone saddle and nut in the instrument. But if I was to nit-pick, the slots in the nut were deeper than I like to see.  

So, the owner told me that this instrument was two years old and while he played the other guitar, this one got neglected and was left standing in a corner of a room, under string tension.

My guess is that the heel separation began somewhere in April-end – May and as the heat increased and moisture in the air reduced, the gap too increased, and was only noticed recently. What followed was bound to happen and it is only a miracle that one did not see greater damage than the heel separating.

A good clean-up of the mating surfaces, lots of good wood glue, even more clamping pressure and enough time (72 hours) cured this baby!

I had initially advised putting 13s on the guitar but soon realised that putting those big strings was a sure recipe for disaster. Instead, I ended up putting 12s on it and let the guitar stand for 4 -5 hours under string tension. The following are the ‘after’ photographs.

I also cleaned and oiled the fretboard, buffed out the tarnished fretwires, snugged up the hardware on the headstock and gave the entire body a good rub-down.

My advice to the owner and to you is NEVER LEAVE A GUITAR STANDING UNDER STRING TENSION FOR LONG!

Guitar repair – dealing with over humidification!

Yes! That is a thing, a dangerous thing, and now is exactly the time (here in North India) when over-humidification symptoms begin to surface. Over a period of a month, I am expecting a lot of ailing guitars.

Just like an exposed acoustic guitar (not so much solid-body electrics) can lose moisture, become dehydrated and show symptoms thereof, an instrument can absorb moisture from the surroundings and get over humidified.

Also, if one notices that his/her guitar has dried out and the consequent humidification process goes too far, over humidification can happen, causing all sorts of problems, which may or may not be remedied.

The following are a few problems that come to my mind immediately. Please note that this list is far from exhaustive and there may be other problems associated with over humidification that have slipped my mind, or ones that I am yet to get acquainted with (We all learn each day, as we go)!


The Ski Jump

This is a classic symptom. If you look at the guitar sideways (as shown in my childish diagram), the fretboard tongue (from the body joint till its end) seems to take off into space for no apparent reason.

Also, if you sight down the fretboard, towards the bridge, you will notice that the bridge is invisible because it is blocked completely by the risen fretboard extension.

Not only does this give rise to fret buzzes, on a cutaway guitar, playing on the higher frets is near impossible for the strings are sitting on the fretwires here. 

The remedy here is to correct the humidity content, apply a little heat and pressure.  


Bellying and String Tension

Not always is the bellying in an acoustic guitar due to faulty manufacturing (crappy bracing and bridgeplate used). If it is the wet season and a belly begins to grow, it means that guitar is over humidified. 

String tension acts on the top and helps the belly grow. That is one of the reasons I tell people that if it is known that an instrument will not be played for three weeks or more, loosen the strings.


Shattered Finish

As the top expands after soaking in moisture, the finish on it does not expand in the same proportion and thus the ‘shattered glass’ look.

One may notice this phenomenon growing as the instrument continues to take in moisture. On sudden exposure to moisture – moving from a dry climate to a wet one – the shattering can be quick and dramatic. It is not uncommon for the owner to go to sleep with the guitar okay and wake up with that shattered look.

This is one problem that is the hardest to send away. Besides removing the finish from the top, back and sides and redoing the guitar again, there is nothing that can be done.

Yes, people talk about painting lacquer thinners into the crevices of the ‘shatter’ but that may work if there are one or two cracks. If it’s a maze of ‘shatter’, doing each line separately while being tedious, may end up looking botched.


Curling Pickguards

Yes, of course plastic (pickguard) shrinks with age, but sometimes, it is not the plastic shrinking but the wood it is stuck to, expanding (due to excess moisture). With the wood having moved, a corner or two of the pickguard comes loose, and then with time, the pickguard begins to curl.

First, the wood will need to be treated and then the pickguard needs to be taken off, heated some and then reapplied to the top.


Separating Fretboards


Again like the pickguard, the neck may expand on soaking in moisture, letting go of a part of the fretboard, or the fretboard may expand letting go of the neck.

Again, excess humidity treatment and then a reglue job. If done with patience this should be a clean job leaving no trace of having been worked on.


Loose Braces

Like the pickguard, the fretboard and the neck, when the top expands due to excessive moisture, some or all the braces are bound to come loose, evoking a strange rattle when you play the guitar.

After dehydrating the guitar a bit, all the loose braces will have to be detected and reglued.  


Bridge may pull up


Also due to the top expanding, the bridge may start lifting. Generally, when it is a belly caused by humidity, it is the wings of the bridge that get loose. Given enough time and string tension, the bridge getting pulled off completely is not outside the realms of imagination.


Bridgepin holes get tighter

Over-humidification may also cause the wood on just the bridge to expand. This will cause the bridgepin holes to hold the pins even tighter, sometimes making it impossible to pull them out.

If after reducing the humidity content the bridgepin holes do not get back to their original size, reaming them is the only option. 


Body comes apart/ binding comes loose

In very extreme cases, over-humidification may lead to the top and the back of the instrument to separate from the sides.  

Before this happens,  often, the binding around the instrument gets loose and falls away from the body.

Getting the binding to reglue correctly is a big pain in the you-know-what. There’s heating involved and if the right glue is not used, the binding will never reglue.


Some do’s and don’ts

  • Humidify without string tension

When you feel your guitar is dehydrated and needs a drink of water, do give that drink but completely remove string tension. That way, even if you over humidify your guitar, at least you won’t be pulling a sure belly into it because of string tension.  

  • Check the humidity inside your guitar

There are small and inexpensive hygrometers (humidity reading devices) which you can drop into the soundhole of your guitar. Once there, cover the soundhole with something that will not absorb moisture and leave the set-up for at least 48 hours.

After that time, the reading that you get in the hygrometer will be the moisture content inside your guitar. With that reading, you can either hydrate or dehydrate your guitar. Your aim should be to always keep the humidity inside your guitar between the 45% – 55% range. If the reading on the hygrometer stays in that bracket for over a couple of days at least, your guitar is at optimum humidity levels.


How to reduce the moisture content inside your guitar

That, I guess, is the aim of this blogpost. All you need to do is drop in a couple of sachets of silica gel inside the soundbox and cover up the soundhole.

Silica gel sachets are those which you often find inside shoe boxes and packaging of electronic goods.  

You DO NOT open the sachets, you just drop them as they are inside the guitar. For excessive humidity effects on other guitar parts, you need the drop a few in your guitar case, close it up and forget about the guitar for at least a week. 

Later, check, and if needed, repeat the process.

SO…if you are buying a new guitar and the salesman tells you that you must put in silica gel, just nod and forget about it. Those ‘experts’ who tell you that silica gel is needed to keep the guitar in good shape, ask them to take a walk!


There is a little caveat to this entire blogpost: whatever you have read up to this point is primarily for solid wood guitars (If you don’t know what that is, search this blog for ‘solid wood guitars’). That is not to say that laminated wood instruments are not affected by excess humidity or the lack of it. It is just that changes will be minimal and many times, unnoticeable in laminated guitars.    


Guitar repair – What will become of this guitar?

I have stalled writing this post for weeks. 

It is about an instrument that came to me having suffered severe trauma after a dumbbell (no less) fell on it! The extent of the damage made the repair cost spiral out of the owner’s comfort level and he decided not to get it repaired (at least not from me!).

I’m sure thought that he will hunt out wannabe repair persons in the lanes and by-lanes of Aminabad who will probably fix the guitar with super glue – quick and dirty – at 1/10 the cost I quoted.

Photographs of the damage follow, and what follow those, are my observations about what would have been a great repair, as also the future of this guitar. It was a Westwood.

Observing the instrument it appeared to me as if the dumbbell fell on the edge of the soundhole closest to the bridge. Obviously, the impact broke not only the soundhole periphery at two places but also cracked the X-brace right at the joint – unfortunately the X-brace joint was right under the point of impact. Due to the impact, all the arms of the X-brace too had been shaken loose all the way and were holding on to bits of glue, here and there.

Also due to the impact breaking the X-brace, other braces running up to it had also been knocked loose.

If I was to rate the damage to the face of the instrument to its innards, the outside would score a 2 out of 10 and the inside 8 out of 10.


Corrective measures

To bring healing to this instrument, one needs to start from the inside out. Check all the braces and glue them with good wood glue ONLY.

Then the soundhole can be repaired but without cleats I doubt if the soundhole repair is going to hold too long.


Problem with super glue

Cyanoacrylate glue (or super glue) is a great glue: smaller mess, fast-curing, great, strong bond. So what is the problem? It’s strength is its greatest weakness, for it is so strong that it dries hard and brittle.

For furniture which does not need to move, super glue works perfect. For string instruments, it is the worst glue ever.

Let me illustrate with this particular guitar in question. Now, it is very easy to wick superglue down all those broken braces, clamp them and the guitar is healed. But…how long will the guitar stay healed?

As you play the instrument, as the top vibrates – and along with that the braces – the vibration is going to break the superglue loose sooner rather than later. 

And what then? Will the owner get the instrument repaired again? Will anyone hazard taking on a job that has been botched earlier?

And this is where my dilemma begins. Am I doing something wrong by trying to do things the right way? The right way, the right path, is always tougher. So, am I right in making things hard for myself?

Anyway!!!!


What I ended up doing

Since the instrument had come to me, I just could not let it go just like that. Earlier, before I had fully realised the extent of damage, I had told the owner that we would need to cleat the guitar at the soundhole. Now that the repair had been called off, I felt that I should do at least something for the instrument.

The impact of the falling dumbbell had caused uneven planes at the point of impact. No side wished to align with the other. With clamps and brute force, I brought the two planes together. Once that was done, I put a mix of sawdust and glue along the break.

Not a very pretty picture but at least, now, the instrument won’t ‘look’ broken. This was before I tried to disguise my effort a bit. My rationale in doing this was that the joint would come under the strings which would hide it somewhat. 

However, I did caution the owner not to string up the instrument before he got the braces repaired inside.

If he pays heed the guitar will remain playable. If he doesn’t, he’ll see the instrument collapse before he is able to tune it up to pitch!