Guitar repair: This Yamaha required emergency surgery!

This Yamaha came to me a few months ago in a great deal of distress. In between came a host of instruments with various humidity-related issues which leapfrogged this one.

This too is partly a result of the lack of humidity as you will discover.

A 3/4 guitar, it belonged to a lanky, soft-spoken recording/performing artist. As I inspected the guitar he told me that this guitar had been lying with his brother for two years. The young man was attached to this instrument and wanted it fixed proper.

I don’t think that it was cared for very much during those two years, for this is how it came to me.

While you see the bridge cracked, it was also lifting. While casually looking at it, it might appear that the crack was in a straight line. However, that was not the case. Look closely at the ‘D’ string bridgepin hole. You clearly see how the break is in two lines and not one. And it is a deep break, almost running through the entire thickness of the bridge.

I knew I had to be really gentle with the bridge to be able to take it off in one piece. But then gentle is not the word that comes to mind when you are talking about taking off bridges!

Usually, it is a 10-15 min job. This bridge, however, took almost 30. Why?

Because it was stuck with epoxy! See that shiny underside of the bridge. That’s epoxy!

Whatever, there was a job at hand and it had to be done. So, after 40 mins of scraping and sanding, this is what it looked like

After another 20 mins, it looked like this

A final 25 minutes – 85 minutes in all – later, it looked like this: nice, clean, bare wood!

Once the underside was clean, the crack demanded being tended to.

With not too much clamping pressure, I was able to make the two seams meet, well, almost! That gave me much hope and I went about filling, filing and sanding. Slow and painstaking but fruitful.

This is how it looked once I was through! Not bad, eh?!

Now, there may be some of you who might question the amount of effort and time to put a broken bridge together. Why not put in a new one? Well, I could if I had the exact same bridge. I did not. And I was sure I would not have been able to find exactly the same one no matter how hard I searched. Besides, when you put on a new bridge on an old guitar, you better be sure that the new one is slightly larger than what the old one was, otherwise it leaves a very unsightly margin of bare wood showing all around.

With what I thought was the major part of the work done, I turned my attention to the guitar itself.

The footprint of the guitar on the top needed to be cleaned of all extra lacquer and paint. But this was easier said than done, for no matter how careful you are, there will always be chips, dings and scratches that belie your efforts.

I took the chips and dings with a pinch of salt, deciding to touch up once the bridge was glued on.

Here’s the cleaned bridge area of the guitar with the bridgepin holes and the soundhole covered up in preparation for a cleaning of the fretboard. It was an electro-acoustic instrument.

Now, it was time for major surgery: to glue the bridge to the top. But here I was accosted by a problem.

The body from the outside measured 2.75″ (approximately). Then the braces were .5″ on the back. Take another .5″ for the braces on the top. What all those numbers translated to was that I had 1.75″ of space (approximately), to put my hand in, the clamps in to be able to glue the bridge to the top.

Also, the owner told me how good the electronics were. While clamping, I had to also take care that I did not inadvertently crush the piezo piece stuck to the bridgeplate.

After struggling for what seemed an eternity, I finally to get all the clamps where I wanted them to be. Dry run complete, I applied glue, put on the bridge and  clamped it so tight that air would not be able to get in. Thing is, you never get a good bond with just glue. Unless the clamping is just right, either the bond is going to fail soon, or you’re going to break something.

Here’s a look at the bridge under pressure.

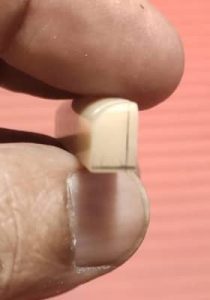
After I caught my breath, I began work on a new bone saddle and nut. We could most certainly do better than the plastic nut that the company provided.

The top-most two elements are bone. The owner had purposely chosen an unbleached bone nut to give the instrument an aged look. But before those could be put in the instrument, they would have to be cut to size, and so…calculations!

Those were shaved down and while I waited for the glue to cure under the bridge, I worked on the fretboard which was in dire need of some love. There were a few fretwires that needed divots removed from them and the fretboard certainly use some cleaning and some love potion.

Also, there were minor irritants like the strap button on the heel of the instrument rather than being on its side.

I swear I haven’t seen a longer screw in a guitar. As I pulled it out, I was fearing that the screw was holding the neck and body together.

That hole was plugged and a new hole was drilled for a smaller screw, on the side of the heel.

When the clamps did come off, the bridge looked as good as new. I was happy with my work.

Now, it was time to bring everything together. It came together like a charm. Here’s a look at the finished job!

Guitar repair: You do as the customer says – Part II

This is the second of the guitars that came to me where I did not understand the reasoning of the customer. I might add that this was a return customer on whose guitar I had worked a couple of years ago.

For those interested in reading about that experience, here it is:

3/4th Ibanez in for string change but danger lurking nigh!

This time, the customer had ordered online a set of bone saddle and nut and wanted me to install it. He planned to give away the guitar and wanted it to be in top shape. Creditable!

However, when he arrived, the nut seemed fine but the saddle seemed to have been shaped by a novice, for the intonation made for the ‘B’ string was situated where the ‘A’ string would ride! And no! It wasn’t as if a saddle meant for a left-handed guitar had been sent by mistake. Besides, the quality of the bone used in making the saddle was very suspect. No wonder the cost of nuts and saddles is less than half the price I charge!

When I first learned that that major e-tailer was selling nuts and saddles, I decided to check them out. I ordered two sets of nuts and saddles. Call it coincidence, poor workmanship or just my luck (e-tailer’s luck?), both saddles cracked under string tension while I was tuning up the instruments.  

I have since preserved the saddle to show customers who think buying from the e-tailer is a great idea. Like I always say, I can only advise and guide. It is your decision completely, and most certainly, your money! 

So, with the situation being what it was, the customer decided that he would take a saddle from me and use the nut procured from the e-tailer. The shocker came later. Though the saddle slot was meant to accommodate a 76mm saddle, the owner was sure that a 72mm saddle would work as well. Of course! Your instrument, your decision, your money! 

The owner said that he would like a really low action. If you can see it, the line on the new saddle (left) shows how much I have to take off the base to get the action right.

He also did not want me to change the strings. According to him, he had a set at home which he would later change himself. Good enough, but that would mean that I had to work with old strings hanging around, and the danger that in the process of winding and unwinding, there was every chance that a string would break. 

While I was checking the guitar, I noticed that the bridge was lifting all around the far side of the bridge.

I showed this to the owner but he decided that the bridge did not require immediate attention. And yes, he understood completely that the raised action on his instrument would be completely solved if the lifting bridge was attended to. And then again, who am I to say anything; your decision, your money.

I got down to working on the instrument and started by taking a look at the neck.

Thankfully, it was dead straight which is how we wish to see it.

Next job to be done? Knocking out the factory-fitted nut.

Usually a tap of the hammer is enough to do the job, but this nut was so well stuck that despite robust raps from the front and from the sides, I failed to dislodge it. Just when I was beginning to think that super glue had been used to hold the nut down, and just when I began swearing, the nut gave way. Maybe the swearing did the trick!

The nut was not super-glued as I had been imagining. In fact, it was seated in a rather deep slot, which was very pleasing to see. A deeper than usual slot for the nut means that the nut is seated perfectly and in perfect contact with the slot walls. What happens then is that sound transfer is much better and loss of sound energy is near negligible.

As I measured the old and the new nuts I realised that the new nut was much longer than the standard nut length! It sat very snug in its slot, such that there was no glue required to hold it in place but it hung out of its slot a couple of millimetres on both sides.

I called the owner and told him about the long nut. He said that he knew about it and it was quite alright if it hangs out a bit.  And that is how it went home!

When the owner came to pick up the guitar, I asked him whether he wished to ‘give away’ or ‘sell’ his guitar? He replied that he wished to ‘give’ it to his sister.

Hearing his reply I could have slapped my forehead in exasperation. Though I did not say as much then, but if it was his sister he was wishing to give the guitar to, so that she could learn how to play, why change a perfectly working saddle and nut, and why not fix a bridge that needed fixing?

Even as I write this, I am shaking my head in incomprehension.    

Guitar repair – You do as the customer says – Part I

My experience with customers, usually, is that facts and logic will appeal to most, if the pocket allows. In my dealings with them, I  place the pros and cons of going (or not going) down a certain route and then let them decide the path they wish to take. Mostly, the choices made are correct, or, if not entirely correct, understandable.

In case I feel that the customer is making a wrong choice, I try to explain to him what could go wrong going down that path. But still if he insists, I do as he says.

I saw two guitars in quick succession which left me first amused and then scratching my head. This is the story about the first one.

The instrument was in for a saddle and nut replacement for the owner of the Westwood had tried to correct the intonation on his guitar by filing the intonated sections on the saddle close to nothing.

Wonder if you can see it, but the area where the B sting is supposed to ride has been filed all the way back. Once things got out of hand, the SOS call came to me. I could do little with the old saddle and had to replace it.

As I began taking off the strings, I noticed this

I showed it to him and he showed no surprise seeing it. He didn’t want me to do anything about it because he felt that it would not affect his playing.

I tried explaining to him that tending to a split bridge was as important as swapping the filed down saddle with a new one, but he would have nothing of it. So, I let it be.

While replacing the saddle, I tried to explain that it would be a good idea to replace the nut too, but he wasn’t too enthused. Instead, he  asked me to correct the action at the 1st fret with the old nut.

As I took off the nut, I saw why I had been finding it odd all along. Although the nut wasn’t of bone, it had been very oddly cut.

The nut slot on the headstock was worse. Not very clear here but it had a thick coat of dried glue. I tried removing as much as I could safely remove.

In fact the rubbish that you see in the background of the nut photographs is the dried glue removed from the slot.

As I began work on his guitar, he said he would get his own strings and went out to get a set.

Some time later, he called to ask me to retain the old strings. By that time I had taken off the strings and dumped them, and after the call, I had to fish them out of the dustbin. To be fair, he had on a fairly new set with just the ‘G’ string missing. It had snapped, I was told. He brought me a spare ‘G’ string and I got to work.

And as we all know, winding and unwinding strings is the perfect recipe for a string break. And so, the ‘D’ string broke on me as I was trying to tune it up.

I rummaged through my pile of spares and found a D string of the right thickness and replaced it.

There was a slight buzz on the open D string, which disappeared once the string was fretted. I let it be attributing it if not to the cobbled together strings, then to the nut slot geography.

A new fresh set of strings would certainly solve the issue.

But why let a split bridge remain split? I just hope he doesn’t call me in six months saying the bridge has completely split into two!!

Guitar repair: The one hit hardest by (lack of) humidity, came in last!

For some time now, I have made my bias towards UK-based Tanglewood guitars apparent to you, readers.

After a long time, I noticed guitars that used good materials, had good construction quality, sounded good, and the overall appeal of the instrument was good. Of course, you get all of these in high-end guitars too, but then Tanglewood is far from high-end, and that is what appeals to me: it’s price point.

So, I was particularly intrigued, even distressed, when this beautiful all-mahogany guitar with a satin finish came in

The owner – a UG student – told me how he had bought the instrument and was just getting his hands set on the instrument when the pandemic struck and schools and colleges everywhere were shut down. This young man left his new guitar strung to pitch in a hostel room that wasn’t opened for nearly two years!

When the situation improved and schools and colleges were reopened, the young man found his guitar with a lifting bridge, a sunken top, the beautiful wood binding coming loose at most spots, and the headstock joint and the heel joint beginning to come loose.

There was also a soundhole crack staring at you.

And as if this wasn’t enough, the saddle was falling forward. I was a little surprised that staying under string tension for two years, with the saddle straining against the bridge, it hadn’t cracked the bridge.

Oh, I had to do so much that I didn’t know where to start.

I suggested to the owner that we throw out this factory-fitted micarta or whatever saddle and put in a solid bone saddle which will sit upright, correct the intonation, and would be a wonderful for overall sound projection. However, the young man declined and I kind of understood that with a shoestring budget and such a lot of work to be done, costs needed to be cut wherever. Besides, he could get a bone nut and saddle installed at a later date.

I wanted to help the young man and the instrument, so I just glued a piece of an old debit card and filed it to where the saddle sat bolt upright in its slot without having to be pushed into it.

Next, I decided to tackle the toughest job, the binding coming loose in places, almost all around the top. Oh, there was a lot of heat and glue and clamping involved and some double and some triple tries before everything finally came together.

Similarly, the neck heel had to be tackled: a job done best under string tension.

I must apologise for the crappy photograph: the flash makes the joint unclear. But do take my word for it, the heel came together rather nicely on each side.

While turning my attention to the headstock joint opening, I noticed that there was little to no difference in the opening of the crack with and without string tension. The seam had opened so minimally that though you could more than feel a lip, even with string tension, there was no way of getting glue in and clamping it shut.

I suggested to the owner that if in the future, it opens up some, we will tackle it then.

As far as the soundhole crack was concerned, the owner was not convinced that it was in emergent need of attention. Again, though I did not quite agree with him, I kind of understood his reason.

The bridge which was lifting was glued back in place and it was a happy sight to see some of it ooze out.

A 48-hour resting period and all would be well. After the clamps came off, there was a certain roughness to the bridge which I found irritating. I decided to take five grits of sandpaper to it and make it as smooth as a baby’s bottom.

I got it that smooth but then I lost all the colour that the bridge had been dyed with!

And thus, began preparations to dye it back.

Once that was through, I cleaned up the fretboard, gave it a coat of the love potion, and some to the bridge too. Considering how dry the instrument was, I decided to put on the potion but never took it off as is the practice. I knew from experience that the wood would soak up the fluid very quickly. This is how it looked after I was done stringing it.

I also gave the body an almighty rub with warm water and then a light coat of the potion to do its magic. The sheen on the instrument would warm the cockles of the heart of any guitar lover. Me? I was thrilled!

And to get the ‘big picture’

Very purty!

I sent home the owner happy, but with the advice that at least for four weeks he had to make the guitar drink water. He had to make it drink water till the water in the container stopped giving up water. I asked him to come back in a couple of months for a re-evaluation.

Till then…!

And yet…who am I to say that this was the last humidity-hit guitar??!! Maybe, there are more in line!

Guitar repair: This too was hit by falling humidity – Part III

This instrument has come to me off and on for something so minor and insignificant that I never charged the ‘customer’, nor did I ever feel compelled to document the work done on it. Those visits could also be that the owner of this guitar was trying to ‘suss me out’, for we had long conversations regarding guitar upkeep, this and that. And I understand that sentiment completely. You don’t just hand over your Epiphone Dove Pro to anybody!


This time when it came in, the owner was plagued by a buzz around the 8th-9th fret area, on almost all the strings. Again, I smiled compulsively and knowingly.


This is from a few evenings ago. If the relative humidity is down to 18%, it is bound to play havoc with all acoustic instruments.

The owner had also brought in the instrument because he wished to have the plastic nut on it


swapped with a bone nut. I remember pointing it out to him in our previous conversations.

I showed him a set of bone bridgepins and he chose these


to go on his instrument. (Not a very good photograph, but it is a abalone dot with a gold circle around it).

There were other issues too. The ‘B’ string had chewed up fretwires 1 to 6 in its path (the usual culprit).

Along with these, there were itty-bitty things like a dried fretboard and bridge and taking a look at the hardware on the headstock.

With the owner still around, I played with the truss rod some and when I was satisfied, handed over the instrument to him. Though he loved the change, I cautioned him not to look for perfection in the coming two months, and to just bide his time.

After two months, the humidity will start rising and reach such levels that it gets oppressive. That’s when acoustic instruments will demand another change. That’s the fun of living in North India! Right now, it is hot and dry, then it will be hot and wet, then it will be wet and cool, then cool and dry, then cold and dry and lastly cold and wet! Ladies and gentlemen, you have to play with those truss rods!

Back to the Dove, I dumped the strings and went to work on the fretwires


That’s after levelling and crowing the first six fretwires and going through six grits of sandpaper on each one of them. You may still be able to see a little dimple along the fretwires where the ‘B’ string had dug in, but that’s harmless, and taking that out would have meant doing all the fretwires. Not required right now.

That done, a coat of the love potion was mandatory on the fretboard and the bridge.

Then I turned my attention to the headstock and snugged up the hardware there. The buttons of the tuning machines were a tad too tight, or so I thought. So, I loosened them up a little, till they turned just fine.

Next, major work: bridgepins. I tired fitting the pins in their holes but they would not fit, so I had to ream them. But it seems I forgot to capture that on camera (so like me)!


Once they fit perfectly, I began installing the new nut. The nut was shaved down to the right height and then each slot was worked upon so that each string had the near perfect action at the first fret.

The owner had chosen these (after a little prodding) to go on his guitar. I had argued that he being a performing artiste, would love the bigger bang 13s delivered for his buck.


Here’s how these came together


After everything was done, I was buffing out the body, when I noticed these scratches where the playing arm elbow would normally rest.


Wonder if you can see it…it’s just after the reflection of the light bulb. Anyway, I didn’t do anything with it and decided that I would ask the owner and then buff out those marks.

Maybe next time!

But remember this was a humidity patient? Well, this wasn’t the last.

Betcha, there’s more of ’em comin’!