Miraculous sound transformation in this one!

Most guitar repairmen often say this, but I am only realising it now: guitars come in batches!
Last week I worked on the same model of the same company and this week, its sibling lands up.

The week before last it was a Yamaha F310. If you consider price range, all three guitars are more or less the same.

Before the Yamaha, I had worked on three toy guitars (Rs 3 – 3.5K), the ones that I love so much!

So, yeah! guitars do come in batches, I do agree.

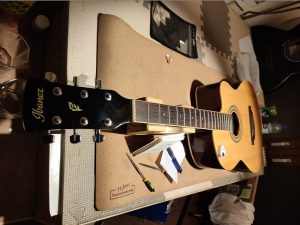
Having bought this previously loved Ibanez MD3NC-NT, the owner was wise to have it shown to someone who knew a little more about acoustic guitars than himself. 

NOTE TO READERS: Guitars – like shirts – are mass produced. If you want a really proper fit, you have to take it to the tailor to get little things done. Even a brand new guitar – electric or acoustic – needs to be looked at and set up to play the best that it can ACCORDING TO YOUR PLAYING STYLE!

As I inspected the guitar, I noticed that there was nothing wrong with it, except, the action was a tad high. I measured it at 2.25 mm.

However, it was the action at the first fret that alarmed me. Quite easily, I managed to slip in a .025″ feeler gauge under the first fretwire.

I played the instrument, and to my ears, it seemed that the 5th and 6th strings were oddly subdued. I thought that maybe changing the strings and putting in a fresh set would do the trick, but the owner clarified that he had changed strings just last month.

That got me thinking. If D’addario .012 – .053″ strings are sounding like this, maybe it’s the nut and the saddle. Of course, they were plastic!

I suggested that I could bring the action down and I would like to change the nut and saddle to bone components, to which the owner agreed.

And then I went about my routine. Loosen strings, pull out the bridgepins and keep them in order;

pull out the saddle and clean the bridge slot in preparation of receiving the new saddle. But wait!!

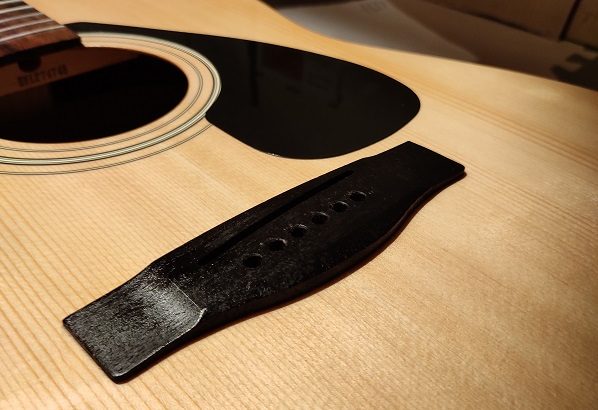
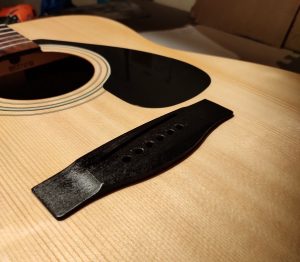
What is that in the saddle slot – right where the 5th and the 6th string would be?  I pulled it out with a pair of tweezers and to my astonishment, it was a piece of card paper, cushioning the saddle on the bass side. No wonder the 5th and 6th strings were sounding dead!

A closer inspection of the saddle revealed that a manufacturing fault had left the saddle shorter on one end (bass side) than on the other end. Naturally, the saddle rocked lengthwise in its slot in the bridge and to stabilise it, the card bit had been shoved in. While the saddle rocked no more, the piece of paper managed to all but deaden the bass strings.

It was a 76 mm saddle and was replaced with a bone one of equal length.

Removing the nut from its slot, I found a strange white, powder-like residue, and even as I write this, I am sorry to inform you that I still don’t know what it could have been and where it came from.

Anyway, I scraped it clean and glued in a new bone nut.

Thankfully, the neck was as straight as an arrow. Not a bad thing at all. Once the strings are put on and tuned to pitch, the tension, invariably, pulls a little relief (a little gap between the strings and the fretwires) into the neck.

Installation of the new saddle entailed a bit of work and a lot more calculation and marking than I am used to.

See what I mean?

With the new bone nut glued in, I stuffed its slots with graphite so that the strings would not have any problems running through them.

Meanwhile, the fretboard and the bridge were given a much-needed ‘oil massage’.

Stringing it up with the strings that were originally on it, the action was exactly where I wanted it.

The owner hesitantly acceded that yes, the action had improved as well as the volume, and particularly the sound of the 5th and 6th strings.

Two days later, he messaged me to inform that indeed the sound had improved tremendously and he was enjoying playing the instrument.

I patted my back!

Here’s me signing off with one last look at the guitar!

The Ibanez returns – for strings and bone elements!

I had worked on this guitar some time back though it was only a bit of tuning up that was required then.

Recently, it returned for a string change and slight action-correction. I noticed that the saddle and nut were plastic (yes, that is the first thing I notice when instruments are brought to me), and also that the strings had already bitten into them. The grooves in the nut were deeper than I would like to see.

Ideally, what you want to see on the nut slots is that the strings ride half in their slot and half outside, for perfect playing and sustain. So, strings should never be seated more than half their circumference in their slots. 

I suggested to the owner that it was just the right time to swap the plastic for new, bone elements – a compensated saddle and a nut – as in any case the action correction would require me to work on the saddle and nut. The owner saw light and agreed.

But before I put the new nut and saddle, I removed the old one and cleaned up the slot where it would sit with a small chisel. Any residual glue or chips of wood are bound to affect both action and sound.

My reasoning in suggesting to the owner that he replace the saddle and nut was that going by the rate at which the slots were deepening in the nut, soon the slots would grow so deep that strings would start buzzing.

In order to avoid a buzz, or worse, the nut splitting due to string tension, and double work for me (first work on the plastic set and then later on the new bone set) I thought of doing it at one go and save myself some work. Of course, if the customer came back a second time, he would have paid me a second time, but goodwill is prime.

And after all that thinking and planning, look what I did? I first worked on the plastic set using old strings, left things just a hair above where I wanted them, and then marked the bone saddle and nut to the plastic pair’s dimensions and then worked on them!

Just what I had hoped to avoid! But then the owner now has a bone saddle and nut in his guitar and a spare plastic set, should he require them in an emergency. However, the plastic pair will work only on THIS guitar and no other instrument.

Once everything had been worked and reworked, it was time to put everything together and hear what the Ibanez had to say.

And while I had the fretboard in full view, I thought a little polishing of the frets and a little oil for the board itself would only make the guitar look prettier.

See the difference?

Meanwhile, the strings that the owner chose were these.

These ‘Authentic Acoustic’ strings from the house of CF Martin, are probably among the best acoustic strings for amateur players. For bigger bucks, there are other options. 

CF Martin is an American guitar company established in 1833. Till date it makes only acoustic guitars and its instruments are the pride and joy of players around the world. It was this company that gave guitar manufacturers around the world the famous  ‘X’ brace pattern as early as between 1840 and 1845 – a pattern that is used till today. The company began making its own strings in 1970.

But just as I was about to string the guitar up, I noticed that the buttons on the tuning machines were very loose. The buttons are what you hold and turn to tune up your guitar.

If you notice, the buttons are held to the rest of the tuning machine with a screw. Tightening or loosening that screw gives you that perfect movement which is not too loose and not too tight.

However, the trick to doing it right is that you just don’t pick up any screwdriver and start twisting. Check very carefully the size of the screwdriver and use one that fits perfectly on the screwhead. Using a bigger or a smaller screwdriver can ruin the head of the screw, which may lead to it remaining permanently stuck inside the button.

When the owner came to pick up the guitar, he wanted the action to be lowered still. Remember, I had left a little bit on the saddle, just in case the owner wanted it lower? So, I removed that extra portion and the owner was very happy with the action.

All’s well that ends well!


A visit by a troubled Yamaha F310

After a long, long time, a proper guitar on the counter top and as you can probably notice, not too used also: the pickguard still carried the skin from the manufacturers! 

The lady player brought it in on the recommendation of an acquaintance, who is my customer and also an avid reader of this blog.

The trouble, as she said, was that she noticed that the action had got increasingly high over the period (around 1 year) she had owned it. She also complained of a certain ‘dulling’ of the sound.

As I measured the action (left photograph) at the 12th fret, it was 3.25 mm. Ideally, I like to see 2.25 mm or better still 2 mm at the 12th fret. So yeah, the saddle would need to be pulled out and given some amount of shaving.

Meanwhile, in the photograph on the right, I am trying to measure the action at the 1st fret. I know you can’t see it but I am holding a .025″ feeler gauge when ideally, I like to read between .016″ – .018″. Again, the nut height would need to be reduced.

As far as the ‘dulling’ of the sound was concerned, though I did not feel the same when I played the guitar, but I took the young lady’s word for it. If you look closely at the photograph on the right,  you see even the thickest string buried in the nut, while the 1st string is deeper inside.

What you should see on your guitar nut is that all strings – thick or thin – sit just half their circumference in their respective slots. Since these weren’t, that could be the possible reason for a certain deadening of the tone.

So, I advised the customer to have both the saddle and the nut replaced with bone elements and with new strings, everything should be sorted out. She agreed.

I took off the strings, pulled out the bridgepins and kept them, each in its respective slot in my block, so that when they went back into the guitar, each pin went back into the hole it came out of.

As I took out the saddle, I realised that there wasn’t much meat in it. I measured and marked, and this is how much I had to take off it. Likewise, I measured and marked the nut too.

This, of course, is the saddle that was installed in the guitar. I shaved it, put it back in, put back the old strings, just to see if everything measured up. 

Since everything added up, I took off the strings again, took out the saddle and the nut, took a swanky new set of bone elements, marked them with the old, plastic elements and shaved off to the  required height.

After I put those in and left the glue to dry on the nut (you never glue in the saddle!), I decided to give the fretwires a shine and oil the fretboard too with boiled linseed oil (Alsi ka Tel I think, it’s called). Here, you can even catch a glimpse of the new bone nut installed to the correct height.

Along with the fretboard, I also decided to pay attention to the bridge and gave it a little drink of oil. Doesn’t it look pretty?

After the glue had dried, and the excess oil had been taken off, it was time to restring this beauty. To give the owner a bigger bang for her buck, I had suggested that she try .013″ to .056″ gauge strings. The strings chosen by the owner were these:

Of course, I did point out that while the volume will increase appreciably and there will be better sustain, initially, these strings will be painful and will need a little getting-used-to. 

But before actually stringing the guitar, there was one little step to be done: shaving the bridgepin ends at an angle so that the ball-end of the strings did not catch on the pin ends but slip off them to rest against the bridgeplate, where they ideally should.

This is what the bridgepins and ball-ends of the strings looked like at the end of the exercise:


And as each string went in, it got a little 90° bend in it, again so that the ball ends did not rest on the pin ends but against the bridgeplate. 

After stringing it up and tuning it to pitch, the strings needed to be stretched to bring them out of their ‘Inertia of Rest’ and get them used to the tension that they would be living under. 

The reason why you often find new strings losing tune fast is because new strings are not stretched, or not enough. Do this one little step and your guitar should never fall out of tune again.

The customer had also requested that I install a strap button on the heel of the guitar. This is how it looks now.

And the guitar itself? Here it is:


Attention parents: Here’s why you should never buy a Rs 3 – 3.5K acoustic guitar

The period of lockdown has been cataclysmic for most of us, with people wondering what to do with their time.

During this period, I have received umpteen calls from children and parents asking if I also sell guitars. My answer in the negative must have been a disappointment for them but I did also guide them about what they should look for while buying a guitar, and why a Rs 3,000 – 3,500 guitar is a recipe for disaster.

I have told them, and all who ask me, that in India, the starting range for a passably good guitar is Rs 5,000. Anything below that price is a wastage of money. With, say, a Rs 7,000 guitar, you spend once and have the instrument last a lifetime and beyond.

Here is my reply to them in greater depth, explaining my reasons for shaking my head at cheap instruments.


CONSTRUCTION

It’s actually a no-brainer. Why does a simple sponge cake at your corner bakery cost ‘x’ and at a reputed bakery 10x? A simple answer would be that it is primarily due to the quality of ingredients used in making the cake.

While that is true, another aspect is that at the up-market bakery, they try to protect their reputation. ‘Reputation’, you ask?

Yes! The upmarket bakery realises that its clientele is used to a certain quality and any compromise on that quality would mean losing that clientele. And so, the upmarket shop invests in maintaining that quality by investing in good ingredients, and particularly in workers, who can maintain that level of quality, for only when the workforce understands the concept of quality, will they produce a quality product.

Now, read the above few paragraphs, replacing the word ‘acoustic guitar’ with ‘cake’ and you will realise why the Martins, the Gibsons, the Taylors, the Matons, the Breedloves, et al, carry the price tags that they do.

Now, let’s look at the construction of the 3-3.5K guitar. I would like to break ‘construction’ into several sub-heads:

a) Materials used
b) Bridgeplate
c) Braces
d) Drilling of bridgepin holes
e) Bridge screws
f) Fret ends

a) Materials used

The primary reason why a Rs3 – 3.5K guitar is able to cost that much is because of the materials used in building it. Let’s start with the wood – or the lack of it. In this guitar, not wood but plyboard is used. To remind you, plyboard (plywood is a grade above plyboard) is layers of wood loosely pressed together – not good at all for sound transmission.

b) Bridgeplate

This is a piece of wood that is supposed to support the bridge by sandwiching the guitar top between itself and the bridge. Ideally, you want a hard wood piece (mahogany, rosewood, walnut, maple) serving as a bridgeplate, and for it to run at least for 3/4 the length of the bridge.

The purpose of the bridgeplate is to take the strain from the ball-ends of the strings and not to let the tension from them be transferred to the guitar top. If it fails in this purpose, it can let the strings pull up the top exactly in front of the bridge.

Like this:

Not a very good shot but there are Rs 2 coins at each end of the ruler. The centre of the ruler is touching the top but its ends are raised the width of a Rs 2 coin at either end.

This is called belly bulge in a guitar and is very common in almost all acoustic guitars, irrespective of how expensive they are. However, while in an expensive guitar it might take years for a belly to emerge, in a cheap guitar with a faulty/lightweight/incorrectly placed bridgeplate, it can be a matter of a couple of months.

In the worst case, it may rip right through the top, pulling out the bridge and all!

Notice how useless this bridgeplate (the little square piece in the centre) from a cheap guitar is. Just two bridgepin holes pass through it, while three are passing through the guitar top itself and one has actually pierced a brace/strut.

And while this guitar was fortunate to have one, I have often come across cheap guitars without bridgeplates!

c) Braces

The pieces of wood that you see standing upright in the picture above are called braces or struts. As the name suggests, the function of the braces is to ‘brace’ the guitar top against the tension of the strings (there’s a force of 80kg exerted by the strings when they are in tune).

Braces also help the guitar top to vibrate, so their length, height and placement is of prime importance.

Here’s a better look at them:

In a high-end guitar, they end up looking like this:

Notice the difference in symmetry, the finish. While you are at it notice how you can see the characteristic lines in the underside of the second guitar – a high end one. It shows that it is a solid spruce top and not a laminated one. Notice also the size of the bridgeplate.

d) Drilling of bridgepin holes

In cheap guitars, often the bridgepin holes are all over the place. Either they are not in a line, or, they are not drilled exactly at 90° to the guitar top. If they are not drilled at an absolute right angle to the guitar top, there is always the fear that the leaning forward bridgepin or the laying back bridgepin will fall victim to string tension, pulling the bridge one way or another.

In the cross-section of the guitar top (above), the dotted lines represent the path the drill should have taken. Often in cheap guitars, you will find bridgepins either leaning forward or laying back. What this does, is to not have complete contact with the string all through, impeding sound transfer. Also, it does not sit too well on the eyes.

e) Bridge screws

So, with all those faults, what is the best way to hold everything together? Screws.

Every time you see white dots on your bridge, know that they are not just for show, but are hiding something sinister under them: screws. The white dots are just efforts to hide the screws from plain sight. All you need to do is take a mirror in through the soundhole and look up at the bridgeplate and you will see the nuts and bolts there.

Nothing wrong with screws – Gibson started using them way back in the day – except that the screws chew into the plyboard, causing more damage than providing structural support.

f) Fret ends

The haphazard way cheap guitars are put together, leaves a lot to be desired. Sharp fret ends is another factor to watch out for.

Such fret ends can be a real pain when you play.


HARDWARE

The tuning machines on a cheap guitar are the worst things about them. It is a miracle that they actually turn and do not allow the string to slip through them!

On your left is your favourite toy and on the right is a branded guitar. On each is the set of tuning machines that came with it from the factory. It is tough trying to tune the guitar using the tuning machines on the left, while its a breeze doing it with the ones on the right.

Tuning machines have gears inside them and the more teeth they have, the slower they move, allowing you to ‘fine tune’ your guitar. Gears with more teeth cost money and so never exist in cheap guitars.

Oh, the list is a lot longer, but for now, I suppose this will suffice to help prove to you, dear parents, never buy your child this set of problems. Yes, I understand that you don’t know whether your child will continue with this ‘hobby’ for long, but when you buy a branded guitar, it will have a resale value.