That is what fretwire sprout looks like and you can imagine what it feels like. (pix courtesy tdpri.com)
Last week, while dwelling upon humidity issues at length, I knew I had missed something. It came to me yesterday evening: fretwire sprout!
No! The fretwire does not sprout, as would seeds soaked overnight, but the shrinkage caused due to the loss of moisture in fretboard wood, forces the fretwires to poke out, making it seem as if the fretwire had sprouted. I can assure you fretwire sprout can be a very painful discovery, if not serious one, causing a cut and bleeding, and some serious enough to require medical attention!
If it is some solace, it can happen in any guitar – acoustic and electric!
The other day, I pulled out a guitar of mine from storage and while playing it discovered – rather painfully – that the fretwires on it had indeed sprouted. Thankfully, there was no cut or blood. That was when I got reminded of what I had missed mentioning in my last blog post.
So, like I mentioned above, fretwire sprouts primarily due to lack of humidity. However, humidity is not the only culprit. Sometimes, fretwires pop loose and move in their slot too. How do you figure out what caused it?
Simple! If along the length of the fretboard – on one or both sides – you find fretwires sprouted, rest assured that humidity is the culprit. In case of fretwires popping loose and moving, it is rare that you will find more than a couple.
If it is a humidity issue, you will have to take it to a specialist guitar tech/luthier, who will first humidify the guitar for at least 72 hours, and if afterwards the sprout still exists, he will even employ a specialised file to file away the ends.
A specialised file used by guitar techs and luthiers to file away sprouted fretwires. (pix courtesy fender.com)
Please don’t try this at home but even a simple bastard file will do the job – IF it happens to be an expert who is wielding it.
A simple wood file (pix courtesy lowes.com)
So, basically, this specialised file is rubbed along the length of the fretboard up and down, till the sprouts are ground level with the side of fretboard. Then follows a long and tedious process of cleaning up burrs, polishing and shining the fretwire, and, lo and behold, you are ready to rock and roll!
If it is just one or two frets popped up and dancing around in their slots, they are simply tapped into place and sometimes, even secured with a bit of super glue.
The summer in North India (at least the first few months) is a time for dry weather with the humidity wavering around the 40% mark. This is a bad time for your acoustic instruments. Why?
The wood of your instrument loses its moisture to the atmosphere when it is hot and dry. Add to it the tension of the six strings (and imagine the tension on the neck of a 12-string instrument). That twin effect can bend, bow and crack wood easily. Remember that’s 90% of your instrument that I am talking about. In extreme cases of neglect, the instrument may be damaged irreparably.
What lack of humidity does
The top and back of your guitar are actually two pieces each (in all four pieces) which are glued together. Look closely and you will be able to see the seam where the two pieces of your top or the back are glued.
pix courtesy: crawlsbackwards.blogspot.com
‘Dehydration’ shows up here first as the seams slowly start opening up as the wood shrinks, losing moisture. One day, running your fingers across the top or the back you may find your fingernail catch on something. A week or two later, you may actually ‘see’ the crack, and a month later, a toothpick may drop through it!
The fretboard – generally made of rosewood or ebony – is open-grain wood (without any finish on it) and thus, loses and absorbs moisture very quickly. A continued spell of dryness will certainly lead to cracks in the fretboard, which may lead to frets popping up, sinking, or simply hinder playability.
pix courtesy: thetopguitars.com
As the fretboard shrinks, the fretwires stick out (called fret sprout in technical jingo), making playing the instrument a difficult, if not a completely dangerous proposition.
pix courtesy: blog.zzounds.com
The shrinking wood even breaks away at places like right next to the fretboard extension on the top of the guitar, or, along where the pickguard is stuck. Old Martin guitars were notorious for acting up like this.
pix courtesy: fretnotguitarrepair.com
What can be done?
Acoustic instruments wish to remain in that optimum range of 45 to 60% humidity. The first thing, come March, is to keep a close watch on the hygrometer (in your smartphone). Otherwise, it is a relatively simple and not too expensive instrument. If you have an expensive instrument (money-wise or sentiment-wise) I will advise that you buy a proper hygrometer – both analogue and digital are available – and keep it your guitar case at all times.
However, keeping a hygrometer in the case does not measure the humidity ‘inside’ the guitar. It only measures the ambient humidity of the case. To keep proper tabs on the humidity in your instrument, you will need a small hygrometer that you can place through the soundhole of the guitar. Put it inside. Cover the soundhole and leave it like that for the next 48 hours. The reading that you get, then, is the real humidity of your instrument.
The first photograph of this post is of a hygrometer measuring 1.88″x1.12″x0.59”.
Even if you don’t wish to go through the above exercise, knowing that the outside humidity is at or below 40% should be enough to give your ‘thirsty’ instrument a drink of water. But don’t soak it in the bathtub yet!
Simply…
There are many, many implements available in the market to humidify your acoustic guitar, but then nothing as cheap and as effective as what I do. Take a small plastic container (that can go through your soundhole) and a piece of your old cotton t-shirt. Soak the t-shirt in water, put it in the container, and put the container through the soundhole into your guitar.
pix courtesy: bryankimsey.com
Cover the soundhole with something so that the moisture does not escape from the instrument but is absorbed into it. Leave it like that for at least 72 hours and then check the dampness of the cloth that you left inside. If the cloth dries out, wet it again and repeat the process till you find that the cloth continues to remain as wet as you put it in.
And, of course, you have the hygrometer inside to actually check the humidity reading.
To take care of the neck and fretboard, leave another dish of water-soaked rag in the case of your guitar. But be very careful that it does not topple and wet the case or the instrument.
How ‘the drink’ affects
Try and imagine a raisin. Try leaving it in a bowl of water for two nights. By the third day, it is swollen, with the water it has absorbed.
The wood on your guitar is pretty much like that. After it has had that ‘drink of water’, it will swell. What that will do is that if, earlier, your fingernail would catch on the seam of the top or the back, now it would smoothly glide over it. Cracks closed!
However, it would be wrong to think that just putting in a cup of water inside your guitar would cure it of its cracks. There might be some which may get better but not close completely. In that case, you will have to find a guitar tech and get it proper attention.
This particular post is for people who have been playing for more than a couple of years (and have never really cleaned their fretboard). A couple of years is enough time for a build up of body oils, grime, dirt and skin to get deposited on the fretboard.
Like the rest of your guitar, you need to clean the fretboard too. However, here is the cautionary note: the procedure that I am about to describe, is only meant for rosewood and ebony fretboards. NEVER try this on a maple fretboard!
Another cautionary note: if your acoustic guitar has a pick-up/equaliser installed (electro-acoustic guitar), then you need to mummify your guitar, like this:
Painter’s tape (called locally as Abro tape and available at paint shops) must be used to cover the side of the fretboard as also the soundhole. pix courtesy sixstringcoustic.com
What taping it up like this does, is prevents dust and dirt and other particles from getting into the soundhole and sticking to your pick-up/equaliser.
Once that is done you can get started working on the fretboard. You will need ‘0000’ steel wool. This is cheap and an excellent fretboard-cleaning tool, though it makes a royal mess.
pix courtesy: guitaranswerguy.com
Take the amount of steel wool shown in the photograph above and then go over each fret and each fret wire until you have managed to take off everything you saw earlier on your fretboard, using an up-and-down motion as shown below.
pix courtesy: guitaranswerguy.com
Despite the accumulated muck, you will notice that the fretwires on the fretboard bear a shine almost as if they were new. Indeed, ‘0000’ steel wool is a burnisher and works wonders on wood and metal.
If, however, you feel that there are still some stubborn bits of gunk left on the fretboard, you will need an old credit card. Sand at least two edges of the card to a knife-like edge.
pix courtesy: pinterest
Stick the sharpened edges right against the fretwire, as shown above and pull outwards. Whatever is settled in that little space between the fretwire and the fretboard is taken out, leaving your entire fretboard well and truly cleaned.
After you are fully satisfied with the results, it is time to nourish the fretboard with some oil or a fretboard conditioner. There are umpteen number of products available in the market, though the best is still BOILED linseed oil. If you can get some, a 300 ml bottle should last you a lifetime.
Take a little on a paper towel, a soft, cotton cloth and massage each fret. Leave it on for 5 or so minutes and then with a clean piece of paper towel, a soft, cotton cloth, wipe off the excess.
pix courtesy: guitaranswerguy.com
Look at the first four frets of the fretboard in the picture above. Look at the rest of the fretboard. That is the difference a conditioner/oil makes to it. Not only does it look great, it plays good too. HOWEVER, the oiling of the fretboard should not be repeated more than once a year IF it is oil that you are using to condition. Though oil is good but it does have a tendency to cake up.
The acoustic guitar is a rather simple instrument (though a lot of physics went into building it), and requires a very simple regimen to keep it singing for long. If you (are able to) do the following, suffice it to say that there won’t be any SOSs sent out, no frantic runs to the ER. But the operative word here is ‘IF’!!!
So simple are the pointers that oftentimes we tend to skip these simple steps and get straight into playing the instrument. Curb those instincts and follow the maintenance routine religiously.
What you will need:
Old denim
Old PURE cotton t-shirt(s)
A small jar of petroleum jelly
Some hot water
A soft make-up brush
Paper towels/tissues
The procedure:
If you have never properly cleaned your guitar, the first time is going to be a little time-consuming and will require a little more effort. The following are the steps to be taken in that situation. In any case, this should be your Sunday routine.
Take the fan brush (make-up brush) and dust areas that you can’t reach with your hands and fingers – under the strings before the bridge and at the headstock. This particular brush design is best suited for dusting.
Take a piece of the old, soft, cotton t-shirt moisten it with hot water. Wring dry. With the rag barely moist, wipe down the entire body of the guitar, paying special attention to areas that come in contact with the body. Once you think you are done, take a look at all surfaces of the instrument against light. Areas that you missed, or those that need more attention will show up. Go at them again until you are satisfied.
pix courtesy: acousticguitar.com
The tissues/paper towels are for particularly obstinate areas. Wet the towel and leave it on the spot for 30 seconds. Go at it with your dry t-shirt again.
Take another – larger – piece of an old, soft, cotton t-shirt, wipe the guitar dry completely to a light shine.
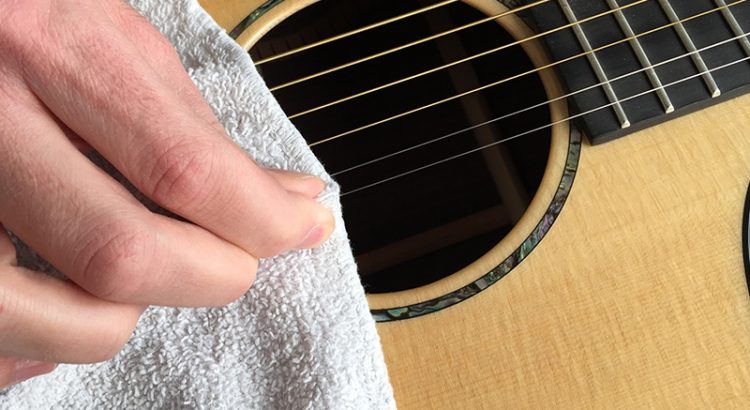
Loosen all strings. Take a bit of petroleum jelly and dab it onto a piece of old soft denim – just a pinch. Pinch each string so that the jelly comes in contact with the string. Run the pinch down the entire length of the string, paying greater attention to the thicker, wound strings. For each string take a different portion of the cloth so that you can clean the strings better.
pix courtesy: guitaranswerguy.com
Finally, take a clean, dry corner of the denim and wipe off whatever jelly you may have left off on any of the strings. Looking at the pieces of denim, you will realise how dirty those strings were, and when you play them, they may even surprise you with their brightness.
The daily routine BEFORE you start playing:
Take an old, soft, cotton t-shirt and wipe the guitar properly: especially those areas that come in contact with the skin the most.
Loosen strings and take a piece of denim and wipe each string clean. While you are at it, also clean the fretboard, giving it a rub at each fret under the strings.
Wipe each tuning machine properly, lifting off dust, grime and fingerprints.
Still holding the tuning machines with a soft cloth, tune guitar to pitch and have fun.