When you buy a new two-wheeler or four-wheeler, ideally, the showroom fine-tunes the vehicle before handing it over to you. What that little fine-tuning does is, it removes any small flaws that might have existed, making the vehicle perform to its optimum. Exactly in the same way, a new guitar – acoustic or electric – MUST BE SET UP TO THE PLAYER’S STYLE, for it to play the best that it can.
The set-up on a new guitar is ideally done in one of two ways: for the beginner and for the experienced player.

For the beginner
If you have started learning how to play a guitar, or intend to learn how to play it, and you purchase a new instrument, you MUST take it to an experienced guitar technician and have it set up. As explained earlier, this exercise will not only eliminate flaws in your instrument, but will also make it play the best that it can.
By spending a little extra money, the technician will improve the instrument’s playability, thus ensuring that you don’t fall out of love with playing your guitar. However, this is a job of approximation, a temporary set-up. He will call you back a year or 18 months later, ask you to play a little for him and watching your playing style, he will give the instrument a proper set-up.
For the intermediate player
Once you have played for a few years and have established a playing style, the luthier (guitar technician) will set up the guitar specifically to your style. Thus, the set-up for a finger-style player or a lead guitarist will get a much lower action, as compared to a rhythm guitarist or a country/folk style guitarist. The strings too, which he will suggest, will be suited to your playing style: thinner ones for the lead and finger-style artiste and thicker ones for the rhythm/country player.
The set-up proper
Everything related to or touching the strings has to be adjusted and/or modified when a proper set-up is given. Thus, the relief in the neck (how straight or curved the neck is), the action of the guitar at the 1st and 12th fret (distance of the lowest point of a string to the highest point of a fretwire), radius of the saddle and the nut (matching the curvature of the fretboard), the condition of the fretwires, tuning machines, the intonation of the instrument (whether an open string and the same string fretted at the 12th fret sound exactly the same), all need to be worked upon.
Getting the relief right
Relief in the neck of any stringed instrument allows the strings the space they need to vibrate. Once you take off the strings from the guitar, the neck of the instrument should be absolutely straight. If it still has relief – a concave bend in it – it must be taken out by adjusting the truss rod with a hex key (Allen wrench). Similarly, if the neck has a back bow in it – a convex bend – that too must be removed by adjusting the truss rod.
How much is the relief can be checked by either placing a long enough straight-edge on the fretboard or holding down a string at the 1st and the 12th fret and then trying to tap around the 7th or 8th fret. At these points you should have just enough space to hear the ‘clink’ of the string as it hits the fretwire when you tap.


The truss rod is seated in the neck of the guitar and runs just underneath the fretboard. It can be accessed either through the soundhole of the guitar, or from the headstock end in some guitars. And yes, the neck and the fretboard are two different things stuck together! Never confuse one for the other.


After the truss rod is adjusted, the neck should be straight. Once the guitar gets strings and they are tuned up, the pull of the strings will give the neck a natural concave bend, which, nine out of 10 times, is enough for the strings to vibrate freely without affecting action.
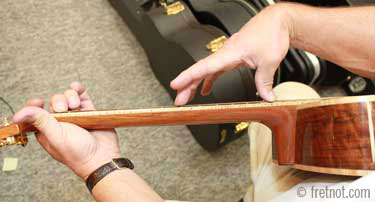
Matching the radius of the fretboard, saddle and nut
On steel-string guitars (as opposed to nylon-string guitars) the fretboard has a slight curvature. This curvature is measured and must be the same on the top of the saddle and the top of the nut. If it is not then the saddle or the nut, or both, have to be given this curvature by sanding/filing them along their tops. Once the nut, fretboard and saddle have the same curvature, playing of the instrument is indeed a pleasure.

Getting the action right
If the action on your guitar is high, then to bring it down, the saddle is pulled out from its slot and some material is removed from the bottom of the saddle by sanding it. You get a reading of the action by placing a well-calibrated ruler on the 12th fretwire. Know that if you wish to lower the action at the 12th fretwire by 1 mm, you have to take away 2mm from the saddle (The 12th fretwire is generally the halfway point of the string).


Once the saddle height is settled, we move to the nut end of the instrument. Again, the string height is measured at the 1st fretwire. This is measured by pressing a particular string on the 3rd fretwire.


The gap which is left at the 1st fretwire, should be just enough to let a business card pass through. Specialised two-sided files are used to deepen the nut sots so that the desired height of the string is attained at the 1st fret. This process is repeated for all the other five strings.
However, If the slots need to be filed down too much, and for all six strings, it is better to take matter off the bottom of the nut, just as in the case of the saddle.
Once done, strings should ideally sit half in the slot and half outside.

Getting the fretwires right
Many times, fretwires have not been seated properly in their slots. This can cause string buzz – a squeak produced by a string which is fretted anywhere before the raised fretwire. These can easily be re-seated by a firm knock with a jeweller’s hammer.

Many times, a fretwire can be seated very properly but it is still higher than the rest. An implement called a thick five-sided, flattened piece of aluminium, called the Fret Rocker, is used to check whether all the frets are in level or not. The five edges of the Fret Rocker are all of different lengths, each length enough to sit on just three fretwires at a time.
If there are more than two or three fretwires standing out, all the fretwires on the fretboard are levelled, crowned and polished.


The fretwires have rounded tops. Once they are filed, they get flattened and rough. To put the ‘roundness’ back in them, a specialised crowning file is used which works on each fretwire individually. To remove the roughness from all that filing, fretwires are rubbed with different grits of sandpaper (500 to 2000), and finally polished with a good chrome polish.

Also, if the guitar has been sitting in the showroom for long, fretwires can get tarnished or dull, which can again majorly affect the sound the instrument produces. Again, the fretwires go through the polishing process to make them gleam like new.
Getting the hardware snug
The tuning machines and the jack-input points are basically held by screws. These can get loosened over time, or in the case of a new guitar, may not have been tightened well enough in the first place. These need to be checked and tightened. However, caution must be exercised. The hardware on your guitar should be just tight enough to be snug. One doesn’t need to use the same kind of effort used to tighten the nuts on the wheels of your car.
Checking the intonation
Once all the above steps have been carried out, it is time to condition the fretboard and put on the strings. One last thing – and probably the most important thing – to be done is to check the intonation. Play a string open and then play it placing a finger at the 12th fret. The two sounds should be the same except for their pitch. If not, the string is taken off and the top of the saddle is sanded in such a way that either the contact point of the string where it rides the saddle, either moves forward or goes back. This process is repeated till the unfretted and fretted string sounds the same. And then the process is repeated for all the other five strings.

That is the basic set-up process, a very labour and time-intensive process but well worth it. Without it, you would be either playing a wrong-sounding guitar or wasting way too much energy playing it.
This was the process for a new guitar. Older guitars need set-ups too – if they move from or to different climate conditions, or when the weather changes, or when fretwires develop furrows from where strings rub against them constantly. A change in the thickness of strings also requires a set-up anew.