If BB King can call his favourite guitar ‘Lucielle’ and Willie Nelson can call his ‘Trigger’, why should not a young man in Lucknow, India, call his acoustic guitar ‘Sundari’ (Beauty)?
Whatever that might convey to you, to me it shows a stronger attachment to the instrument.


And why shouldn’t the attachment be stronger? This was a Squier Fender sporting a handsome sunburst. But more importantly, Sundari had a lot of character: booming lows, clear ringing highs and overall some excellent sustain.

Now, I must tell you that the Squier Fender is not a very high-value instrument, yet, as a starter guitar and a sturdy one at that it does get the job done.
Sundari seemed to have been well-loved

See what I mean? But seriously, the missing colour on the fretboard is more a comment on construction quality than long hours spent with Sundari!
So, what was it in for? Over time, the action on Sundari had rendered her almost unlovable and the young man wished that she regain her old charm.
The bridge was thankfully stuck down well and the relief in the neck was slightly lesser than what I would have liked to see. That made the belly behind the bridge the culprit.
Now, I know from experience that the best of instruments with the best of bridgeplates in them will begin to show a belly after a decade or so. In cheap guitars and starter level instruments it will start showing much earlier because of the quality of bridgeplate used.


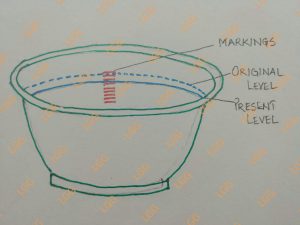
As I checked it, there was a belly behind the bridge but it wasn’t alarming. However, there was huge sinkage in the top in the area between the soundhole and the bridge. This sinkage is a natural and normal counteraction to the belly, and generally, the belly and sinkage are proportional in size to each other.
However, in Sundari, the sinkage appeared much more than the belly she was sporting. This was eyebrow raising!
I took a look inside the guitar and found the culprit staring right back at me. The arm of the ‘X’ brace going down towards the lower bout on the bass side and the sound bar adjacent were loose and I could easily slip in a feeler gauge.

Also, the arm of the ‘X’ brace going down into the lower bout on the treble side was cracked right at the ‘X’.

With cracked and loose braces, it was no wonder that the area between the soundhole and the bridge was sinking.
Also, the saddle slot seemed to be cut bigger than it was required, resulting in the saddle tilting under string tension. That needed correction too.

The cumulative effect of these phenomena was that the action on Sundari was sky high.
There were other smaller issues too. The EQ in the guitar would respond at times and completely miss at times – a loose wire, I thought. More immediately, I noticed that the EQ unit was being held to the body with a solitary 1.5″ screw pinning down one corner of it. For the rest of the EQ body there was transparent packing tape!

When I took off the strings and pulled out the plastic saddle, it was chipped and cracked and ready to give way, especially in the area where the ‘A’ string would generally ride.

You have seen the fretboard on Sundari. Following is what the fretwires looked like almost till the 8th fret.

As I made a list of Sundari’s problems, I decided to start work by glueing up the cracked and separated braces. Once done, this would reduce the sinkage to a great extent. But getting glue into places which you are seeing in the reflection of a mirror is tough. With what do you apply it and how do you work backwards?
Thankfully, I do not have very large hands. Pouring glue into a smaller bottle, and entirely through feel, I smeared glue in the approximate area, hoping that it would reach where I needed it to. Then I took another look through the mirror to check if that was, in fact, the case.
Then armed with a thin paint brush I tried pushing the glue into places I knew the glue would not have wicked into. Later, came the very tedious clean up of the extra glue.
After almost 90 minutes of this exercise, I finally clamped everything in place. Below is one side of the ‘X’ brace glued in place.


While the glue cured, I worked on the fretwires, levelling, crowning and polishing them. However, there was little I could do about the way the fretboard looked. I could have dyed it dark again but the colour would not have stayed. Also, I was not sure that is what the young man would have liked; maybe, he liked the way Sundari’s fretboard looked!!
Then came the EQ. I gently pulled off the tape and removed the single screw holding the unit into the body. I pulled it out, opened it up to find a wire almost ready to lose its connection. I resoldered it in place, closed up the unit and then replaced the single big screw with four proper EQ unit screws.

Once everything was in place, I cleaned up the guitar side of all remnants of the packing tape.
The tilt in the saddle was taken out and new strings put in. As I tuned up Sundari in a bid to set relief in it, my problems began.
If I ‘increased’ relief in the neck, almost all strings buzzed in the centre of the fretboard. If I ‘decreased’ relief, the strings buzzed on the first few and last few frets.
Read that sentence again! What I have written is exactly how Sundari behaved.
Somewhere down the line I felt that I had a raised fretwire. Let’s just say that was where I erred. After that I hopped from one fretwire to its neighbour and back to the first and then on to the 9th.
For four-five days I would work on the fretboard, get exasperated and leave, return, work, get exasperated and leave again. What kept me returning to Sundari was the love the young man felt for her.
Eventually, I realised that neck angle, the erratic truss rod, the slight belly, the much-reduced sinkage would not allow the action to come down to where it should ideally be. It did come down but not too much and that is exactly how the young man would have to continue to love Sundari.
But yes, Sundari possessed a heavenly voice. She’ll sing yet!
When the young man came to pick up Sundari, he brought his amplifier along to check the EQ. But he did not have a battery so I lent him a new one. When all was said and done, he walked out thanking me, carrying Sundari, battery and all!
Young man, you owe me!!